Table of Contents
Manage RAID
Modify RAID Mode
- Make sure that the 4big is turned off but that its power supply is connected and that it's connected to a computer via an interface cable.
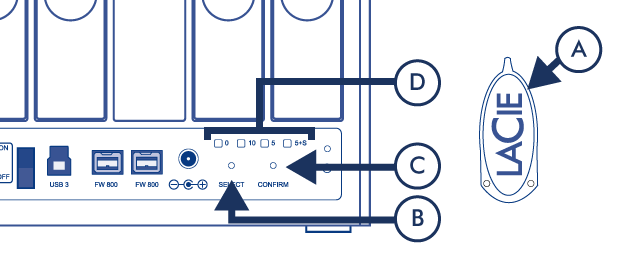
- Use the sharp end of the RAID selection tool (A) to press and hold down the select button (B).
- Without releasing the select button, turn on the product.
- Once the RAID mode LEDs (D) start blinking (takes five seconds), release the select button.
- The LED for the current RAID mode (D) will blink. Using the RAID selection tool, press the select button (B) to toggle between the four different modes.
- Once the LED for the RAID mode you want is blinking, press the confirm button (C). RAID initialization will begin and will take less than one minute.
- Next you must format the volume before it will mount on your computer. For instructions, refer to Formatting Instructions.
About RAID Modes
Refer to the table below for an overview of the different RAID modes, and see the descriptions for details.
| RAID Mode | Capacity | Protection | Speed | Factory Default |
|---|---|---|---|---|
| RAID 0 | 100% | None | Excellent | – |
| RAID 5 | 75% | Good | Good | Yes |
| RAID 5+spare | 50% | Excellent | Good | – |
| RAID 10 | 50% | Excellent | Good | – |
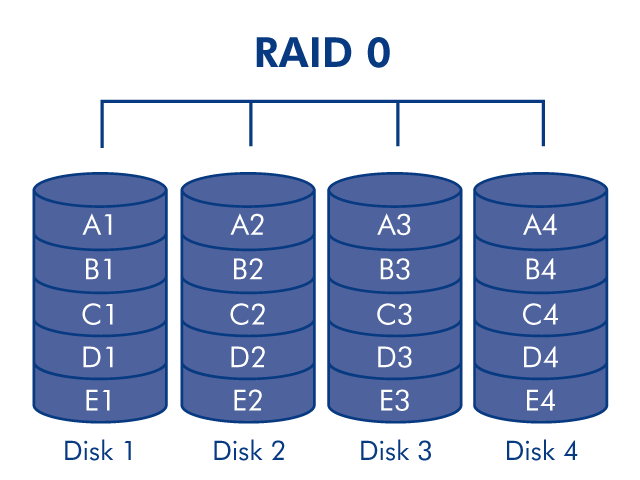
RAID 0: RAID 0, is the fastest RAID mode. In a RAID 0 array, the available capacities of each drive are added together so that one logical volume mounts on the computer. It offers the best performance but no protection in the case that a drive fails.
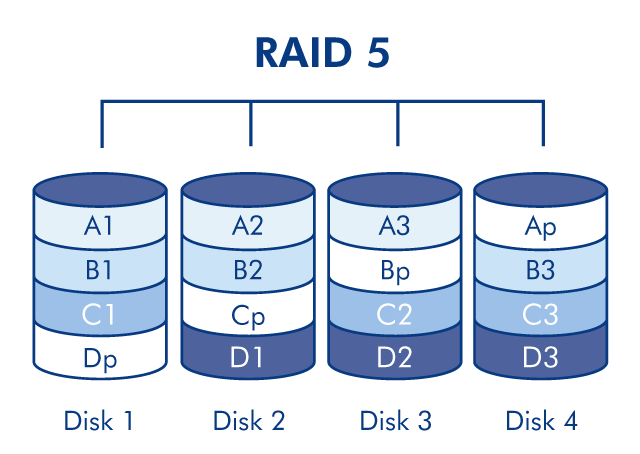
RAID 5: In RAID 5, data is striped across all disks (minimum of three) and a parity block for each data block (P in the illustration below) is written on the same stripe. If one physical disk fails, the data from the failed disk can be rebuilt onto a replacement disk. No data is lost in the case of a single disk failure, but if a second disk fails before data can be rebuilt to a replacement drive, all data in the array will be lost.
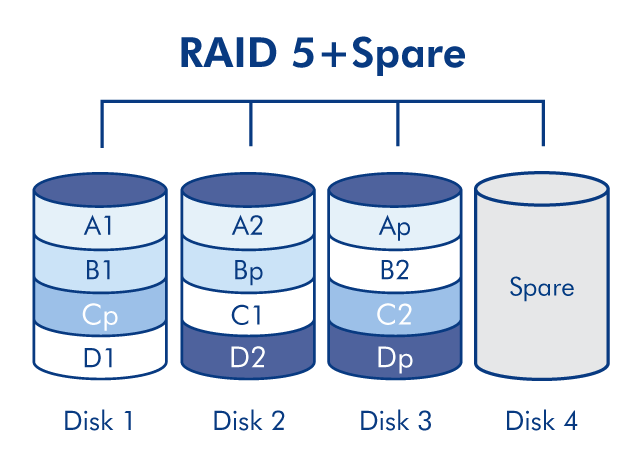
RAID 5+Spare: RAID 5+Spare is a RAID 5 array in which one disk is used as spare to rebuild the system as soon as a disk fails. At least four disks are required. If one physical disk fails, the data remains available because it is read from the parity blocks. Data from a failed disk is rebuilt onto the hot spare disk. When a failed disk is replaced, the replacement becomes the new hot spare. No data is lost in the case of a single disk failure, but if a second disk fails before the system can rebuild data to the hot spare, all data in the array will be lost.
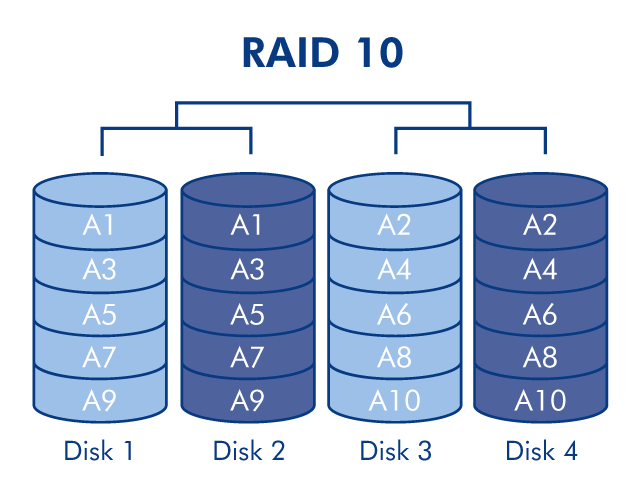
RAID10: RAID 10 (also called RAID 1+0) is another RAID level that combines the attributes of other levels, specifically RAID 1 and RAID 0. It is a “stripe of mirrored sets”, meaning that data is striped across two mirrored arrays. The striping occurs between arrays and the mirroring occurs within the same array, which makes the rebuilding very fast.
Replace Drive
Remove Drive
If your array is protected, ie in a RAID 10, 5, or 5+spare mode, you can remove a drive without damaging the array and losing data even when the product is turned on, a process also referred to as “hot-swapping”. However, if you remove a drive from an unprotected (ie RAID 0) array, you may lose data.
- The drive tray may be locked. To unlock it, use the included RAID selection tool to turn the lock until the slot is vertical.
- Draw out the drive tray by inserting your finger into the space behind the drive tray handle and pulling to disengage the drive.
- Grasp the drive tray handle and carefully extract the drive.
Replace Drive
Note that for optimum storage use, the new drive should have equal or greater capacity than the drive it is replacing.
- Carefully insert the drive tray into an empty drive bay. When the drive tray is most of the way in and you feel resistance, press the drive tray handle firmly until you feel the drive snap into place and the drive tray handle is flush with the back of the product.
- Use the RAID selection/drive removal tool to lock the drive.
- Connect the power supply and turn on the product. Note that you can remove a failed drive and insert a new one while the product is turned on.
- Product behavior will depend on the RAID mode:
- If you are replacing a drive in a protected RAID array: Drive synchronization will begin automatically. The LED of the new drive(s) will blink red and blue until synchronization has completed.
- If you are replacing a drive in a RAID 0 array: All data stored on the device has been deleted, and you need to reformat the volume (see Formatting Instructions). After a brief initialization, the LED indicating a clean RAID 0 will be illuminated.
