Table of Contents
RAID
About RAID Modes
This section will help you decide which RAID mode is right for your application.
| RAID Number | RAID Mode | Capacity | Protection | Speed |
|---|---|---|---|---|
| 0 | RAID 0 | 100% |  |  |
| 1 | RAID 10 | 50% |  |  |
| 2 | Concatenation | 100% | |  |
| 3 | RAID 3 | 75% |  | |
| 4 | RAID 3+Spare | 50% | | |
| 5 | RAID 5 | 75% | | |
| 6 | RAID 5+Spare | 50% | | |
| 7 | N/A (no RAID changes will take effect if 7 is selected) | |||
RAID 0

The 4big Quadra is pre-configured in RAID 0, the fastest RAID mode. Requiring at least 2 drives, RAID 0 stripes data onto each disk. The available capacities of each disk are added together so that one logical volume mounts on the computer.
If one physical disk in the array fails, the data of all disks becomes inaccessible because parts of the data have been written to all disks.
Applications
RAID 0 is ideal for users who need maximum speed and capacity. Video editors working with very large files may use RAID 0 when editing multiple streams of video for optimal playback performance. A RAID 0 array is more suited for actively working with files (editing video, for example) and should not be used as a storage backup.
RAID 10

RAID 10 (also called RAID 1+0) is another RAID level that combines the attributes of other levels, specifically RAID 1 and RAID 0. It is a “mirror of stripes”, meaning that data is striped across two mirrored arrays. The Striping occurs between arrays and the mirroring occurs within the same array. See the diagram, right.
In a RAID 10 array, one disk from each mirrored pair can fail with no data loss. However, the working disk in an array with a failed disk becomes a weak point for the entire array. If the second disk in a mirrored pair fails, the entire array is lost.
Applications
RAID 10 provides good speeds because of RAID 0 striping, but cuts the available capacity of a device in half (assume all disks in the array have the same capacity).
Concatenation

When disks are concatenated, their capacities are combined and data is written to the primary disk in the array until is it full, and then to successive disks. Concatenation provides no performance advantage or added measure of data safety. It is simply a method of combining more than one physical disk into one volume for greater overall capacity.
Concatenation allows full use of the capacity of all disks in the array and most data can survive a disk failure. Only data on the failed disk and data that is partially written on the failed disk and an operative disk is lost.
Offers the maximum possible capacity by combining the capacities of several drives into one large volume.
RAID 3 and RAID 3+Spare


RAID 3 uses byte-level striping with a dedicated parity disk (Disk 4 in the illustrations, right) so that one volume mounts on the computer. A RAID 3 array can tolerate a single disk failure without data loss. If one physical disk fails, the data from the failed disk can be rebuilt onto a replacement disk. If a second disk fails before data can be rebuilt to a replacement drive, all data in the array will be lost.
In RAID 3+Spare, one disk in the array is left empty. If a drive in the array fails, the data from the failed disk is automatically rebuilt to the empty or “spare” disk.
Applications
RAID 3 provides good data safety for environments where long, sequential files are being read, such as video files. Disk failure does not result in a service interruption because data is read from parity blocks. RAID 3 is useful for people who need performance and constant access to their data, like video editors. RAID 3 is not recommended for intensive use with nonsequential files because random read performance is hampered by the dedicated parity disk.
In RAID 3+Spare disk failure does not require immediate attention because the system rebuilds itself using the hot spare, but the failed disk should be replaced as soon as possible.
RAID 5 and RAID 5+Spare


RAID 5 combines the striping of RAID 0 with data redundancy in an array with a minimum of three disks.
Data is striped across all disks and a parity block (P) for each data block is written on the same stripe. If one physical disk fails, the data from the failed disk can be rebuilt onto a replacement disk. No data is lost in the case of a single disk failure, but if a second disk fails before data can be rebuilt to a replacement drive, all data in the array will be lost.
In RAID 5+Spare, one disk in the array is left empty. If a drive in the array fails, the data from the failed disk is automatically rebuilt to the empty or “spare” disk.
Applications
RAID 5 combines data safety with efficient use of disk space. Disk failure does not result in a service interruption because data is read from parity blocks. RAID 5 is useful for people who need performance and constant access to their data, like video editors.
In RAID 5+Spare disk failure does not require immediate attention because the system rebuilds itself using the hot spare, but the failed disk should be replaced as soon as possible.
Changing the RAID Mode
The 4big comes preconfigured in RAID 0 mode. Before you change the RAID mode of the LaCie 4big, familiarize yourself with the 4big’s RAID modes. See About RAID Modes.
To Change the RAID Mode
- Unmount or safely remove the 4big Quadra volumes from your computer, disconnect the interface cable and switch off the 4big.
- To enter RAID modification mode, push and hold the front button and simultaneously turn on the 4big. Continue holding the front button for 15 seconds.
- Push the + or - buttons on the RAID mode selector until the desired RAID number appears.
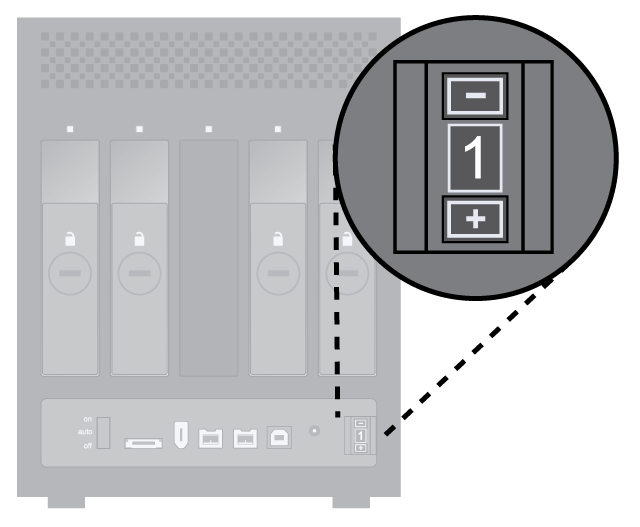
- 0=RAID 0
- 1=RAID 10
- 2=Concatenation
- 3=RAID 3
- 4=RAID 3+Spare
- 5=RAID 5
- 6=RAID 5+Spare
- 7=N/A. Although the number 7 appears in the RAID selector, no RAID changes will take effect if 7 is selected.
- Validate the mode by pushing and holding the front LED button for 2 seconds.
- Let the drives turn on, and then turn off the 4big, allow it to shut down and turn it back on.
- Partition the disks. See Formatting and Partitioning.

Removing and Installing Drives
In the event that an individual hard disk fails in the LaCie 4big, please contact your LaCie reseller or LaCie Customer Support. Please replace a defective hard drive only with a new drive provided by LaCie.
To Remove a Drive
- If the 4big is in RAID 0 or Concatenation mode, turn it off and unplug it. If the 4big is in RAID 10, 3, 3+, 5 or 5+ mode, you can leave it turned on and continue to step 2.
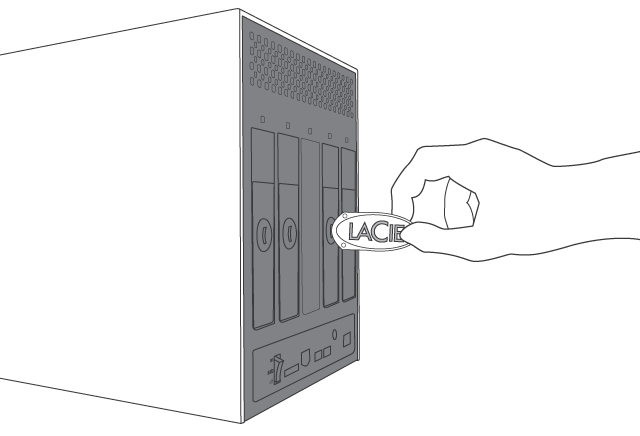
- The drive tray may be locked. To unlock it, insert the round end of the provided 2-in-1 tool into the slot on the drive lock and turn the lock until the slot is vertical.
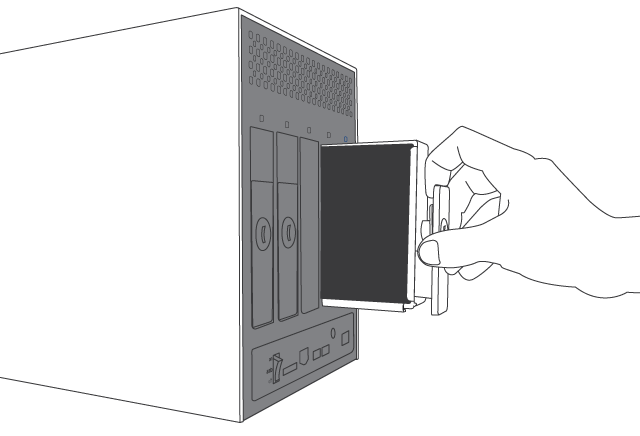
- Draw out the drive tray by inserting your finger into the space behind the drive tray handle and pulling to disengage the drive.
- Grasp the drive tray handle and carefully extract the drive.
- Turn the drive on to continue using the remaining drives.

To Install a Drive
- If the 4big is in RAID 0 or Concatenation mode, turn it off and unplug it. If the 4big is in RAID 10, 3, 3+, 5 or 5+ mode, you can leave it turned on and continue to step 2.
- Carefully insert the drive tray into an empty drive bay. When the drive tray is most of the way in and you feel resistance, press the drive tray handle firmly until you feel the drive snap into place and the drive tray handle is flush with the back of the 4big.
- Use the 2-in-1 tool to lock the drive lock. Turn the locks until the grooves are oriented vertically. The drives are locked when all locks are horizontal.

A replaced drive should not have a smaller capacity than the drive it is replacing.
Rebuilding a RAID array can take several hours. For example, rebuilding a 1TB RAID 3 array can take up to 6 hours. This time it takes to rebuild will be increased if you access the drives during the rebuild.
LaCie does not recommend removing any drives during rebuild.