User Tools
Site Tools
2big Thunderbolt 2
User Manuals Print page
 Save page as PDF
Table of Contents


Table of Contents
Manage RAID
About RAID modes
Review the table below for an overview of the different RAID modes:
| RAID mode | Capacity | Protection | Speed | Factory default |
|---|---|---|---|---|
| FAST (RAID 0) | 100% | None | Excellent | Yes |
| SAFE (RAID 1) | 50% | Excellent | Good | No |
| JBOD | 100% | None | Good | No |
FAST (RAID 0): RAID 0 is the fastest RAID mode. In a RAID 0 array, the available capacities of each hard drive are added together so that one logical volume mounts on the computer. It offers the best performance but no data protection should a hard drive fail.

SAFE (RAID 1): RAID 1 provides data protection since all data is written to each hard drive at the same time. In the event of a single hard drive failure, data remains available on the other hard drive. Due to the time it takes to write the data twice, performance is reduced when compared to RAID 0. RAID 1 is a good choice when safety is more important than speed. However, RAID 1 also reduces the available drive space by 50% due to the need to write every bit of data to each hard drive.

JBOD: Hard drives are independent in a JBOD configuration. You can write data to one hard drive without affecting the other hard drive. An advantage to this configuration is the availability of 100% of the hard drives' total storage capacity. However, it does not offer redundancy and all data on a single hard drive is lost if it fails.

Modify the RAID mode
Important info: Changing the RAID mode destroys data stored on the LaCie 2big. Back up all your data before adjusting the RAID.
Before starting the steps below, locate the RAID selection tool included with the enclosure and know the RAID mode you want to use.
- Unmount the LaCie 2big's volumes from your computer (see Unmounting Your Drive).
- Power off the device using the LED button (see LEDs and LED Power Button).
- Remove the side panel for access to the RAID selection and confirmation buttons (see Getting Connected). The power supply must remain connected to the device.
- Use the sharp end of the RAID selection tool to press and hold down the SELECT button.
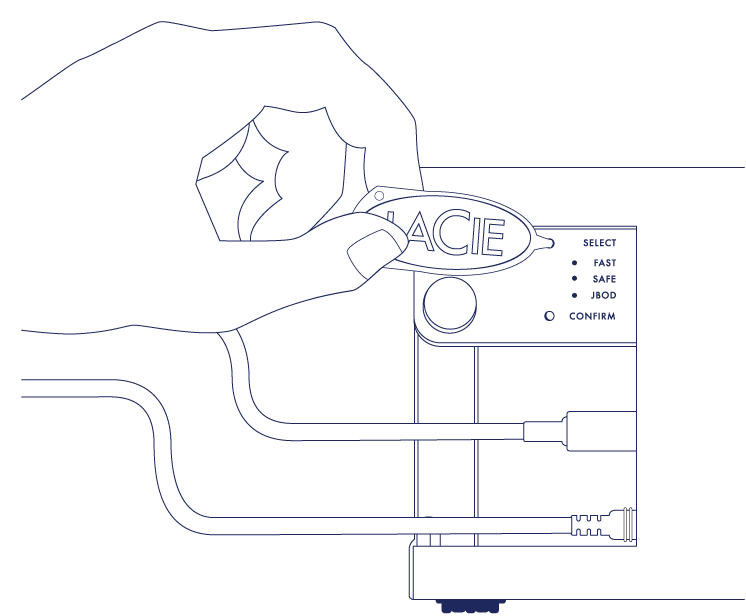
- Without releasing the SELECT button, turn on the product by pressing the front LED button.
- All the RAID mode LEDs flash momentarily before the LED for the current RAID mode blinks on its own. Using the RAID selection tool, press the SELECT button to toggle between the modes.
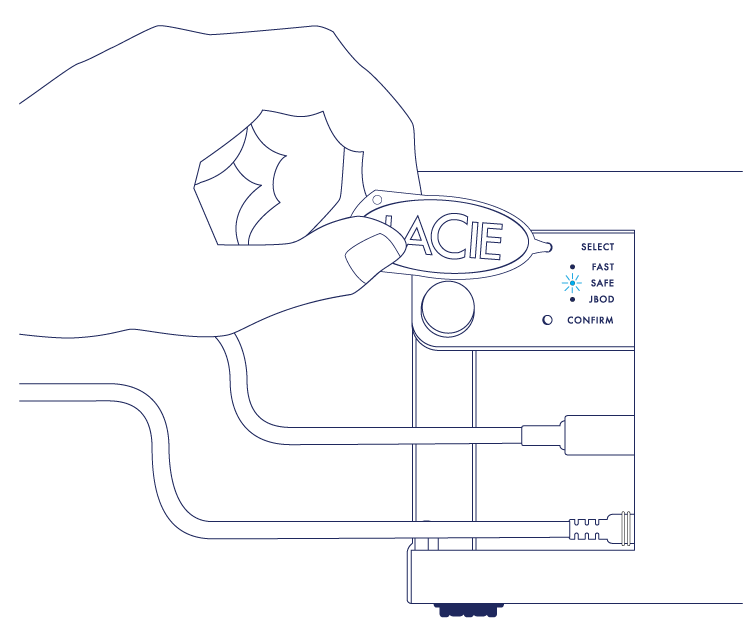
- When the LED for your preferred RAID mode is lit, use the RAID selection tool to press the CONFIRM button. IMPORTANT: Press CONFIRM within five seconds or the selection mode turns off and the configuration reverts to the current RAID.

- Your computer prompts you to initialize the new RAID volume. You must initialize and format the hard drives for use with your computer (see Formatting).
- Replace the side panel to protect the cable connections.


Technical note: Behavior will differ slightly if the interface cable is not connected to its port during the RAID modification. The device will power off once the RAID has been changed.
Important info: If the RAID mode has not been changed, you can try the steps again. When following the steps, make certain to choose CONFIRM as soon as the LED toggles to your preferred RAID mode.
RAID configuration times
The table below provides estimated times to configure the RAID.
| RAID | Time to complete |
|---|---|
| FAST | Less than a minute |
| SAFE | Several hours to one or more days (see note below) |
| JBOD | Less than a minute |
The time to complete the RAID SAFE synchronization is based upon total hard drive capacity. Though the time to synchronize may take several hours, you can begin using the volume immediately by initializing it with your operating system's disk utility (see Formatting).
Performance may be affected during RAID synchronization.
Automatic power off and RAID SAFE synchronization
In general, the LaCie 2big powers off when the computer is shut down. However, the device remains powered on if it is in the midst of a RAID SAFE synchronization.
© LaCie 2024
Last modified : Nov 21, 2014