Herramientas de usuario
Herramientas del sitio
Rugged Thunderbolt™ | USB 3.0
Manuales de instrucciones Imprimir página
 Guardar página como PDF
Índice


Tabla de Contenidos
Conexión
La configuración de la unidad LaCie Rugged Thunderbolt resulta realmente sencilla gracias al asistente de configuración LaCie Setup Assistant. Siga los pasos en el orden indicado para asegurarse de que el volumen de la unidad LaCie Rugged aparezca correctamente en el ordenador.
Thunderbolt y Windows
Información importante: La tecnología Thunderbolt es compatible con Windows 7 y Windows 8. Windows requiere ciertos controladores para poder utilizar el puerto Thunderbolt. Es recomendable que conecte el producto a un equipo host mediante USB y ejecute el software LaCie Setup Assistant (consulte el Paso 2: Inicio de LaCie Setup Assistant). Una vez finalizado LaCie Setup Assistant, desconecte la unidad LaCie Rugged (consulte la sección Desmontar la unidad) del puerto USB e instale los controladores de Thunderbolt para Windows (consulte la sección Instalación de los controladores (solo para Windows)). Puede realizar la conexión a través de la interfaz de Thunderbolt una vez instalados los controladores.
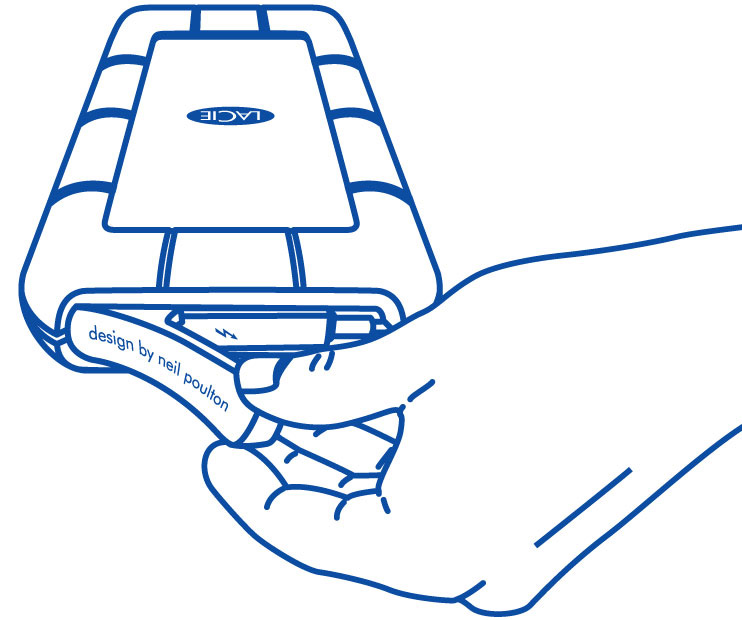
PASO 1: Conexión del cable de interfaz
La unidad LaCie Rugged puede conectarse al PC o al Mac mediante el cable Thunderbolt integrado o el cable USB 3.0 incluido. No obstante, no es posible utilizar ambas interfaces simultáneamente. Siga los pasos que se indican a continuación:
- Extraiga la cubierta situando el dedo índice en su borde derecho y separándolo con cuidado para abrirla.
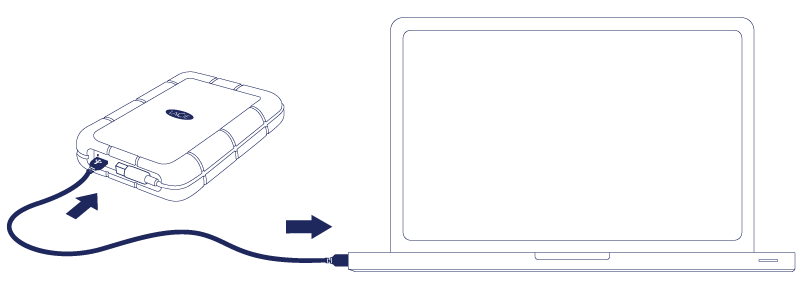
- Conecte la unidad LaCie Rugged al ordenador.
- Thunderbolt: Desenrolle con cuidado el cable Thunderbolt integrado antes de conectarlo al ordenador.
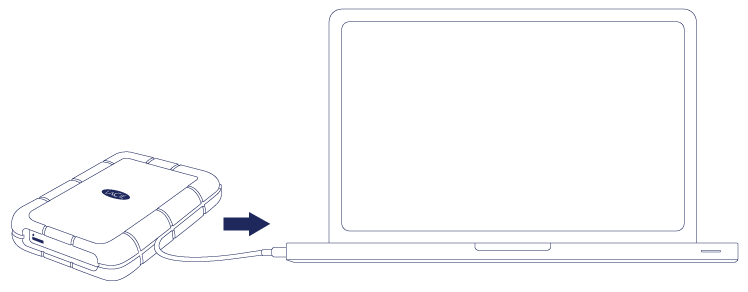
- USB 3.0: Utilice el cable USB 3.0 incluido. Tanto la interfaz como el cable son compatibles con USB 2.0.
- La unidad aparecerá en Equipo/Mi PC (Windows XP), Equipo (Vista, Windows 7 o versiones posteriores) o en el escritorio (Mac).
- Solo para la conexión Thunderbolt: Vuelva a colocar la cubierta en la parte trasera de la unidad LaCie Rugged. De este modo, mantendrá la clasificación IP 54 de la unidad.


Nota: En caso de que la unidad no aparezca en su ordenador, consulte la sección sobre la solución de problemas en Ayuda.
PASO 2: Inicio de LaCie Setup Assistant
LaCie Setup Assistant (LSA) must be launched before using your drive. It will allow you to:
- Easily format the hard drive according to your needs
- Copy the User Manual to your computer
- Install software for added features
- Register your LaCie device
Important info for Thunderbolt on Windows: LaCie Setup Assistant only works through the USB connection. Therefore, it is recommended that you connect via USB and run LaCie Setup Assistant. Once LaCie Setup Assistant is finished, disconnect the d2 Thunderbolt 2 USB 3.0 (see Unmounting Your Hard Drive) from the USB port and install the Thunderbolt drivers for Windows (see Install Drivers (Windows Only)). You can connect via the Thunderbolt interface once the drivers are installed.
Important info: If you do not launch LSA or if you quit it after the formatting has begun, your drive will not be ready to use and will require manual formatting. The User Manual and utilities will not be available and will have to be downloaded from the LaCie website: www.lacie.com/support/.
Launch LaCie Setup Assistant
Windows users
AutoPlay: Windows AutoPlay may detect your LaCie hard drive as soon as it is connected to your computer. If the AutoPlay window appears, choose Open folder to view files using Windows Explorer and double-click LaCie Setup.

Manual access: Open the LACIE SETUP volume in Computer/This PC and double-click LaCie Setup.

Mac users
Open the LACIE SETUP volume on your desktop and then double-click LaCie Setup.

Setup
The LaCie Setup Assistant guides you through formatting and registering your hard drive as well as installing LaCie software utilities. Follow the onscreen prompts to complete the setup.
Alternatively, you can use your disk management utility program to format or partition your LaCie drive. See Optional Formatting and Partitioning for details.
Important info for Windows users: While running LaCie Setup Assistant, generic pop-up windows may ask if you wish to change your computer's settings. This is a normal request when formatting a disk or installing certain software, such as Genie Timeline. To successfully complete LaCie Setup Assistant, LaCie recommends that you agree to change the settings.


Important info for Mac users: You may be prompted to enter your computer password to continue with LaCie Setup Assistant.
Important info regarding Mac OS X: Certain versions of LaCie Setup Assistant are not compatible with USB connections on Macintosh computers running Mac OS X 10.11, also known as El Capitan. If LaCie Setup Assistant experiences problems, you can try connecting your LaCie storage using another interface port on your computer (for example, Thunderbolt). If you are unable to use another interface port, format your LaCie hard drive using Disk Utility. For instructions on how to format your LaCie hard drive for Mac, see the chapter Formatting and Partitioning > Mac Users.
Software will be installed on the product's storage, not on your computer. It will be located on the volume entitled “Compatible” or “LaCie Share” if it exists, otherwise on “LaCie”.
LaCie software utilities may be installed at any time. Once the format is complete, the LaCie Setup Assistant application will be available on:
- LaCie: if you created one partition
- Compatible/LaCie Share: if you created two partitions
Si formateó su unidad mediante una utilidad de disco y necesita acceder a las utilidades de software o al manual de usuario, consulte la sección Ayuda.
Desmontaje de la unidad
Para evitar daños en el sistema de archivos, es importante desmontar la unidad antes de apagarla o de desconectar el cable de interfaz. Consulte la sección Desmontar la unidad para obtener más información.
© LaCie 2024
Última modificación : Aug 14, 2017