User Tools
Site Tools
Network Space 2 and Network Space MAX
User Manuals Print page
 Save page as PDF
Table of Contents


Table of Contents
Connect to the Network
This chapter explains how to connect your LaCie network storage to a network. For details on connecting your device directly to a computer via USB, see Connect to a Computer via USB.
A - Connect the Ethernet Cable
- Connect the Ethernet cable to the Ethernet port on the back of the network storage.
- Connect the other end of the Ethernet cable into an available Ethernet “out” port on your router or hub (refer to your router or hub’s documentation).

B - Connect the Power Supply
- Connect the power supply to a wall outlet and to the device.
- Turn on the drive by pressing the power button on the back of the drive. The front LED will turn solid blue and then begin blinking.

The device may take up to three minutes to boot and will be ready once the blue LED has stopped blinking.
Caution: Only use the AC adapter supplied with your specific LaCie device. Do not use a power supply from another LaCie device or another manufacturer. Using any other power cable or power supply may cause damage to the device and void your warranty. Always remove the AC adapter before transporting your LaCie device. Failure to remove the adapter may result in damage and will void your warranty.
C - Install LaCie Network Assistant
LaCie Network Assistant detects all LaCie storage devices on your network. Once installed, LaCie Network Assistant will help you to configure and access your LaCie network storage.
Note: If LaCie Network Assistant is already installed on your computer, please go to www.lacie.com/support to find your product and confirm that you are using the most recent version. If your version of LaCie Network Assistant is out of date, download and install the latest update from the LaCie website.
- Insert the Utilities CD-ROM into your computer's optical drive.
- Windows users, the CD should appear in My Computer / Computer. Mac users, the CD should appear on the Desktop. Double click the CD icon, then double click LaCie Network Assistant Setup.
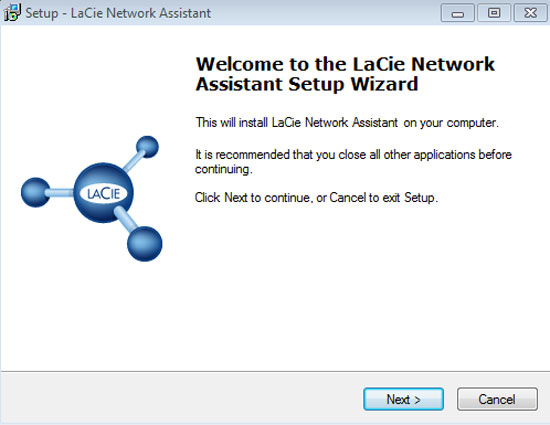
- Follow the LaCie Network Assistant Setup Wizard to complete the installation.
- Once LaCie Setup Assistant is installed, go to Administration (Dashboard) to learn how to administrate your LaCie network storage. You will be asked to fill in important information the first time you log in via your preferred web browser. For information on how to access the network storage volumes, go to Access and Transfer Files.

Static IP Address
Most home and office routers are DHCP servers, meaning that your device will automatically receive an IP address once it is connected to the network. If a network is not DHCP-managed, the LaCie storage device will use APIPA (automatic private IP addressing) to assign itself a valid IP address within the existing network. In some cases, it will assign itself an IP address following the rule 169.254.xxx.yyy/24.
Since the majority of networks use DHCP addressing, LaCie highly recommends that you do not adjust your IP address without contacting your Internet provider or network administrator.
- Make sure LaCie Network Assistant is installed on your computer
- Launch LaCie Network Assistant:
- Windows: Select LaCie Network Assistant in Start > Programs. The LaCie Network Assistant icon will appear in the system tray and the program will automatically detect all LaCie storage devices on your network.
- Mac: Go to the Applications folder to launch LaCie Network Assistant. The LaCie Network Assistant icon will appear in the menu bar and the program will automatically detect all LaCie storage devices on your network.
- Right click on the icon in the system tray (Windows) or click once on the icon in the menu bar (Mac) to select Open LaCie Network Assistant… (Older versions of LaCie Network Assistant should choose Configuration Window…)
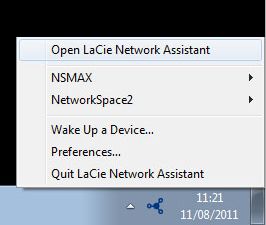

Open LaCie Network Assistant - Windows

Open LaCie Network Assistant - Mac
- Click the Configuration tab and select Manual. (Older versions of LaCie Network Assistant should choose the Network tab.)
- Make sure to provide an IP address that is compatible with your network. As well, it must include the the same subnet as your computer's network settings so that the device will be visible to that computer.
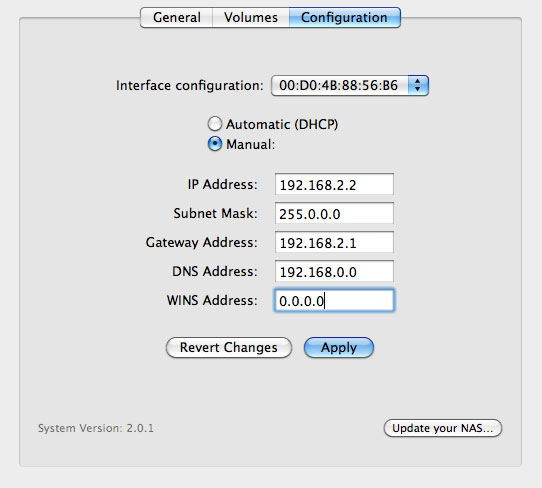
Assign a Static IP compatible with your network
- Click Apply. The device will restart.


© LaCie 2024
Last modified : Mar 01, 2013