User Tools
Site Tools
Rugged RAID
User Manuals Print page
 Save page as PDF
Table of Contents


Table of Contents
Getting Connected
Setting up the LaCie Rugged RAID is easy thanks to LaCie Setup Assistant. Follow the steps in the order they are given to ensure that your LaCie Rugged RAID’s volume mounts correctly on your computer.
Thunderbolt and Windows
Important info: Thunderbolt technology is compatible with Windows 7 and Windows 8. Windows requires drivers to use the Thunderbolt port. It is recommended that you connect the product to a host computer via USB and run LaCie Setup Assistant (see Step 2 - Launch LaCie Setup Assistant). Once LaCie Setup Assistant is finished, disconnect the LaCie Rugged RAID (see Unmounting Your Hard Drive) from the USB port and install the Thunderbolt drivers for Windows (see Install Drivers (Windows Only)). You can connect via the Thunderbolt interface once the drivers are installed.
STEP 1 - Connect the interface cable
First connection
Mac: The LaCie Rugged RAID can be connected to your Mac using the integrated Thunderbolt cable or the included USB 3.0 cable. However, it is not possible to use both interfaces at the same time.
Windows: For the initial setup, you must use the USB 3.0 cable. If your PC has a Thunderbolt port, make certain to install the Thunderbolt driver when prompted by LaCie Setup Assistant. Once the driver is installed, you can connect the Rugged RAID to your PC via Thunderbolt.
Important info on USB 3.0: The power cable must be connected to an active outlet when using the Rugged RAID’s USB 3.0 port.
Thunderbolt
- Remove the cover by placing your index finger on its left edge and gently prying it open. Use caution since the Thunderbolt cable is held by a fastener on the removable cover.
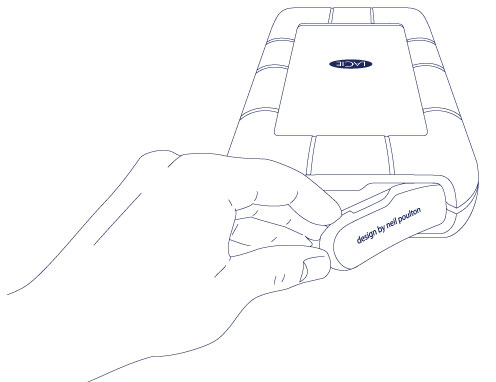
- Gently remove the Thunderbolt connector from the cover.
- Unwind the integrated Thunderbolt cable as needed and connect it to your computer.
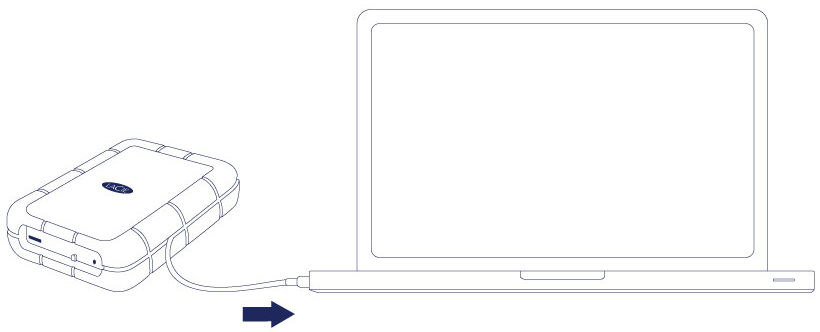
- The drive mounts on your desktop (Mac).
- Replace the cover on the LaCie Rugged. Doing so maintains the LaCie Rugged’s IP 54 rating.


If the Rugged RAID’s Setup volume does not mount on your computer, see troubleshooting topics at Getting Help.
USB 3.0
- Remove the cover by placing your index finger on its left edge and gently prying it open. Use caution since the Thunderbolt cable is held by a fastener on the removable cover.
- Connect the included power cable in the following order:

- The Rugged RAID.
- An active outlet.
- Use the included USB 3.0 cable to connect the Rugged RAID in the following order:
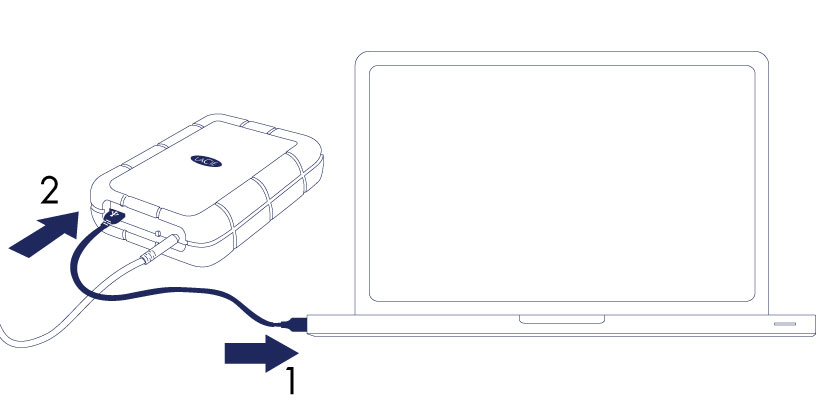
- A USB 3.0 or USB 2.0 port on your computer.
- The USB port on the Rugged RAID.
- The drive mounts in Computer (Windows 7 or later) or on your desktop (Mac).


If the Rugged RAID’s Setup volume does not mount on your computer, see troubleshooting topics at Getting Help.
USB 3.0 connections:
The power cable must be connected to an active outlet when using the Rugged RAID’s USB 3.0 port.
Since the cover cannot be replaced when using the USB 3.0 connection, the Rugged RAID’s IP 54 rating is not in effect.
The power cable must be connected to an active outlet when using the Rugged RAID’s USB 3.0 port.
Since the cover cannot be replaced when using the USB 3.0 connection, the Rugged RAID’s IP 54 rating is not in effect.
STEP 2 - Launch LaCie Setup Assistant
LaCie Setup Assistant (LSA) must be launched before using your drive. It will allow you to:
- Easily format the hard drive according to your needs
- Copy the User Manual to your computer
- Install software for added features
- Register your LaCie device
Important info for Thunderbolt on Windows: LaCie Setup Assistant only works through the USB connection. Therefore, it is recommended that you connect via USB and run LaCie Setup Assistant. Once LaCie Setup Assistant is finished, disconnect the Rugged RAID (see Unmounting Your Hard Drive) from the USB port and install the Thunderbolt drivers for Windows (go to LaCie Support). You can connect via the Thunderbolt interface once the drivers are installed.
Important info: If you do not launch LaCie Setup Assistant or, if you quit it after the formatting has begun, your drive will not be ready to use and will require manual formatting (see Optional Formatting and Partitioning. In such a case, the user manual and utilities must be downloaded from the LaCie website: www.lacie.com/support/.
Launch LaCie Setup Assistant
Windows users
AutoPlay: Windows AutoPlay may detect your LaCie device as soon as it is connected to your computer. If the AutoPlay window appears, choose Open folder to view files using Windows Explorer and double-click LaCie Setup.

Manual access: Open the LACIE SETUP volume in Computer/This PC and double-click LaCie Setup.

Mac users
Open the LACIE SETUP volume on your desktop and then double-click LaCie Setup

Setup
The LaCie Setup Assistant guides you through formatting and registering your hard drive as well as installing LaCie software utilities. Follow the onscreen prompts to complete the setup.
Alternatively, you can use your disk management utility program to format or partition your LaCie drive. See Optional Formatting and Partitioning for details.
Important info for Windows users: While running LaCie Setup Assistant, you may see a User Account Control dialogue asking if you wish to change your computer's settings. This is a normal request when formatting a disk or installing certain software, such as Genie Timeline. To successfully complete LaCie Setup Assistant, LaCie recommends that you agree to change the settings.


Important info for Mac users: You may be prompted to enter your computer’s administrator password to continue with LaCie Setup Assistant.
Software will be installed on the product's storage, not on your computer. It will be located on the volume entitled “Compatible” or “LaCie Share” if it exists, otherwise on “LaCie”.
LaCie software utilities may be installed at any time. Once the format is complete, the LaCie Setup Assistant application will be available on:
- LaCie: If you created one partition
- Compatible/LaCie Share: If you created two partitions
If you formatted your drive using a disk utility and you need access to software utilities or the user manual, visit www.lacie.com/support/.
Note on RAID level: The default RAID level is 0. See Manage RAID for instructions on how to check and change the RAID level.
Unmounting the volumes
In order to avoid file system corruption, it is important to unmount your LaCie device’s volume before turning it off or disconnecting the interface cable. See Unmounting Your Hard Drive for details.
© LaCie 2024
Last modified : Jul 11, 2017