User Tools
Site Tools
Technical Brief: DFS
User Manuals Print page
 Save page as PDF
Table of Contents


Table of Contents
Replication
Setting up DFS-R requires a number of steps but the level of difficulty is not high. However, it is important to remember the reasons for replicating folders and how it will help to resolve certain bandwidth issues.
Why DFS-R?
In our ongoing example with the professional servers, we have used two offices for the company LaCie. There is a 5big Office+ in New York and two 12big Rack Storage Servers in Paris. For improved data organization, the administrator created:
- Shared Folders based upon department and office location (Accounting, Marketing, etc.; Americas and Europe)
- A Namespace, LaCie_Files, to act as a single virtual network drive. All users, no matter the office location, mount only one network drive, LaCie_Files, as opposed to numerous Shared Folders. Rather than searching haphazardly through many mounted drives, users can easily find the Shared Folders that contain the data required for their department.
The data is now easy to manage but the administrator has noticed a growing problem with network transfer rates. He knows that users from Paris require documents stored on the 5big Office+ in New York (5BIGSTORAGE). As well, users in New York must access files from both of the 12big Rack Storage servers (12BIGNETWORK-1 and 12BIGNETWORK-2) in Paris. The high demand for data on WAN servers highlights a common problem with bandwidth. There are no bandwidth issues when files are accessed on the LAN servers.
Table 05 - A LAN or WAN? Server Status by Branch Office
| LaCie Server | New York | Paris |
|---|---|---|
| 5big Office+ (“5BIGSTORAGE”) | LAN | WAN |
| 12big Rack Storage Server-1 (“12BIGNETWORK-1”) | WAN | LAN |
| 12big Rack Storage Server-2 (“12BIGNETWORK-2”) | WAN | LAN |
Windows Storage Server allows the administrator to set up DFS-R on all the servers. Data is replicated as follows:
- 12BIGNETWORK-1 data will be available on 5BIGSTORAGE and 12BIGNETWORK-2
- 12BIGNETWORK-2 data will be available on 5BIGSTORAGE and 12BIGNETWORK-1
- 5BIGSTORAGE data will be available on 12BIGNETWORK-2 and 12BIGNETWORK-1
Individual servers do not have priority once the initial replication is complete. When a user in Paris seeks a document that was created in New York (WAN), he will open a replicated version stored on a server in Paris (LAN). The DFS-R optimizes data availability by replicating on a regular basis, which means that users will always have access to the latest versions of the files via their LAN.
DFS-R Setup
Table 06 - Initial Replication
| Server | Replication |
|---|---|
| 12big Rack Storage Server-1 (“12BIGNETWORK-1”) | Receives replicated data from the Shared Folder Accounting Americas. |
| 5big Office+ (“5BIGSTORAGE”) | Original server location for the Shared Folder Accounting Americas. |
| Both servers | After the initial replication, new and updated data stored on Accounting Americas will be replicated in both direction. |
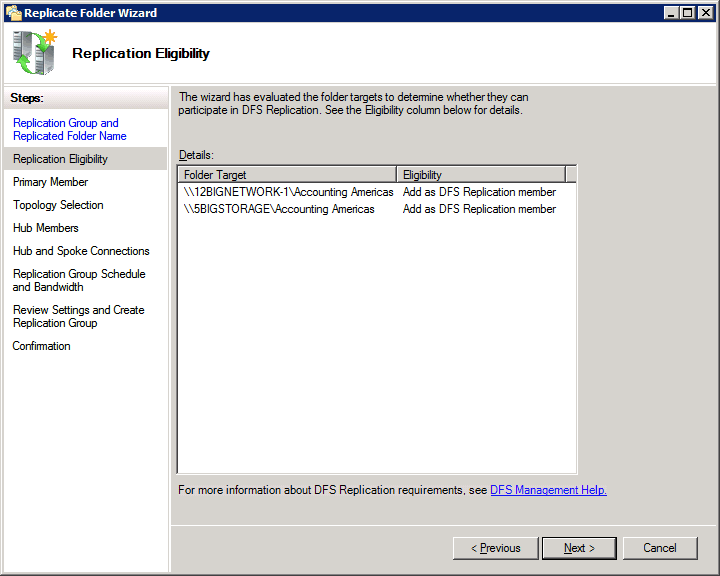
For DFS-R to work, the administrator must add the Target folders to the servers that will receive the replicated files. Select the Target folder that you wish to replicate. In our example, we will choose the Target folders, Americas and Europe.
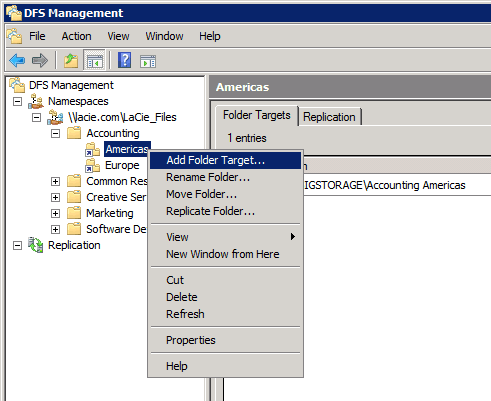
- To begin, go to Start > Administrative Tools> DFS Management > Namespaces > Domain [lacie.com] > Target folder [Americas].
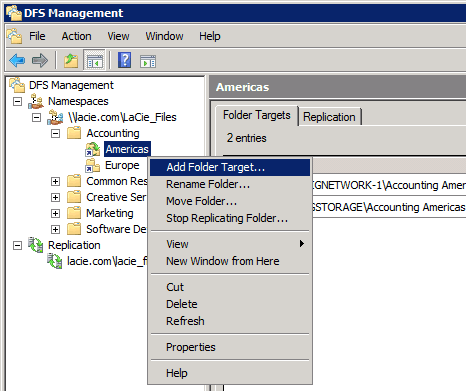
- Right-click on the Target folder [Americas] to select Add Folder Target….
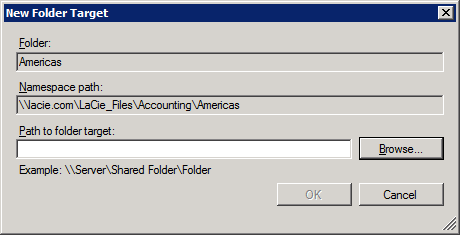
- Select Browse…
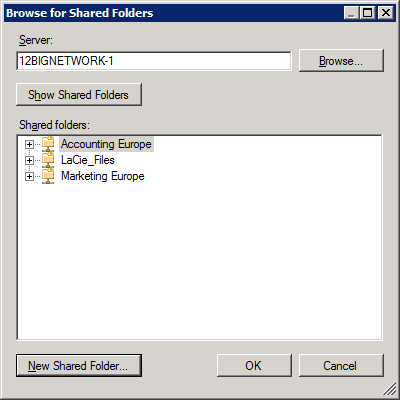
- Select the server that will receive the replicated files. For this step, the administrator chooses 12BIGNETWORK-1 to receive data stored on 5BIGSTORAGE.
- A Shared Folder must be created on the receiving server as a match for the original folder. That is, a new Shared Folder to receive replicated data from 5BIGSTORAGE to 12BIGNETWORK-1.
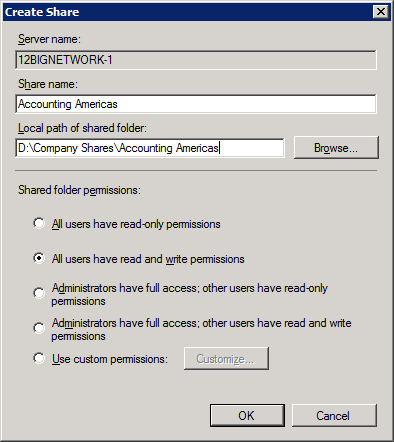
- Click New Shared Folder…
- While it is possible to give this folder any name, the administrator uses the same name as the original Shared Folder to avoid confusion. Confirm the permissions.
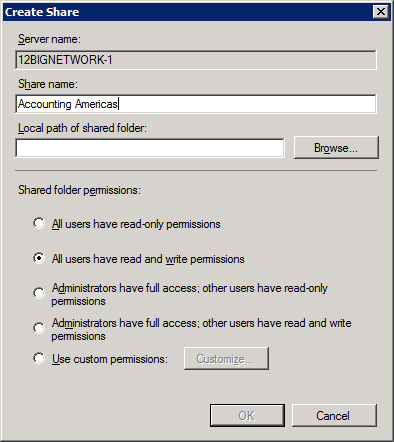
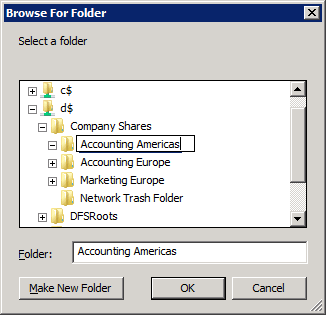
- Click BROWSE… to choose a local path for the Shared Folder.
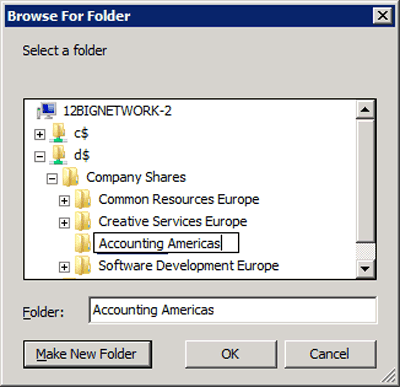
- The administrator chooses the “d” partition for data. Click Make New Folder to enter the name of the Shared Folder. Select the new folder and click OK.
- Click OK.
- The Shared Folder on 12BIGNETWORK-1 is now ready to receive replicated data. Select it and click OK.
- Note the path to the new Shared Folder. Click OK to enter the Replicate Folder Wizard.
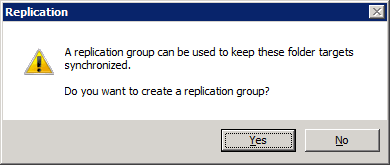
- A Replication window will appear, asking if you wish to keep the two folders synchronized. In this case, it is the Shared Folder on 12BIGNETWORK-1 and the original folder on 5BIGSTORAGE. Click Yes.
- The Replicate Folder Wizard appears. Note that the fields contain the information from the earlier steps. Clck Next>.
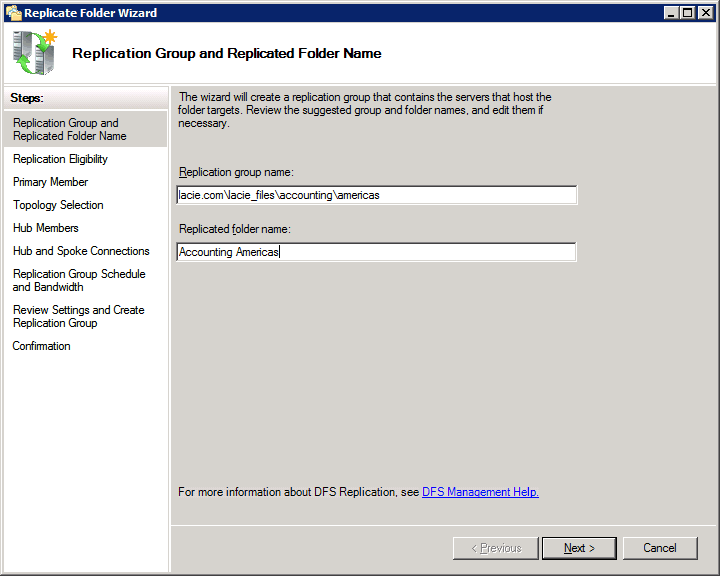
- The wizard will list the folder based upon the name provided. Click Next>.
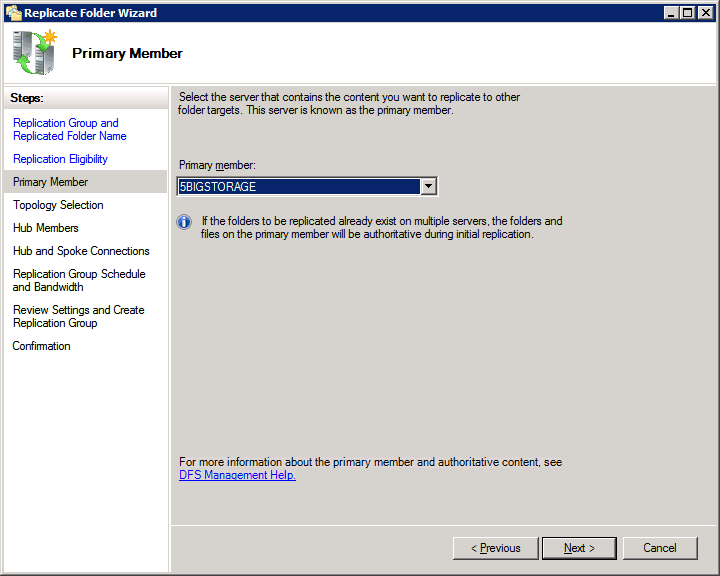
- Choose the server that has the Shared Folder with the data. 5BIGSTORAGE is considered the Primary member at this stage since it holds the data we wish to replicate. Once the replication is finished, both Shared Folders will be equal, each containing the same data. Select the Primary member and click Next>.
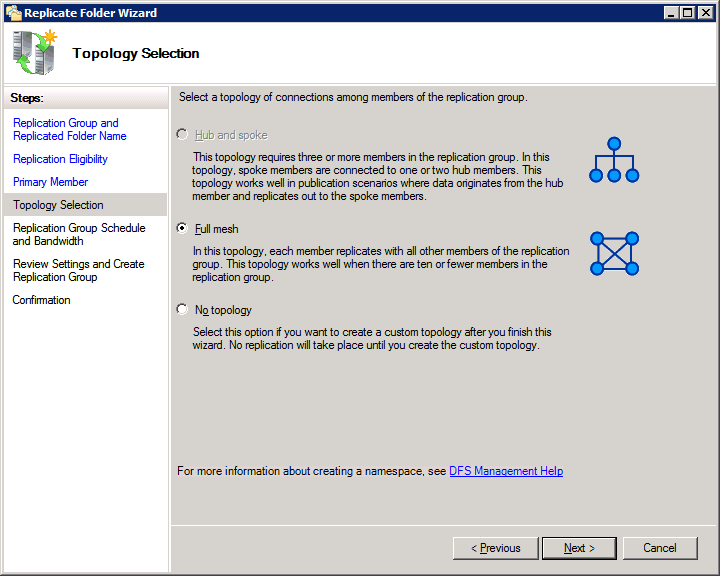
- Full mesh will replicate data in all directions between the servers in a replication group. This is the ideal choice for our example since data added to 12BIG NETWORK-1 will be automatically replicated onto 5BIGSTORAGE, and vice-versa. Click Next>.
- Select how the replication should occur, continuously or on a fixed schedule. The administrator may also select the amount of bandwidth to assign the replication. Click Next>.

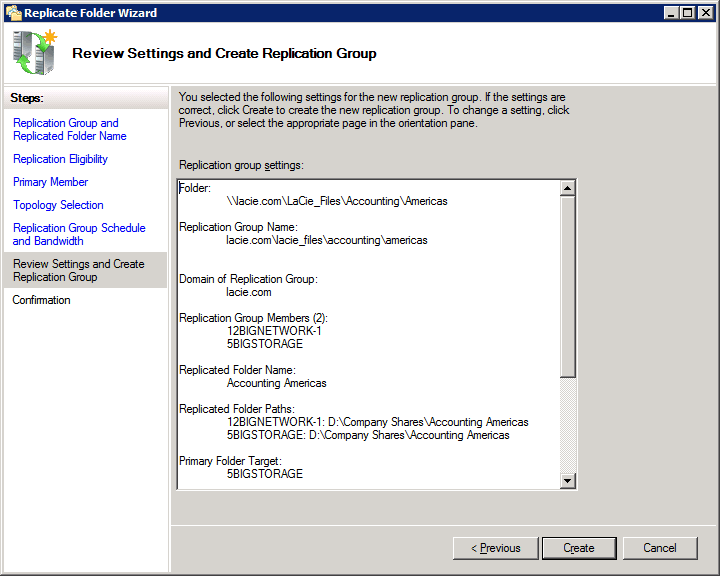
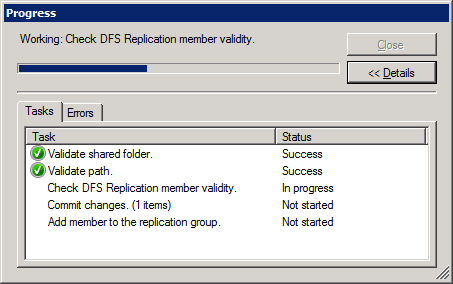
- Review the settings and click Create.
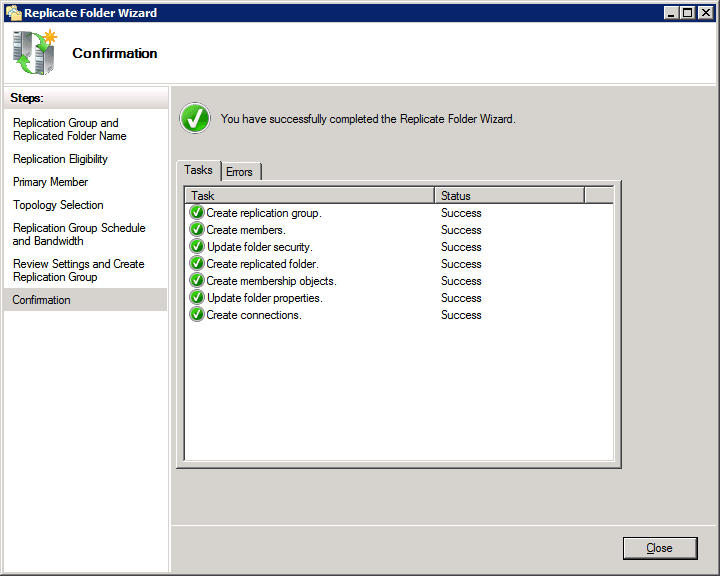
- The Confirmation window will appear once the replication is complete. Click Close.
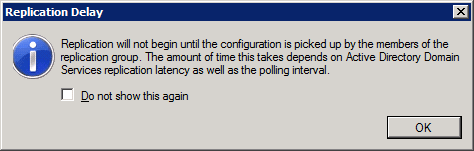
- A notification window provides details on the Replication Delay.
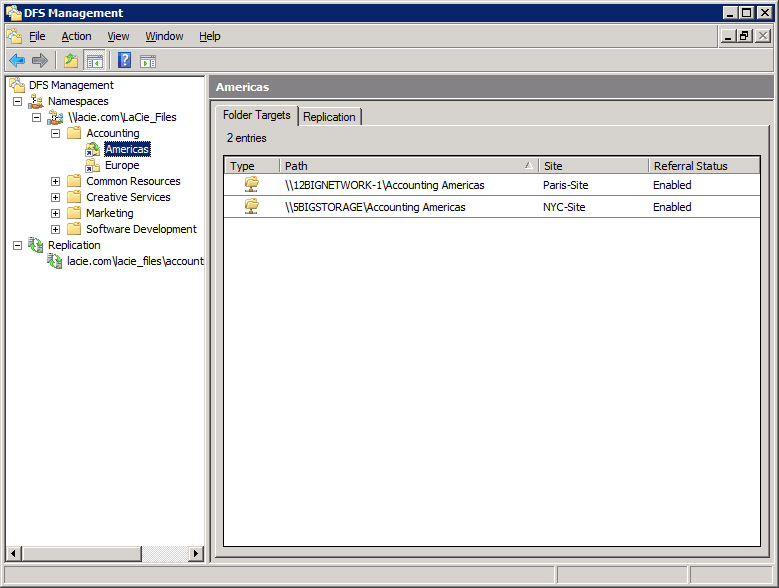
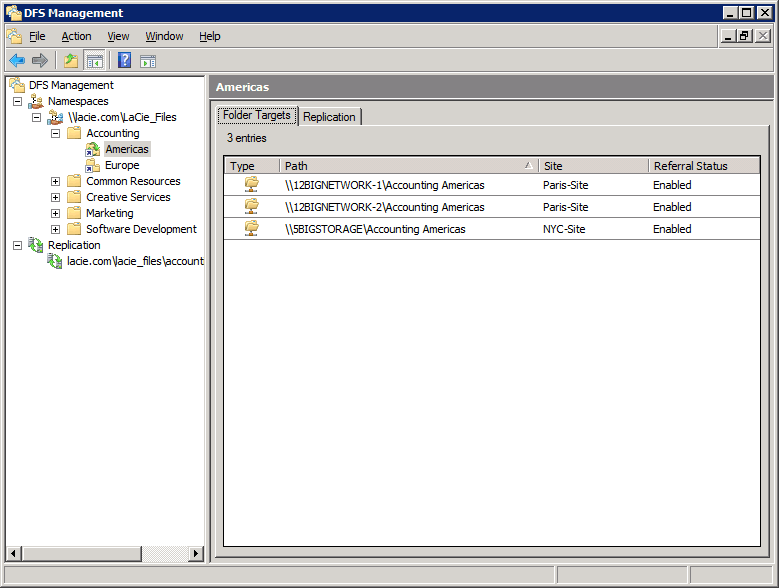
- There are now two replicated folders in New York and Paris. Please note the green arrow above the Americas Target folder. It means that data is being replicated.
- The administrator will now add a third server to the replication group. For some companies, additional servers may be located at other branch sites. For this example, the administrator is providing greater flexibility to the network by replicating onto 12BIGNETWORK-2. The steps are a bit different now that the replication group has been created. Right-click on Americas and select Add Folder Target….
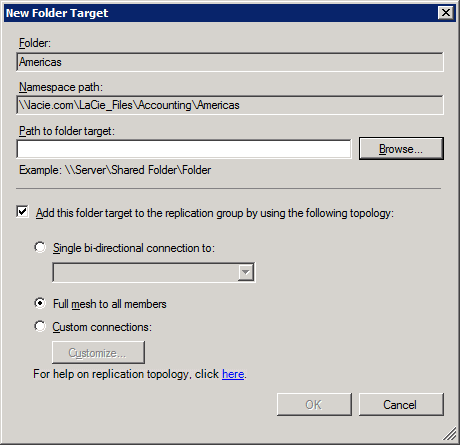
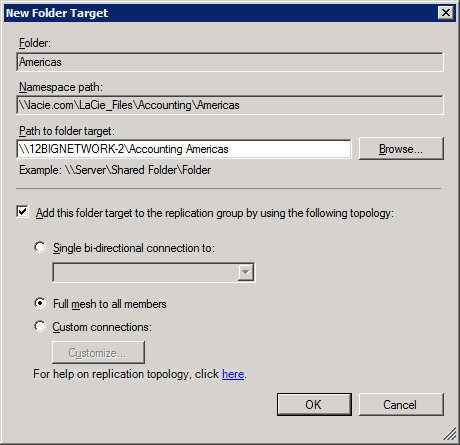
- In the New Folder Target window, the administrator may choose how to replicate data to the third server. For the full replication, choose Full mesh to all members. Click Browse… to create the Shared Folder on 12BIGNETWORK-2.
- Click Browse… or type the name of the server.
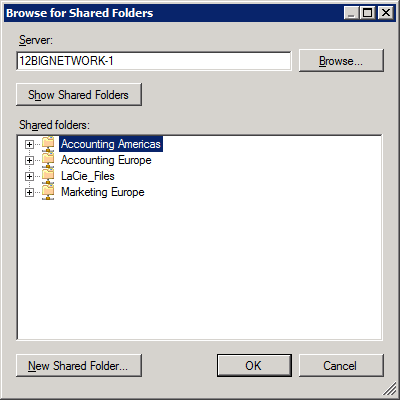
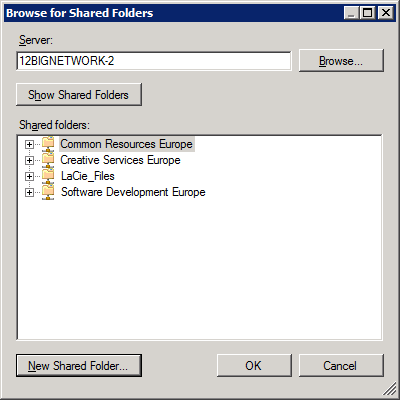
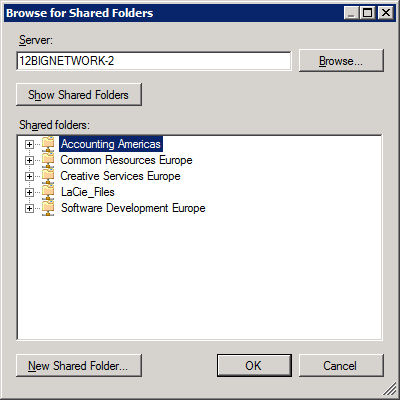
- In the Browse for Shared Folders window, click Show Shared Folders to see the current folders on the third server.
- Click New Shared Folder.
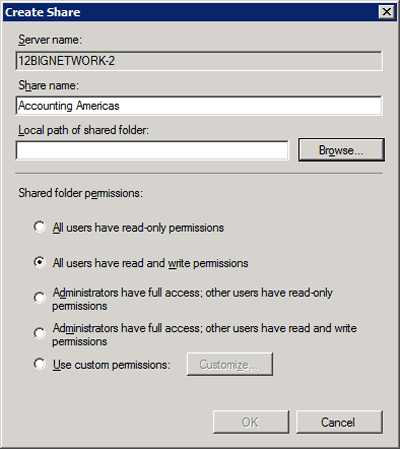
- In the Create Share window, write the name of the Shared Folder in the Share name field.
- Click Browse… to create the path to the 12BIGNETWORK-2.
- Type the name of the Shared Folder for the third server. Click Make New Folder to enter the name of the Shared Folder. Select the new folder and click OK.
- In the Create Share window, confirm the Shared Folder settings and click OK.

- In the Browse for Shared Folders window, click once on the newly created Shared Folder. Click OK.
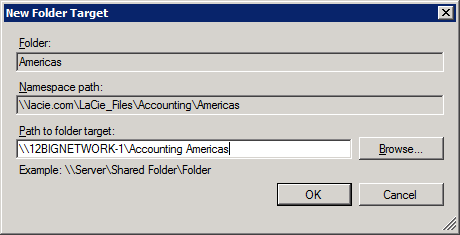
- The Shared Folder has been created. In the New Folder Target window, confirm the settings and path before clicking OK.
- The replication Progress window will appear.
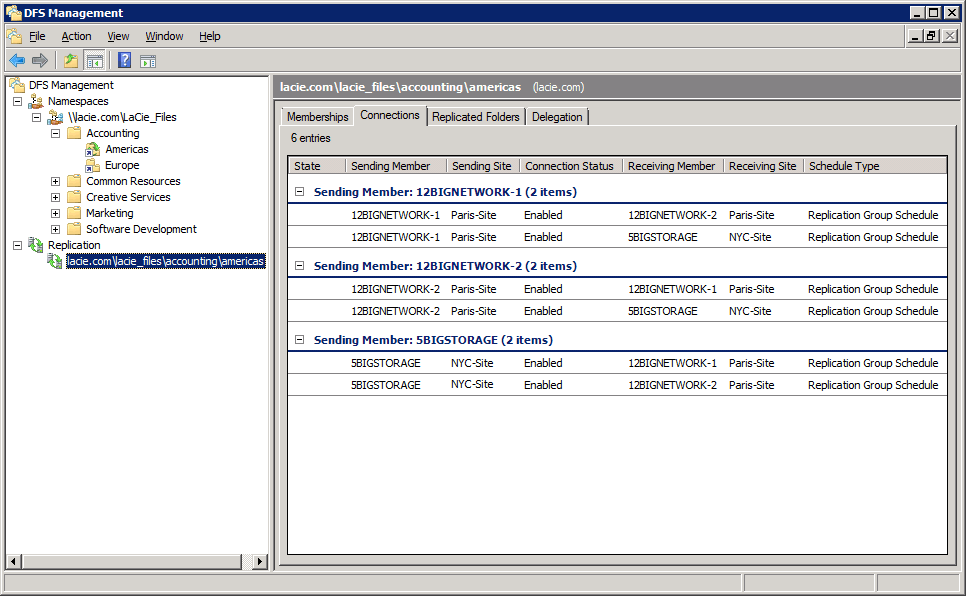
- The Shared Folder is now replicated on three servers.
- To view the servers in the replication group, go to Start > Administrative Tools > DFS Management > Replication > Domain [lacie.com]\Shared Folder [Accounting Americas].
- Repeat the steps to enable DFS replication for additional Target folders.


© LaCie 2024
Last modified : Mar 01, 2013