User Tools
Site Tools
Technical Brief: RAID
User Manuals Print page
 Save page as PDF
Table of Contents


Table of Contents
RAID - Five-Disk Server
A 5big Office/Office+ with five drives offers many options for the user, including the RAID configuration. While it is possible to create Spanned disks or RAID 0 arrays, LaCie highly recommends mirroring and RAID 5 for optimal protection of your data. RAID 0 can offer some speed advantages but data will not be duplicated across both volumes as with mirroring. Users risk losing data if one of the disks should fail in a RAID 0 array.
Suggested RAID Configuration for Five Disks
| Volume | Disks and RAID Level | Usage | Notes |
|---|---|---|---|
| Windows | 2 Disks Mirror | Windows must run from its own volume. Storing data on the system volume will impact server performance. Page file* | A Mirror requires two drives, making it ideal for the Windows operating system. A Mirror offers redundancy, duplicating each file on the two disks that make up the volume. If one disk should fail, the system data will be available on its mirrored drive. If Disk 0 should fail, it will be possible to recover the system boot disk before restarting the server. |
| Data | 5 Disks RAID 5 | The Data volume should be used to create Shared Folders and store data. | RAID 5 requires three or more disks. RAID 5 offers improved storage capacity. While mirroring has an overhead of 50% storage capacity due to file duplication, RAID 5 parity has approximately 20% overhead. This means that close to 80% of the total capacity is available for storing data. RAID 5 includes many features that improve performance. For example, RAID 5 uses block level parity to secure files. Block level parity takes far less time to write data across the disks in the volume than mirroring files across two drives. RAID 5 volumes may not host the Windows operating system. |
| Data 2 | 3 Disks RAID 5 | The Data 2 volume can be used to create Shared Folders and store data. Write the page* file to this volume to extend the server's physical memory. | See notes above. |
*The page file can be created on the Windows volume or the Data 2 volume.
Important info: Mirroring and RAID 5 provide solid protection if one drive in their respective arrays should encounter problems. However, LaCie highly recommends backing up the data stored on your professional server regularly in order to guard against worst case scenarios (i.e. accidental data deletion, malicious programs, viruses, etc.). LaCie professional servers include USB 2.0 and eSATA ports to attach desktop drives for use as backup storage. You can also backup your data to another server on the network.
Adjusting the RAID
Administrators may change RAID configurations to suit the needs of a business or after a server system recovery.
Use Disk Management to view or change RAID configurations in Windows:
- Launch the Dashboard from a Windows workstation on the same network as your LaCie 5big Office/Office+. Start > All Programs > Windows Home Server 2011/Windows Storage Server 2008 R2 > Windows Home Server 2011 Dashboard/Windows Storage Server 2008 R2 Dashboard
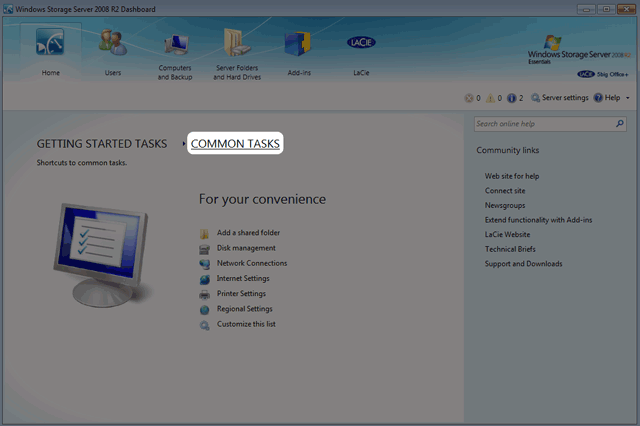
- Select the Home tab.
- Click once on COMMON TASKS.
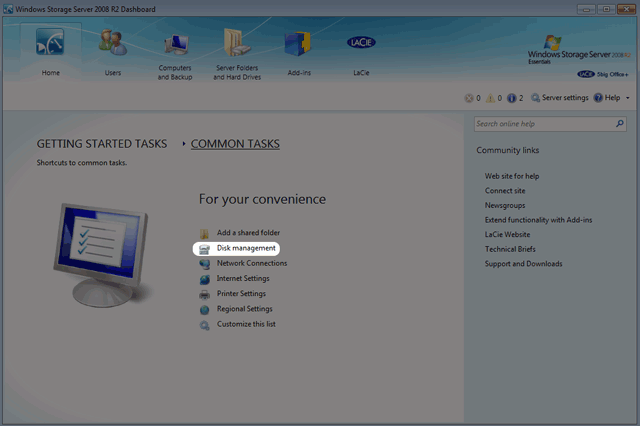
- Click once on Disk Management.


The first time Disk Management is launched, you may be prompted to initialize your drives using MBR or GPT. For information on MBR and GPT formats, please read MBR, GPT and the 5big Office/Office+ Operating Systems. You may initialize the disks at this step or choose Cancel. The drives will be initialized as MBR when creating the arrays.

Note: If you do not see Disk Management among the Common Tasks, you can add it by clicking Customize this list. Check the box next to each task that you wish to include on the Common Tasks list then click OK.


Important info: Please note that Disk 1 should not be initialized as GPT since it will be used to create a mirror of the Windows operating system.
5big Office/Office+ Single Disk Default Configuration
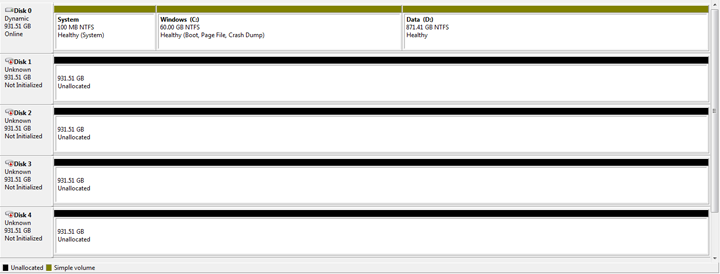
A single disk 5big Office/Office+ is shipped with three partitions, System, Windows, and Data. The screenshot below shows all three partitions on a single hard drive, Disk 0. Volume C contains the Windows operating system and volume D is meant to store data. As shipped, volume C takes up 60 GB.

If you have not inserted disks into the 5big enclosure, please see Removing and Installing Disks for instructions.
Boot Order and Creating the Windows Mirror
All Windows system files will be duplicated on each disk in the Mirror. To protect your system files and to save important data collected by the operating system, LaCie recommends a RAID 1 configuration for the System and Windows volumes. In case of disk failure, all files will be accessible on the disk paired for the Mirror.
Though the bootloader file will be duplicated on both disks, your version of Windows will only boot from Disk 0. Therefore, it is highly recommended that you do not restart the server if Disk 0 experiences problems. Instead, replace Disk 0 (Disk Tray Slot 1) as soon as possible and rebuild the RAID 1 onto the new drive. Windows may not startup properly if you reboot before the Mirror is rebuilt.
Creating the System Mirror
- Insert the new disks into the empty Drive Trays, starting from left to right. See Removing and Installing Disks for details.
- Go to Disk Management Adjusting the RAID.
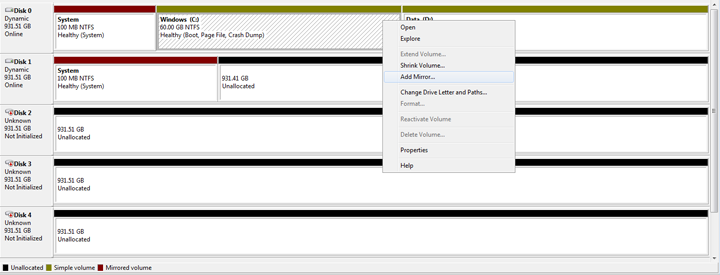
- The second through fifth disks will appear as Unallocated.
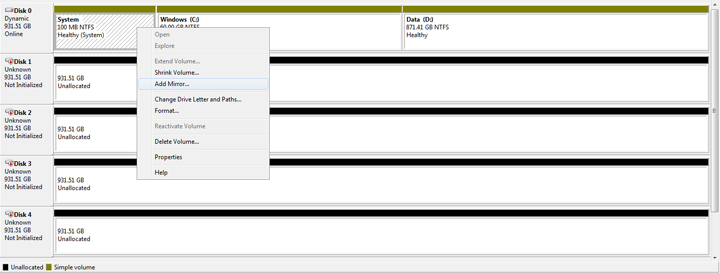
- Right-click on the System volume to select Add Mirror…
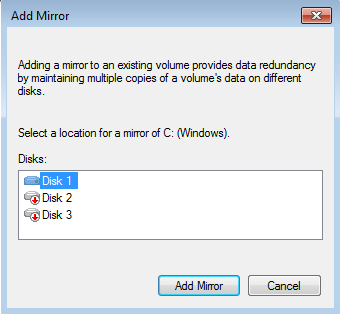
- A prompt will ask you to select a location for the mirror. Choose Disk 1 and click Add Mirror.

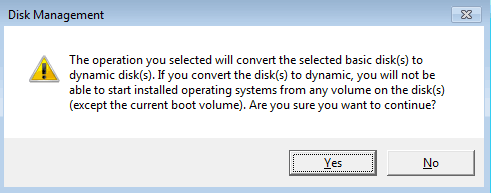
- A Disk Management warning will appear. Please click Yes to continue.


Creating the Windows Mirror
- Create the System Mirror before the Windows Mirror.
- Right-click on the Windows volume to select Add Mirror…
- A prompt will ask you to select a location for the mirror. Choose Disk 1 and click Add Mirror.
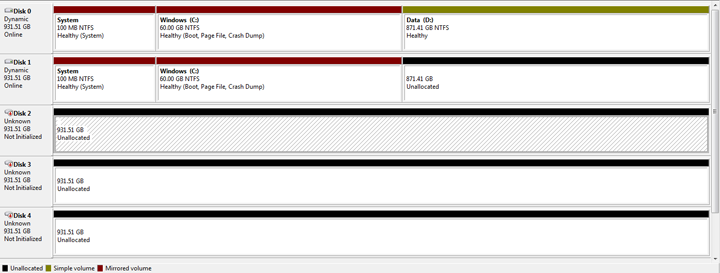
- It may take ten minutes to resync the RAID 1 array.


Note: Please keep the following in mind as Mirrored and/or RAID 5 volumes resync:
- Rebooting the 5big Office/Office+ while Disk Management is Resynching a Mirrored or RAID 5 volume will not harm the configuration or its data. However, since the process was interrupted, Disk Management will restart the resync at 0% once the 5big Office/Office+ has rebooted.
- Due to the capacity of the RAID 5 volume, rebooting while a resync is in progress could extend the operation for many hours.
- A volume that is in the midst of a resync may be accessed by workstations on the network. Users can perform common actions with the volume(s), such as reading files, writing files, or moving Shared Folders. However, performance will be degraded while Windows is resynching Mirrored and/or RAID 5 volumes.
Creating the Data 2 [E] RAID 5 Array
For organizational purposes, LaCie recommends creating the Data 2 [E] RAID 5 array before building the Data [D] RAID 5 array.
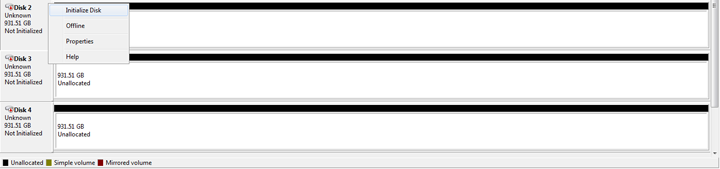
- Right-click on Disk 2 (left side of the panel) to select Initialize Disk.
- Confirm that Disks 2, 3, and 4 are checked.
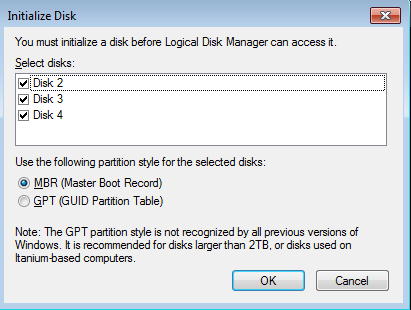
- Based upon the type of disk(s) you are using, select MBR or GPT. Click OK.
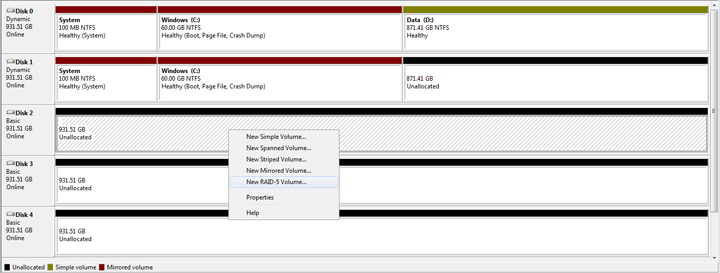
- From Disk 2, right-click on Unallocated. Select New RAID-5 Volume….
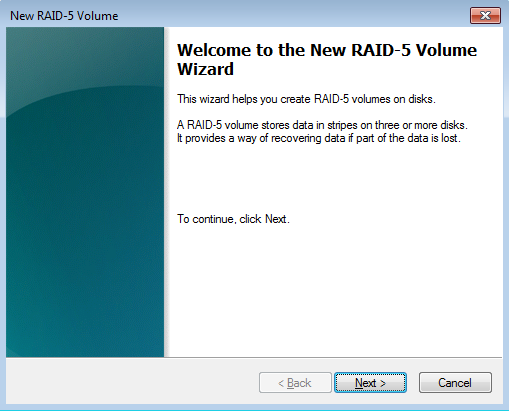
- The New RAID-5 Volume Wizard will launch. Click Next.
- The Select Disks window will ask you to choose the disks to add to the RAID 5 array.
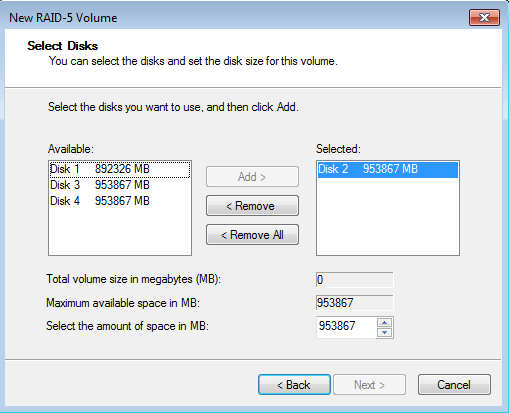
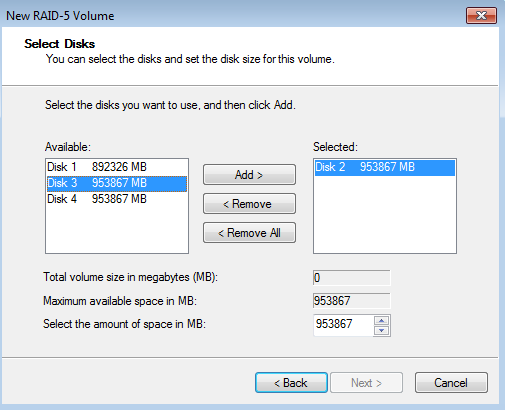
- Select Disk 3 and click Add>.
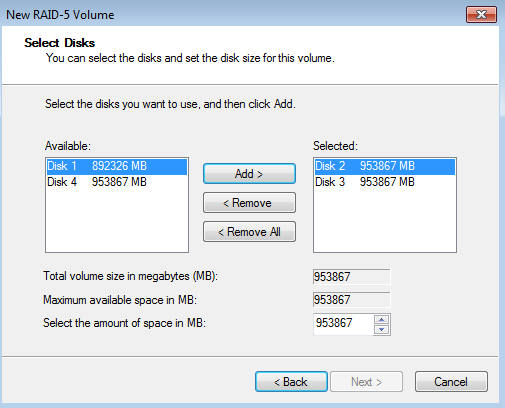
- Select Disk 4 and click Add>.
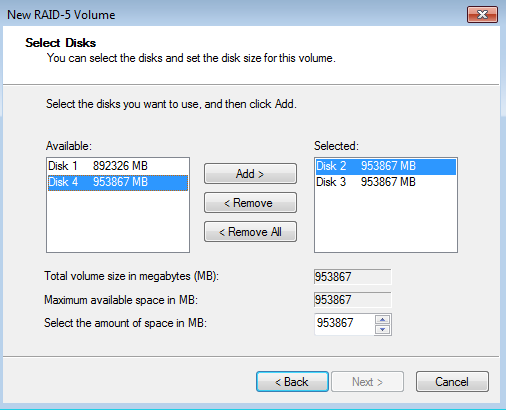
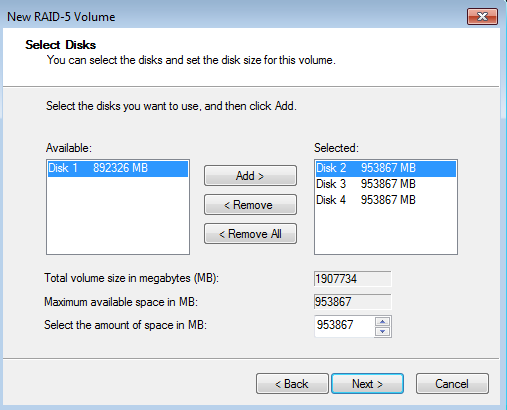
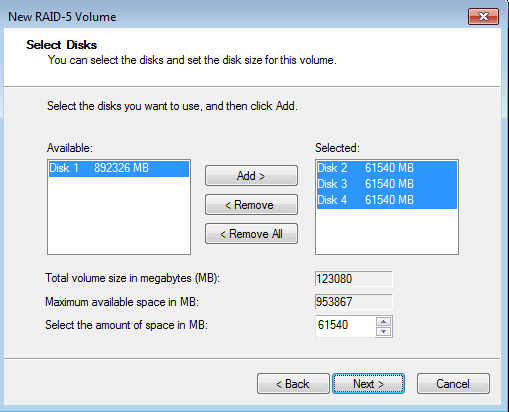
- In anticipation of creating the Data RAID 5 array, please build the Data 2 RAID 5 array with 61540MB.
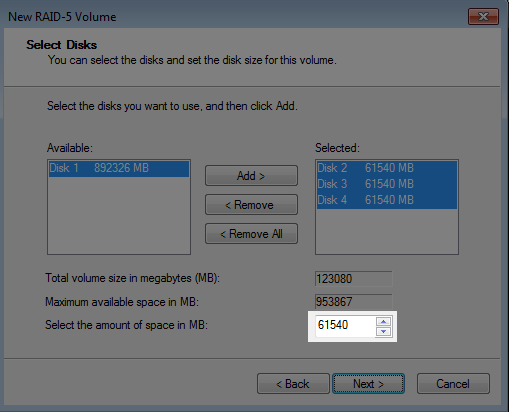
- Click Next.
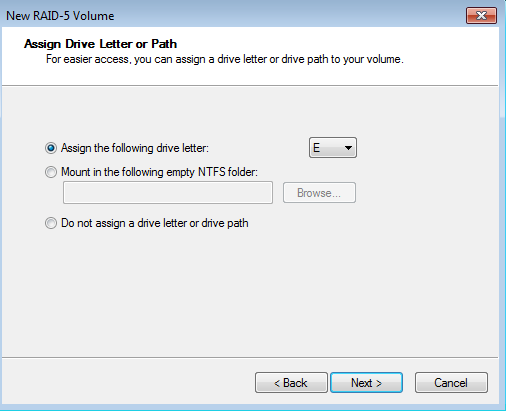
- Choose a drive letter and click Next. In this example, we have selected the next available letter, E.
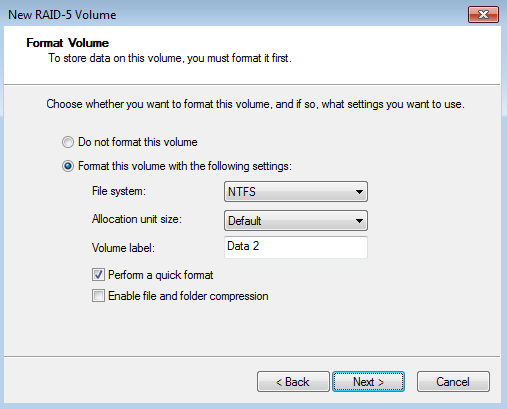
- You may name the volume. As seen below, we have called it Data 2. LaCie recommends keeping the defaults NTFS (file system) and Perform a quick format. Click Next.
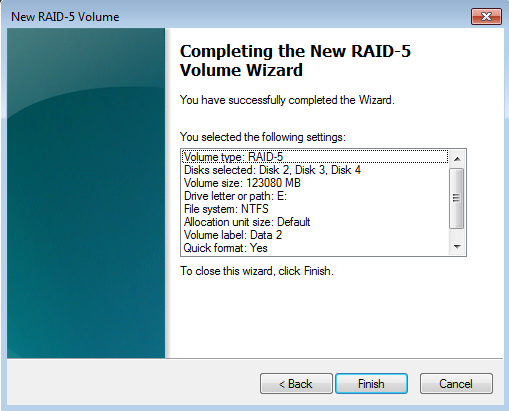
- Review your choices then click Finish.
- A Disk Management warning will appear. Please click Yes to continue.
- The RAID 5 array will resync until the volume has been created.


Important info: Following the steps below will help you create a large capacity RAID 5 volume to store and share your data. As noted in LaCie RAID Configurations and Windows Backup, Windows backup does not support volumes greater then 2TB. If you intend to use the Windows backup solution in the server Dashboard, please see RAID - Creating Multiple Volumes for instructions on creating volumes that do not exceed 2TB.
Preparing the 5big Office/Office+ for the Data RAID 5 Array
Move Shared Folders to a New Location
Windows cannot build the RAID 5 array with Shared Folders stored on the existing Data [D] partition.

Following the creation of the System, Windows, and Data 2 volumes, you must prepare the storage for the Data RAID 5 array. The first step is to move all Shared Folders to another location. In this example, we will move them from the Data [D] volume to the Data 2 [E] RAID 5 volume. Based upon the storage needs of your company, the move can be permanent or temporary.
- Create the System Mirror, Windows Mirror, and Data 2 RAID 5 array before the Data RAID 5 array.
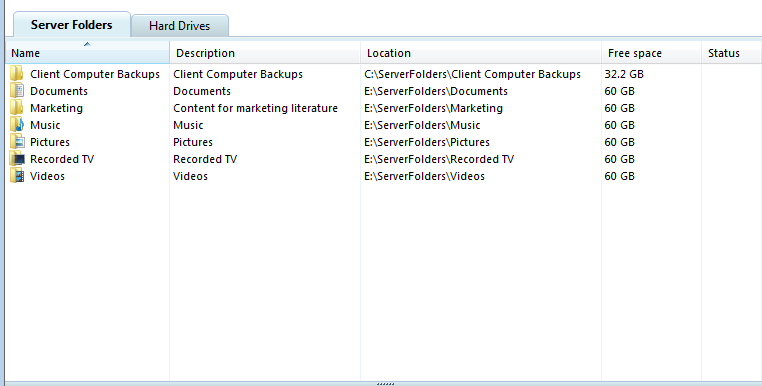
- Open the Dashboard and select the tab Server Folder and Hard Drives.
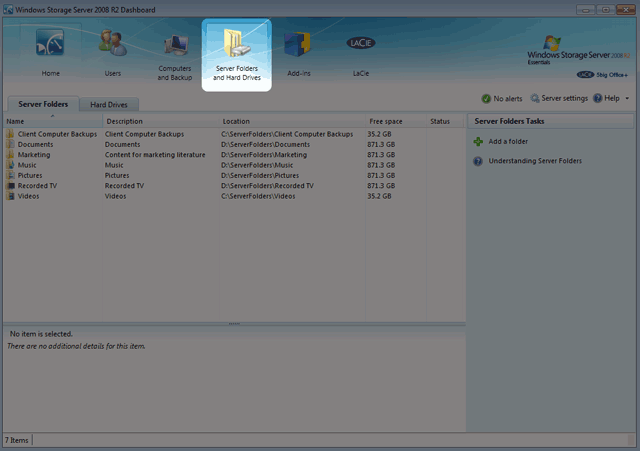
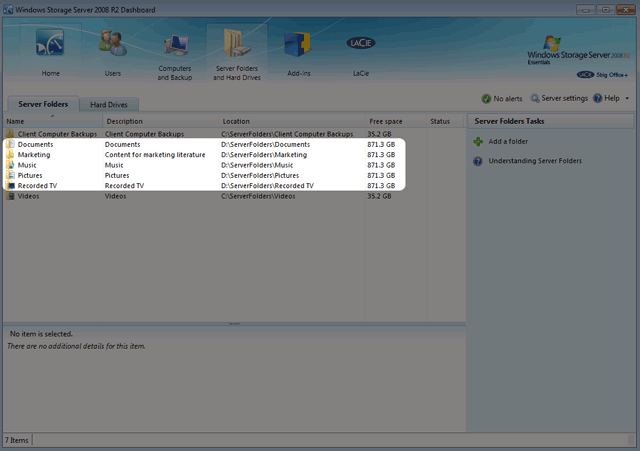
- Look for Shared Folders that are stored on the Data [D] volume.
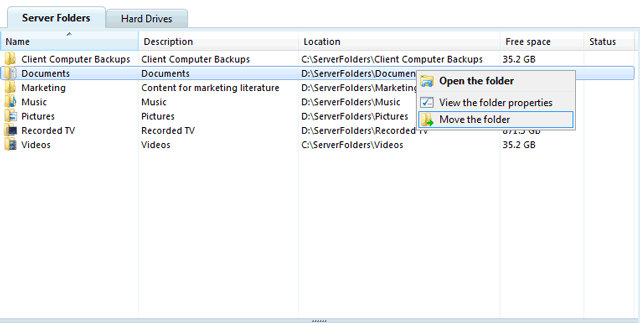
- Right-click on the first Shared Folder to select Move the folder. In this example, the Shared Folder Documents will be moved.
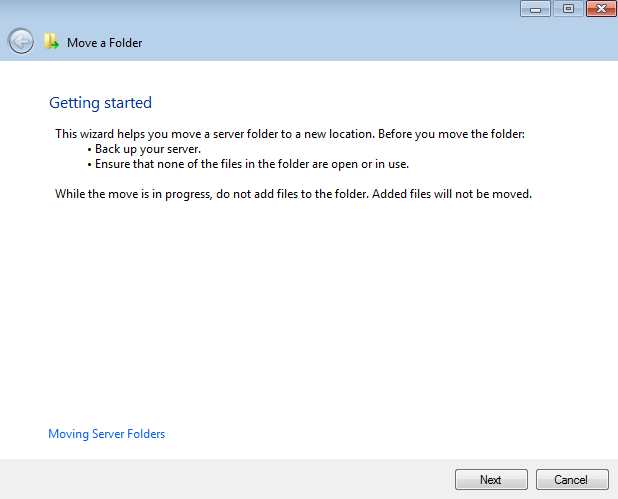
- The Move a Folder wizard will appear. Please read the text before clicking Next.
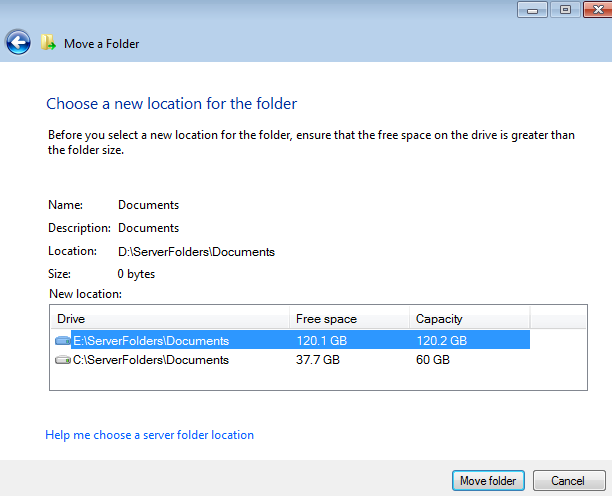
- Select a New location for the Shared Folder. In this example, we are moving Documents to the Data 2 [E] volume. The Windows [C] volume is also available if we require additional space for the Shared Folders. Click Move Folder once you have selected a New location.
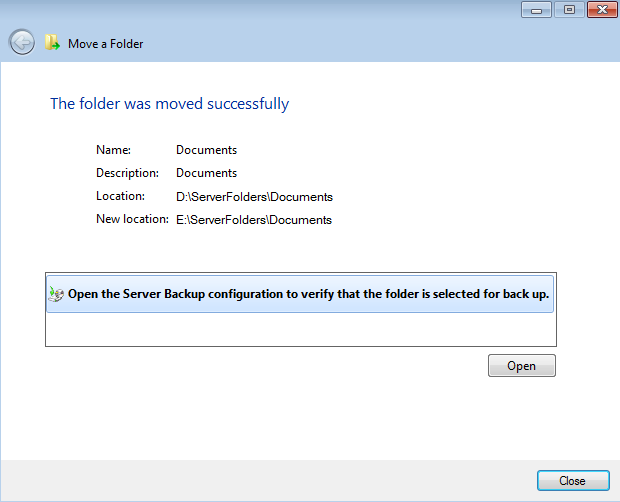
- A prompt will let you know when the Shared Folder has been moved. Click Close.
- Repeat the steps for each Shared Folder on Data [D].


Basic to Dynamic
If you are following the RAID configurations recommended in this Technical Brief, you will not have to convert the disks to Dynamic. Instead, Disk Management will make automatic conversions from Basic to Dynamic while building the System and Windows Mirrored sets and Data 2 RAID 5 array. If you find it necessary to convert any disk to Dynamic, please follow the instructions listed below. Though the directions come from a 5big Office/Office+ with three drives, the same procedure applies here.
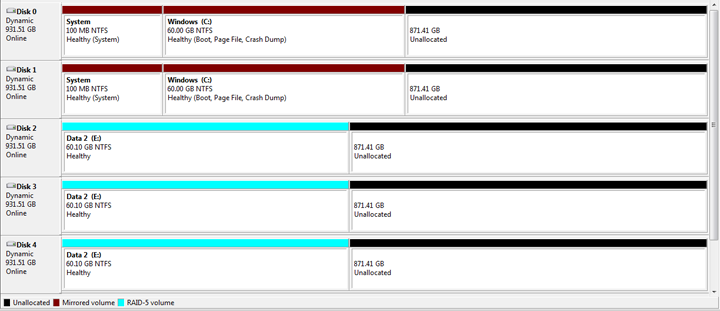
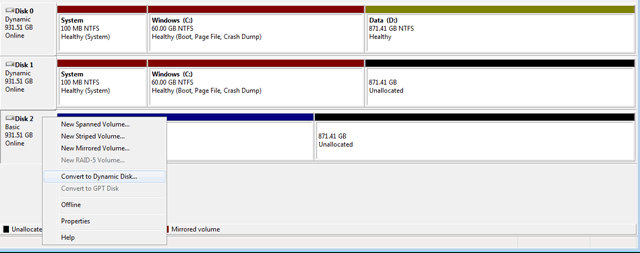
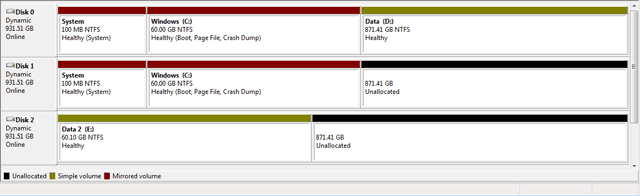
The screenshot below shows three hard drives as they appear in Disk Management. Please note that Disks 0 and 1 are listed as Dynamic while Disk 2 is Basic. A RAID 5 array only supports Dynamic disks.

To convert a disk from Basic to Dynamic:
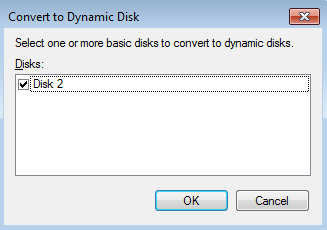
- Right-click on the disk icon on the left and select Convert to Dynamic Disk…
- A prompt will ask you to select the disks for conversion. For this example, select Disk 2 and click OK.
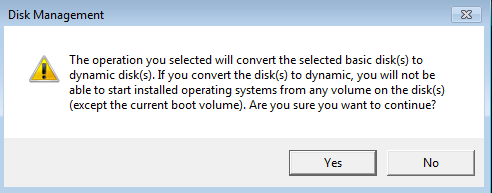
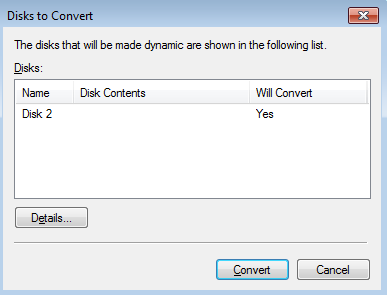
- The Disks to Convert window will ask you to confirm your selection. Click Convert.
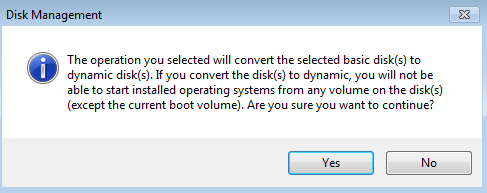
- Click Yes on the Disk Management prompt.
- The disk has been converted to Dynamic.


Delete Data [D]
Building a RAID 5 array requires a minimum of three Unallocated partitions. LaCie recommends combining partitions that share the same size since RAID 5 will always adhere to the lowest capacity. For example, a RAID 5 array using three disks of 50GB, 75GB, and 100GB will only offer 50GB to the user once the configuration is complete.
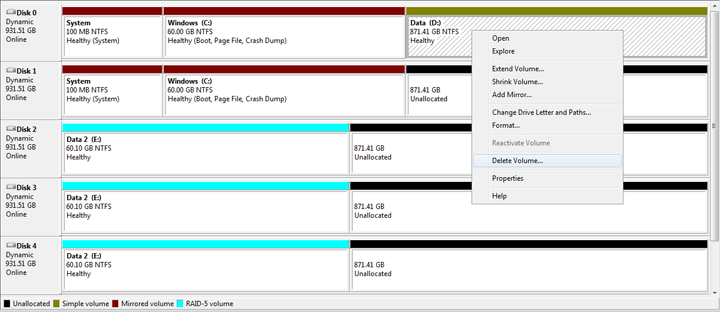
In our example, all disks have partitions that equal 871.41GB. However, the original Data [D] partition must be deleted in favor of an Unallocated section. Since deleting a volume is destructive, please make certain to copy all files that may be stored on Data [D] before following the steps below.
- Right-click on Data [D] to select Delete Volume…
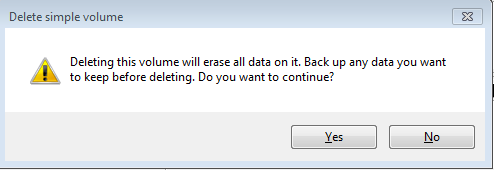
- If you have copied all data from Data [D], click Yes at the Delete simple volume prompt.
- You may receive a notice indicating that Data [D] is in use. Click Yes to continue.
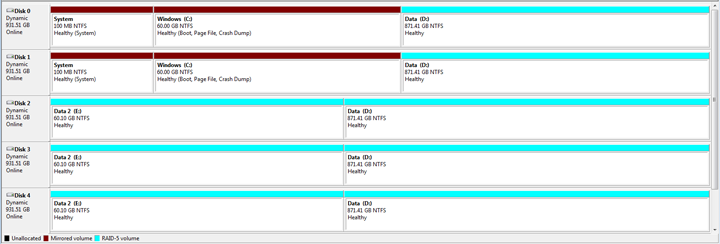
- Disk 0 now has an Unallocated partition.


Creating the Data RAID 5 Array
Before attempting to build the RAID 5 volume, please make certain to:
- Create the System and Windows Mirrored sets and the Data 2 RAID 5 array before the Data RAID 5 array.
- Follow the steps to prepare the disks for a RAID 5 array (Preparing the 5big Office/Office+ for RAID 5]]).
Create the RAID 5 Volume:
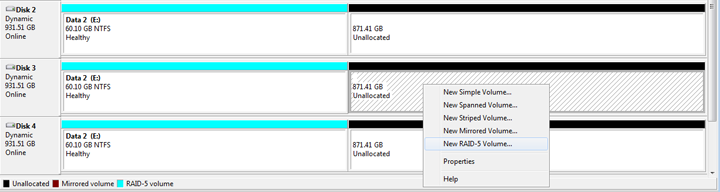
- Right-click on the Unallocated section of Disk 2, Disk 3, or Disk 4 to Select New RAID-5 Volume…. (You may not have the option to create a RAID 5 volume when right-clicking on the Unallocated sections of Disks 0 and 1.)
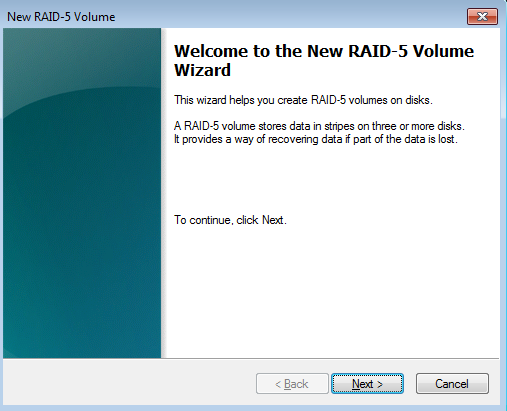
- The New RAID-5 Volume Wizard will open. Click Next.
- You will be prompted to select disks for the RAID 5 volume. Please select each disk and click Add.
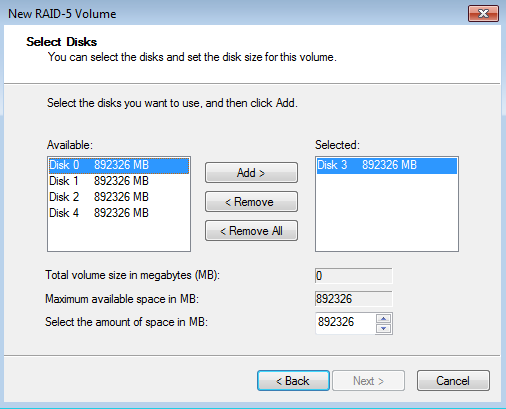
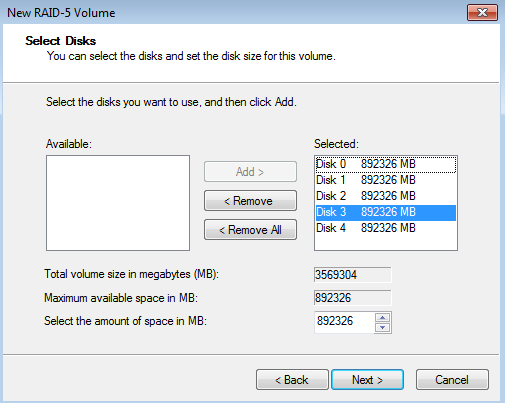
- Once all disks have been selected, click Next.
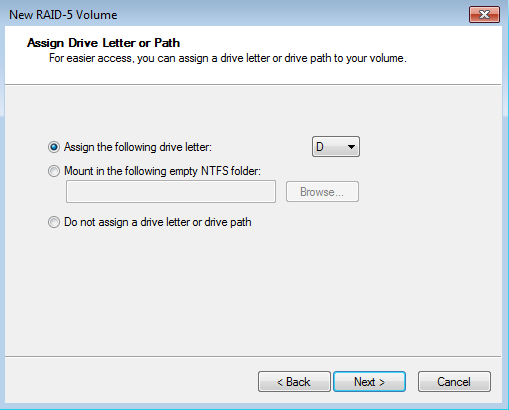
- LaCie recommends assigning the letter D to the RAID 5 volume. Click Next.
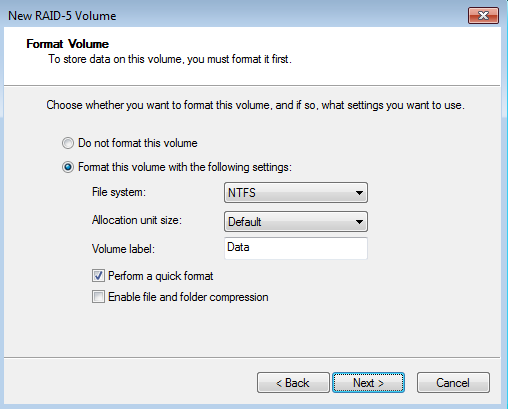
- LaCie recommends keeping the defaults NTFS and Perform a quick format. In this example, the RAID 5 volume is named Data. Click Next.
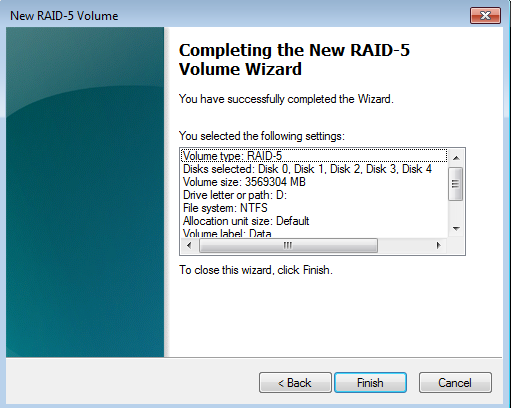
- Review the settings and click Finish.
- The RAID 5 volume will begin resynching. It may take up to a day to create the RAID 5 array.


Note on Shared Folders: Since Data [D] offers greater capacity, LaCie recommends moving the Shared Folders from the Data 2 [E] partition once the RAID 5 volume has been created. Go to Preparing the 5big Office/Office+ for RAID 5 for instructions on moving Shared Folders.
Note: Please keep the following in mind as Mirrored and/or RAID 5 volumes resync:
- Rebooting the 5big Office/Office+ while Disk Management is Resynching a Mirrored or RAID 5 volume will not harm the configuration or its data. However, since the process was interrupted, Disk Management will restart the resync at 0% once the 5big Office/Office+ has rebooted.
- Due to the capacity of the RAID 5 volume, rebooting while a resync is in progress could extend the operation for many hours.
- A volume that is in the midst of a resync may be accessed by workstations on the network. Users can perform common actions with the volume(s), such as reading files, writing files, or moving Shared Folders. However, performance will be degraded while Windows is resynching Mirrored and/or RAID 5 volumes.
© LaCie 2024
Last modified : Apr 23, 2013