Table of Contents
LaPlug User Manual
of this document for the most recent content as well as for features such as expandable illustrations, easier navigation, and search capability.
Introduction
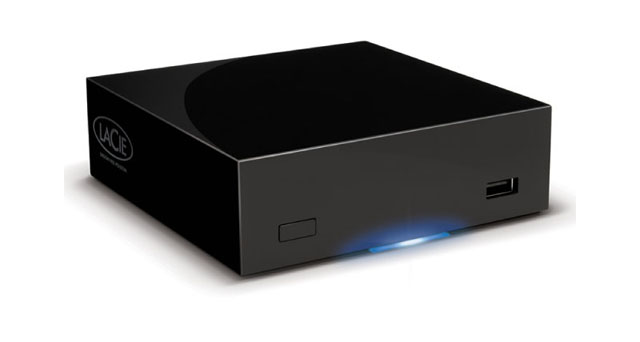 Congratulations on your purchase of a LaPlug. This cutting-edge media adapter will allow you to bring your existing storage devices onto the network, making stored files available throughout the house.
This manual will guide you through the process of connecting your LaCie product to your network and will assist you in troubleshooting any issues that might arise. If you encounter problems, check Getting Help. Note that most user problems can be resolved by resetting the product to factory conditions (see Update Product Software).
Box Content
- Computer with an Ethernet network adapter
- Latest version of Windows® XP, Windows Vista®, Windows 7/ Mac® OS X 10.5, 10.6 / Linux 2.6
- Minimum free disk space: 600MB recommended
- Ethernet switch or router
- Wi-Fi access point for wireless connection
- Web browsers: Internet Explorer® 7.0, Firefox® 3.0, Safari® 3.0, or Chrome 2.0 or higher
- USB external hard disk or USB key
Minimum System Requirements
- Computer with a USB port and Ethernet network adapter
- Latest version of Windows® XP; Windows Vista®, Windows 7 / Mac® OS X 10.5, 10.6 / Linux 2.6
- Minimum free disk space: 600MB recommended
- Ethernet switch or router 10/100/1000Mbits
- Web browsers: Internet Explorer® 7.0, Firefox® 3.0, Safari® 3.0, or Chrome 2.0 or higher
Views of the Drives
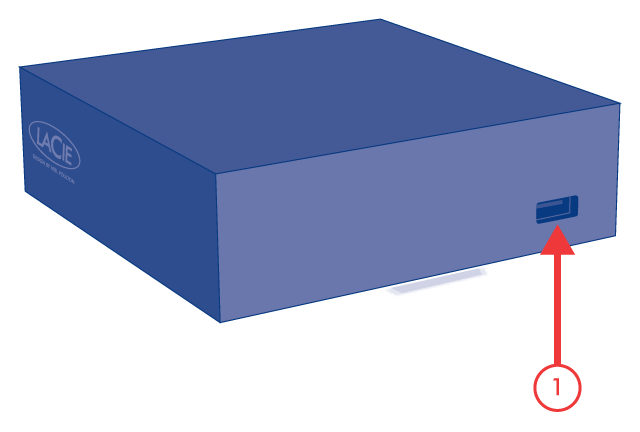
Front View
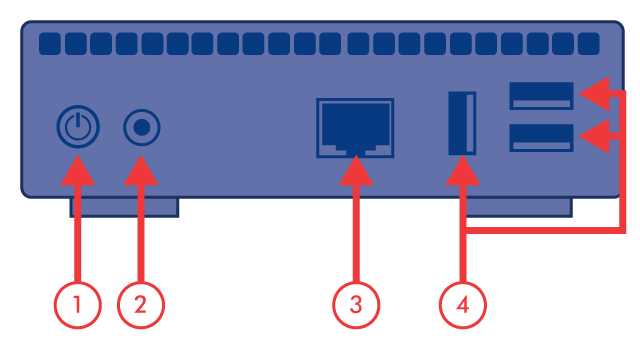
Rear View
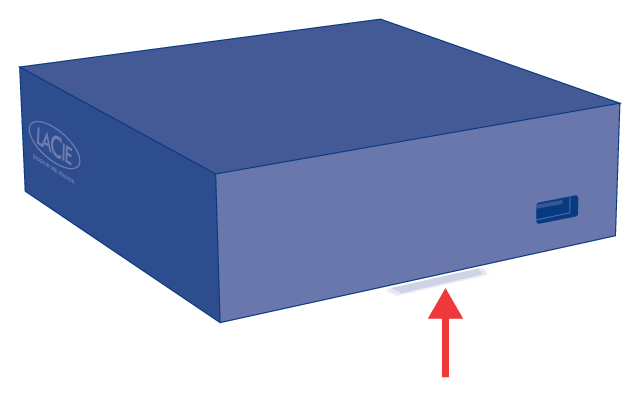
LED Behavior
The front LED changes to indicate different drive behavior. The following table sums up these behaviors.
| State | Indication |
|---|---|
| Solid blue | Product is idle |
| Slow blinking blue | Product is starting up |
| Solid red | System is shutting down |
| Slow blinking red | USB power failure (see Installation) |
| Firmware upgrade failure | |
| Slow blinking blue and red | WiFi enabled but not connected to a network |
| Fast blinking blue and red | Firmware upgrade in process |
Power Button Functions
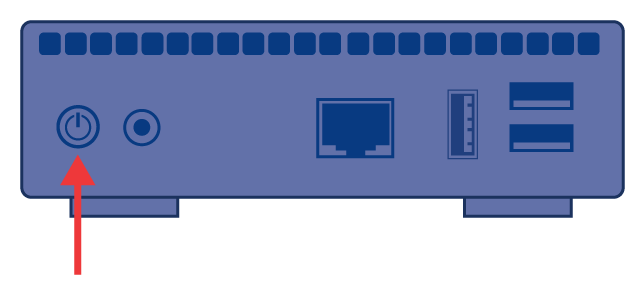
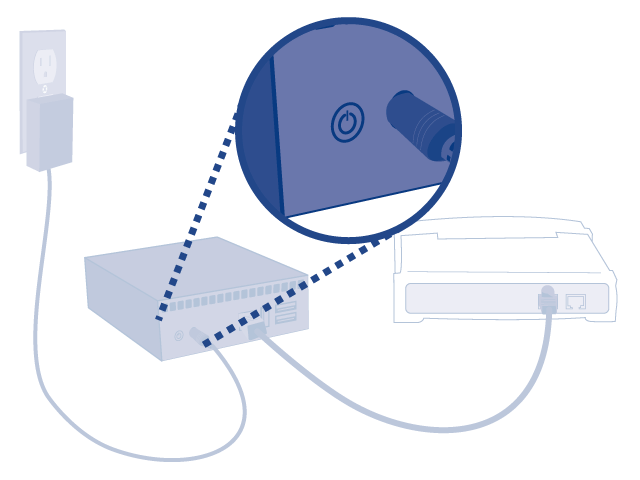
- Turn the product on: Push the power button until the front LED turns blue. Release the button and the LED will flash blue. Then the product will boot, which may take up to two minutes. When the light becomes steady blue, the product is ready to use.
- Turn the product off: Press and hold the power button until the light slowly flashes blue. The product will then:
- Stop file transfers
- Unmount volumes
- Shut down
- Restore Default Configuration: See Update Product Software.
Installation
This chapter explains how to connect your LaPlug to your network. Simply install LaCie Network Assistant, a small utility which will help you to discover and configure your product, then connect the LaPlug to the network.
Follow the steps below to get your product up and running. After you finish installation, move on to Access USB Devices or Administer the LaPlug.
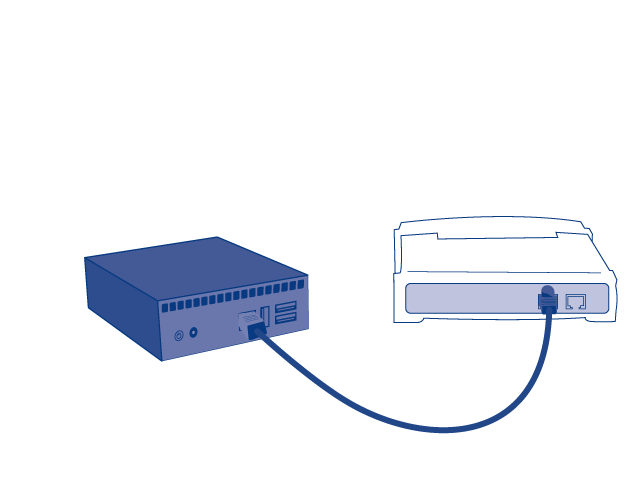
1 - Connect the Ethernet Cable
- Connect the Ethernet cable to the Ethernet port on the back of the product.
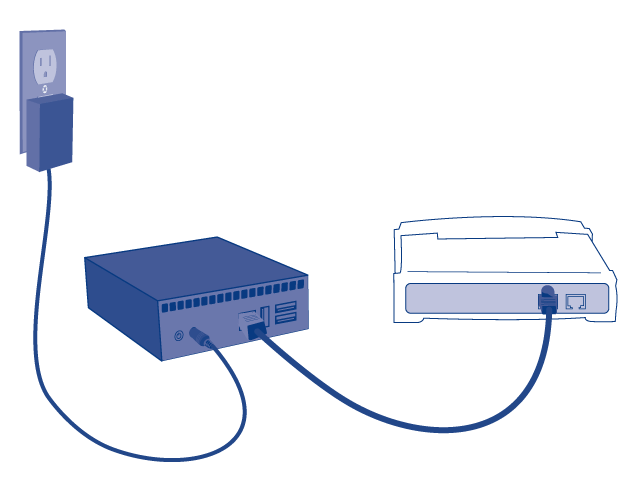
2 - Connect the Power Supply
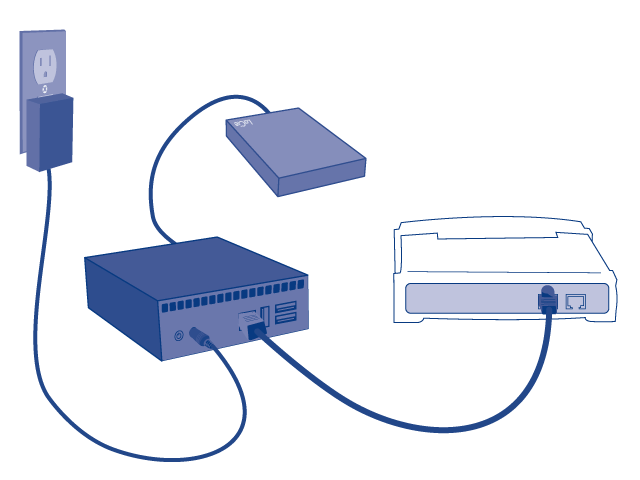
3 - Connect USB Devices
Refer to USB Power Failure for more information.
4 - Install LaCie Network Assistant
Lacie Network Assistant detects all LaCie network-attached storage devices on your network and gives you easy ways to connect to or configure them.
- Insert the CD-ROM into your computer's CD-ROM drive.
- Windows users, the CD should appear in My Computer or Computer. Mac users, the CD should appear on the Desktop. Double-click the CD icon, then double-click LaCie Network Assistant Setup.
- Follow the Wizard to complete installation.
Access USB Devices
You have several options for accessing the USB devices you have connected to your LaCie product.
Option 1
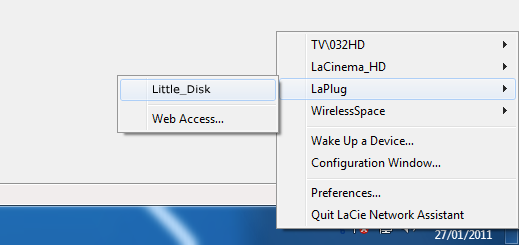
- Launch LaCie Network Assistant.
- Windows Users:
- Select LaCie Network Assistant in Start/Programs. A Network Assistant icon will appear in the system tray and LaCie Network Assistant will automatically detect your LaCie product on the network.
- Mac Users:
- Select LaCie Network Assistant in your Applications folder. A Network Assistant icon will appear in the system tray and LaCie Network Assistant will automatically detect your LaCie product on the network.
- If you are prompted for a username/password, enter your username and password (by default):
Username = admin
Password = admin
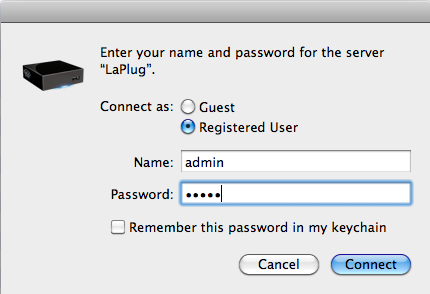
If you have changed the username/password from the default admin/admin (see Administer the LaPlug), enter your new credentials.
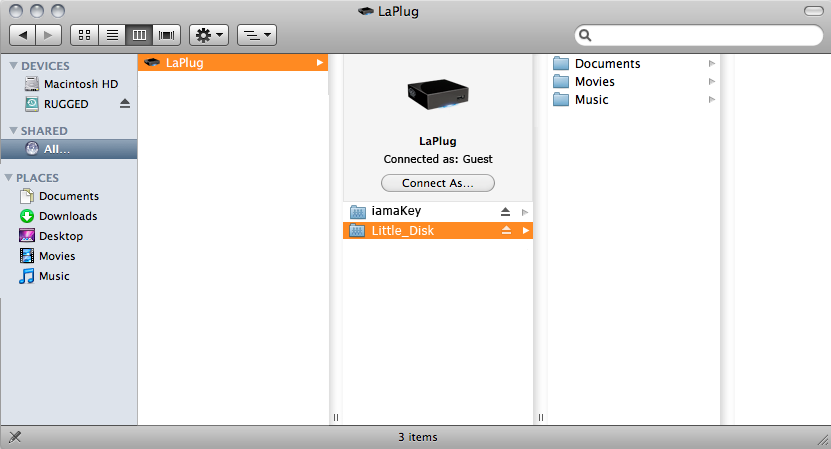
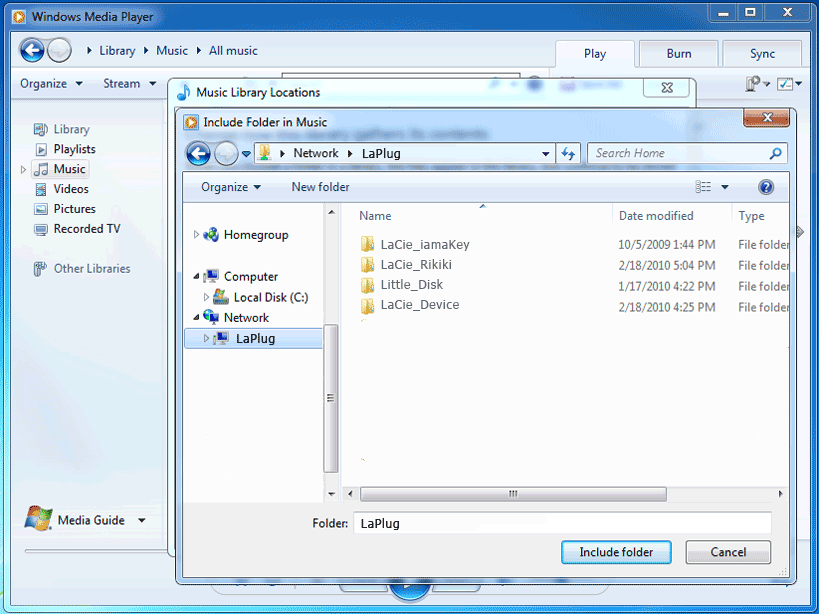
- Transfer files normally between your computer and the USB device. Mac users: If the USB device does not open in a Finder window, simply navigate in the Finder to Network > LaPlug > [disk name].
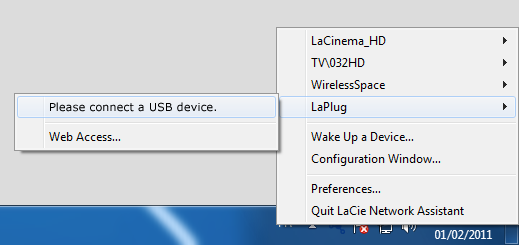
If no USB device is recognized, instead of the USB device name, you will see the text Please connect a USB device. Make sure your device is connected and that it has been formatted. Refer to your device's user manual for formatting procedure.
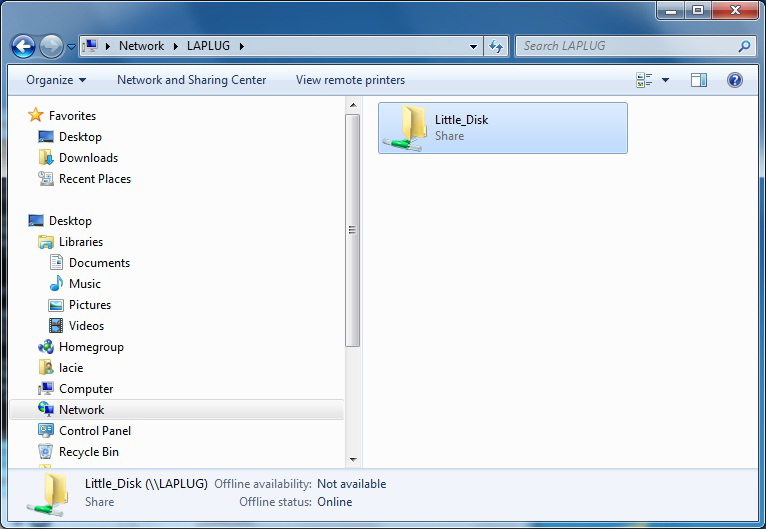
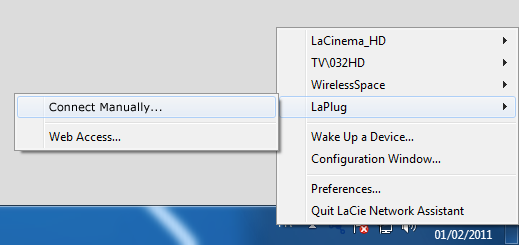
If you see the text Connect Manually instead of the USB device name, click Connect Manually. A Finder window (Mac) or Explorer window (PC) will open, listing all the USB devices connected to your LaPlug.
Option 2
Mac Users
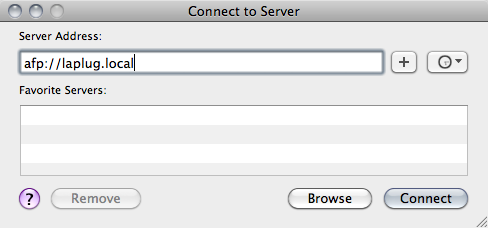
- In your Finder, navigate to Go > Connect to Server.
- In the dialogue window that opens, type one of the following:
afp://laplug.local
smb://laplug.local
afp://[IP address]
smb://[IP address]
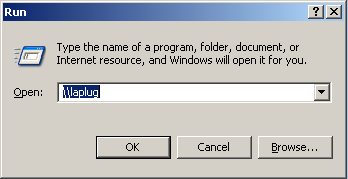
Windows XP Users
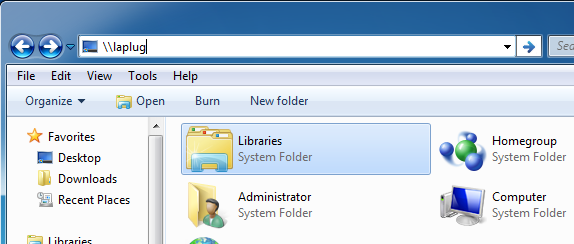
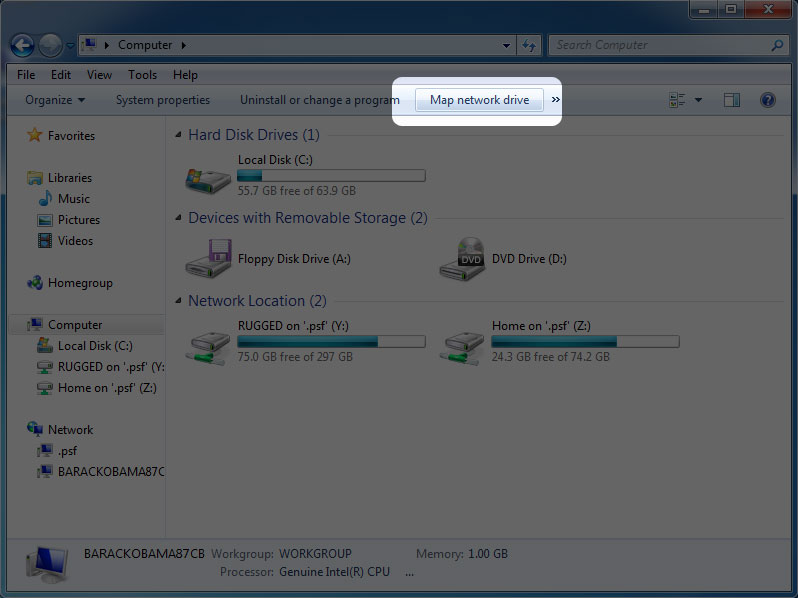
Windows 7 and Vista Users
Option 3
- Launch LaCie Network Assistant.
- Windows Users: Select LaCie Network Assistant in Start/Programs. A Network Assistant icon will appear in the system tray and LaCie Network Assistant will automatically detect your LaCie product on the network.
- Mac Users: Select LaCie Network Assistant in your Applications folder. A Network Assistant icon will appear in the system tray and LaCie Network Assistant will automatically detect your LaCie product on the network.
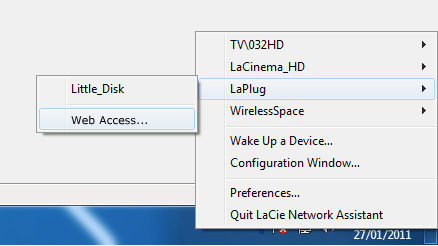
- Right-click the icon in the system tray (Windows) or click the icon in the menu bar (Mac) and select Configuration Window.
- Double-click the USB device you wish to access. The USB device will open in a Finder window (Mac) or an Explorer window (Windows). Transfer files normally from your computer to the USB device.
Administer the LaPlug
The LaCie LaPlug features an easy-to-use browser-based tool for configuring the drive called the Dashboard.
Dashboard - Accessing
There are two ways to access the Dashboard, using the LaCie Network Assistant and using a browser.
Use LaCie Network Assistant
- The LaCie LaPlug login page will open in a new browser window or tab. If your browser is not open, LaCie Network Assistant will open it for you.
- Click Log in.
Use a Browser
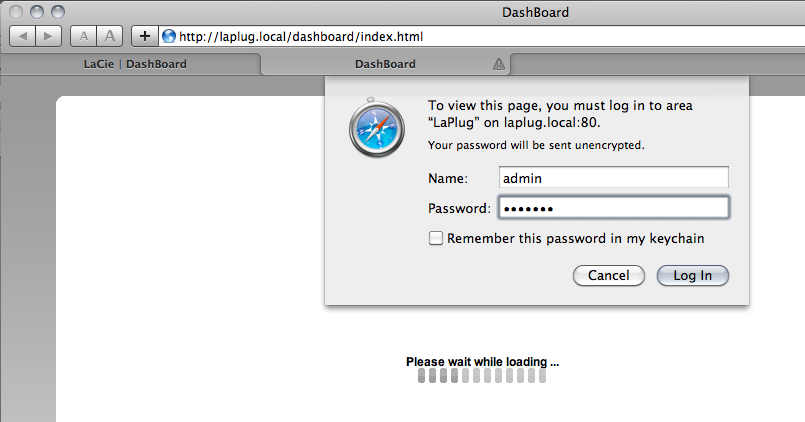
- Open your Internet browser (Firefox, Internet Explorer, Safari, etc.) and type your LaCie LaPlug's IP address or machine name (by default, LaPlug) in the browser's URL (web address) field.
For example: http://[IP-address] or http://LaPlug (Windows) http://LaPlug.local (Mac)


- In the login prompt, enter your username and password (case sensitive; default is admin/admin).
- Click Log in.
Dashboard - Home
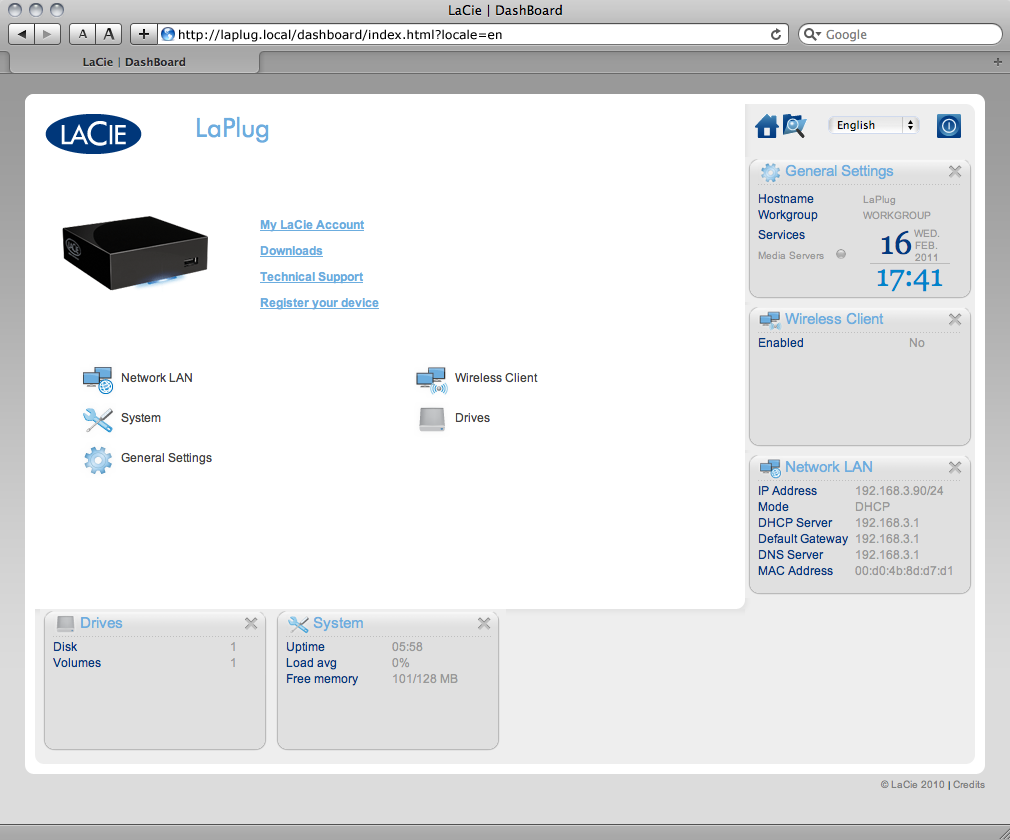
The welcome page contains links to helpful documents from the LaCie website and a list of the different pages that make up the Dashboard.
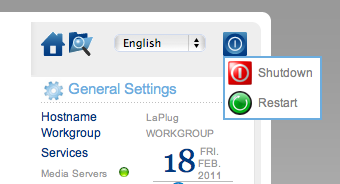
Restart or Shutdown
Dashboard - Navigation
The Dashboard is made up of a central area surrounded by widgets, or small boxes that represent the different pages that make up the Dashboard. The widget displays a summary of the information contained in the page. For full information, navigate to the page itself.
- To navigate to a page, click the widget below its title; or, drag and drop a widget to the center of the window.
- To minimize a widget, click the X next to its title.
- To expand a minimized widget, drag its icon over an expanded widget or to an open widget space.
- To rearrange widgets, drag the minimized widget icon or the expanded widget's heading onto the place of another widget.
Dashboard - Drives
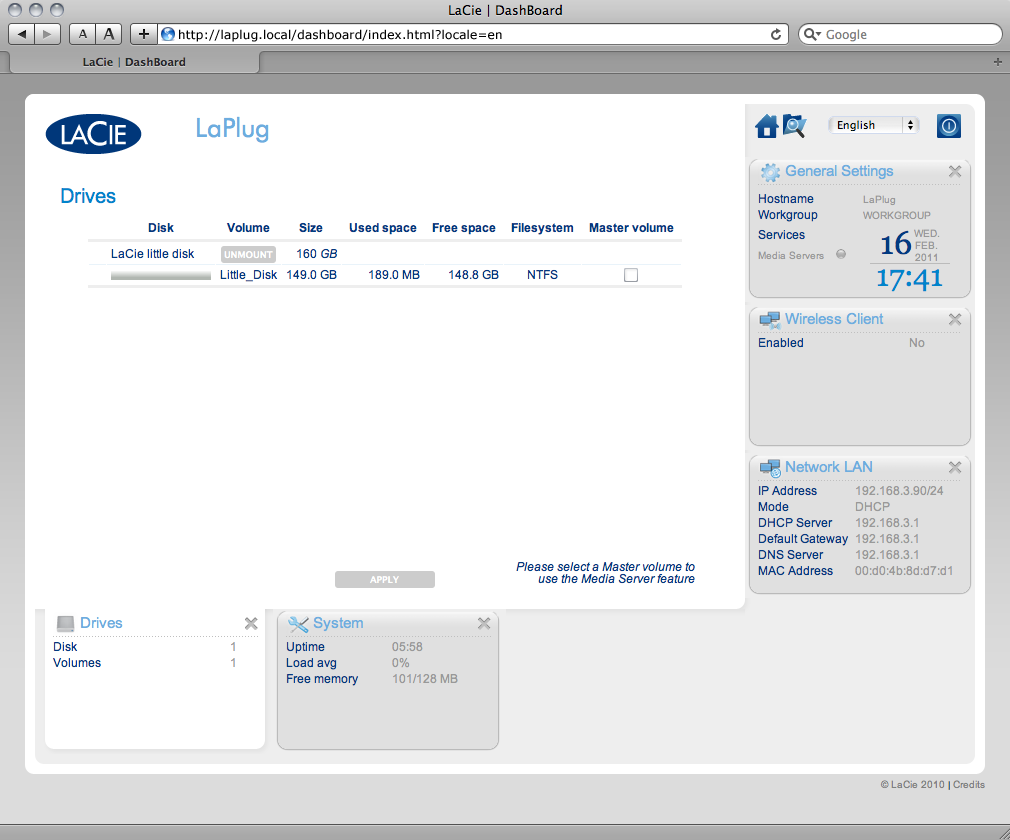
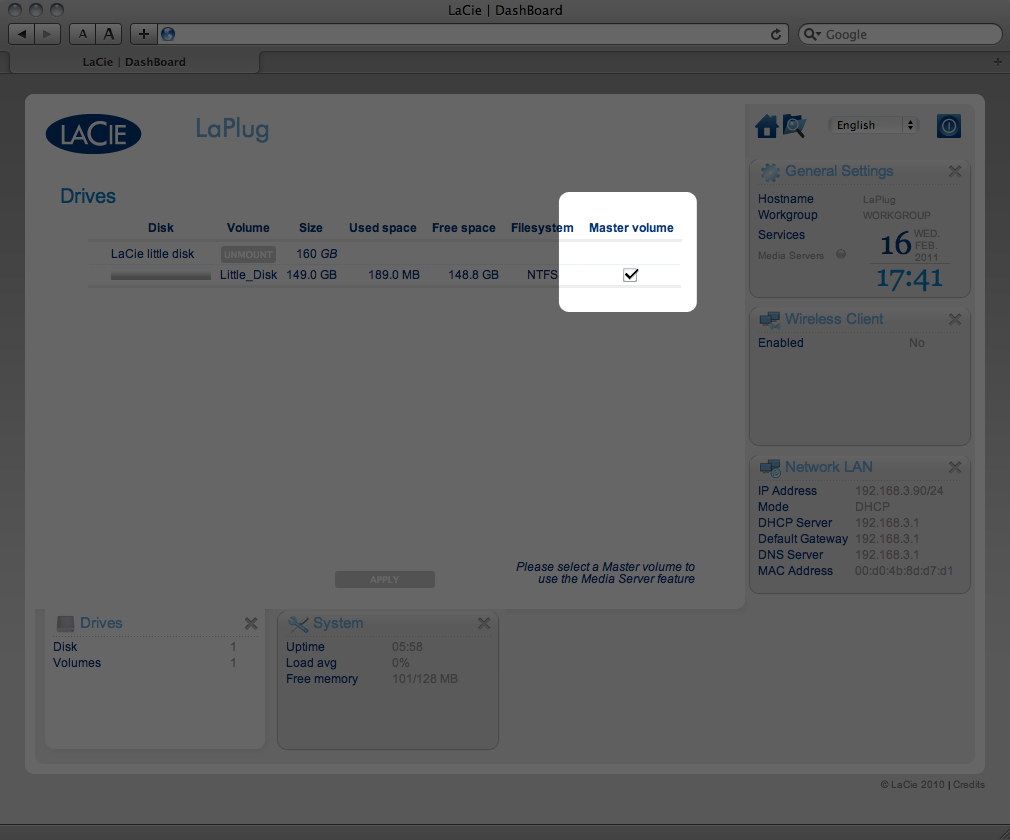
This page will list all the USB devices connected to your LaPlug.
Every USB device will take up at least two rows in the table; the first row describes the disk, and its volumes (or partitions) each take up an additional row(s). So a disk with a single partition will take up two rows, and a disk with two partitions will take up three rows, etc.
- Disk: This column will normally list the drive's manufacturer (or a graphical indication of free space for partitions).
- Volume: This column lists a button to unmount the disk or the name of the drive's partition.
- Unmount: To prevent file system corruption, it's important to unmount a drive by clicking this button before unplugging it.
- Size: Indicates the drive's total capacity.
- Used Space: Indicates how much of the disk's capacity is in use.
- Free Space: Indicates how much of the disk's capacity is available.
- File System: Indicates the drive's file system.
- Master Volume: One of the attached drives must be designated as the master volume in order for the Media Server feature to function. See Media Servers.
USB Power Failure
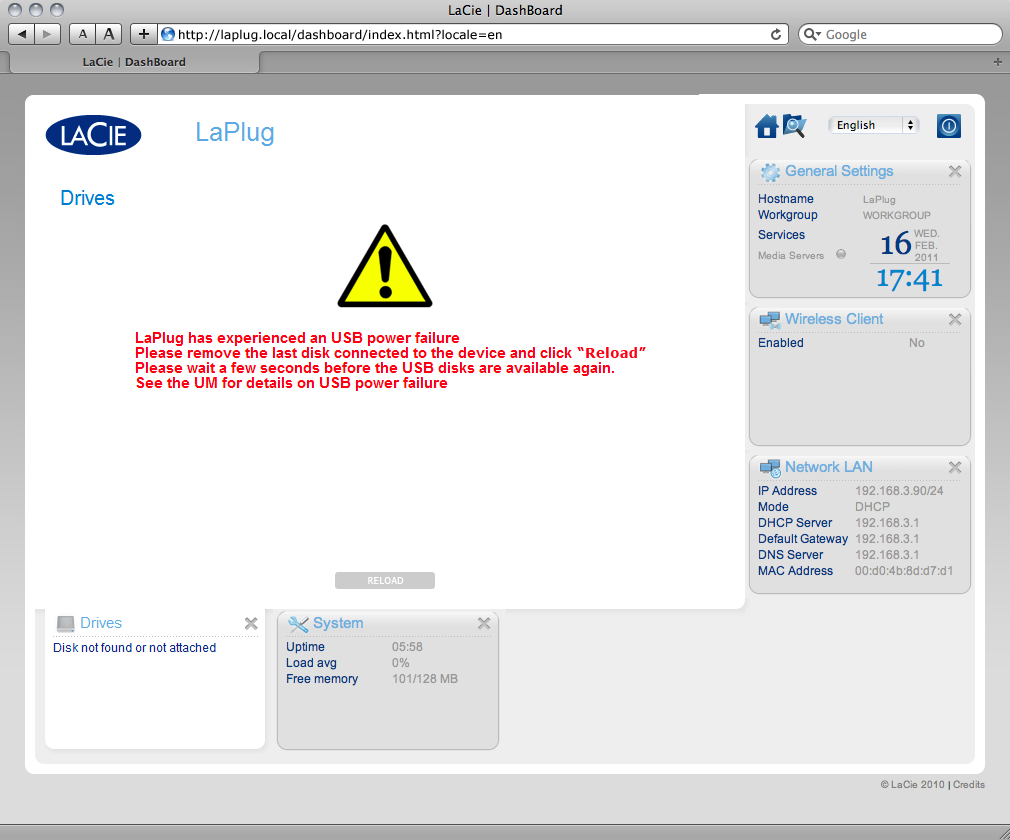
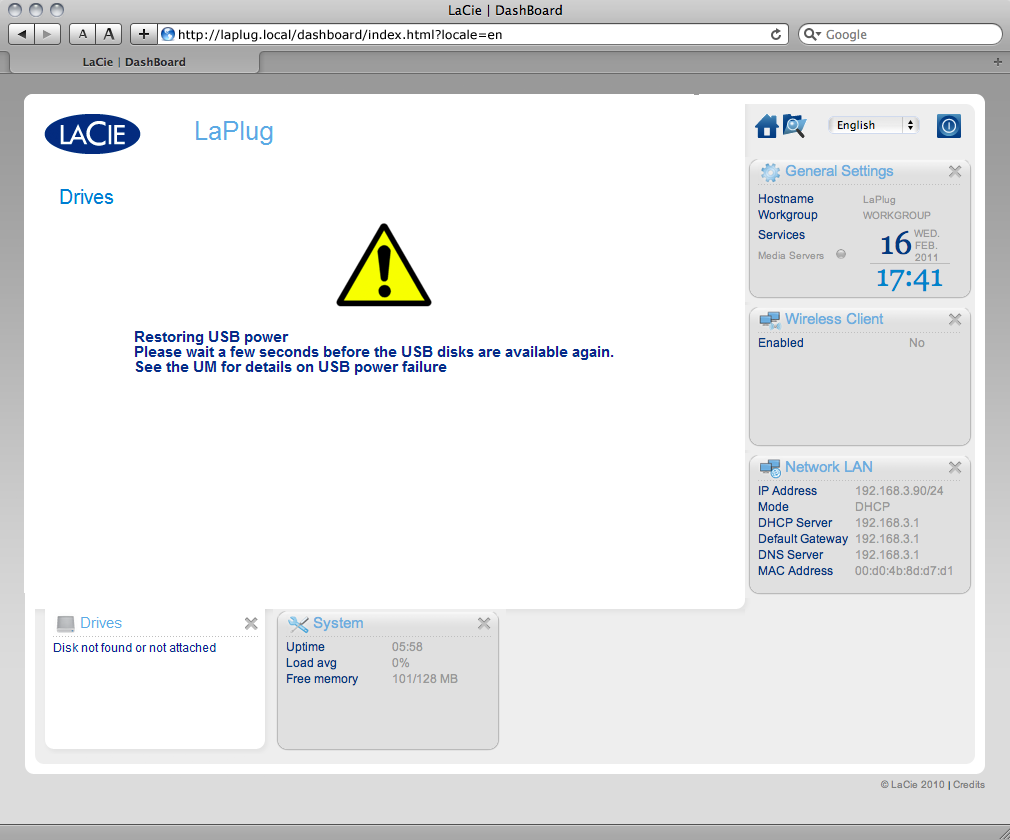
If you connect hard drive(s) to the LaPlug that experience a USB failure, the LED will blink red, all connected USB devices will become inaccessible, and you will receive an error on the Dashboard. USB failures could be the result of a defective USB device or USB cable, or insufficient power being supplied to the USB device.
To resolve the issue, unplug the last-connected USB device. Next:
- Launch the Dashboard (see Dashboard - Accessing).
- After a few seconds, the blinking red LED will turn blue, and the Dashboard > Drives page will list any connected USB devices.
Dashboard - Network LAN
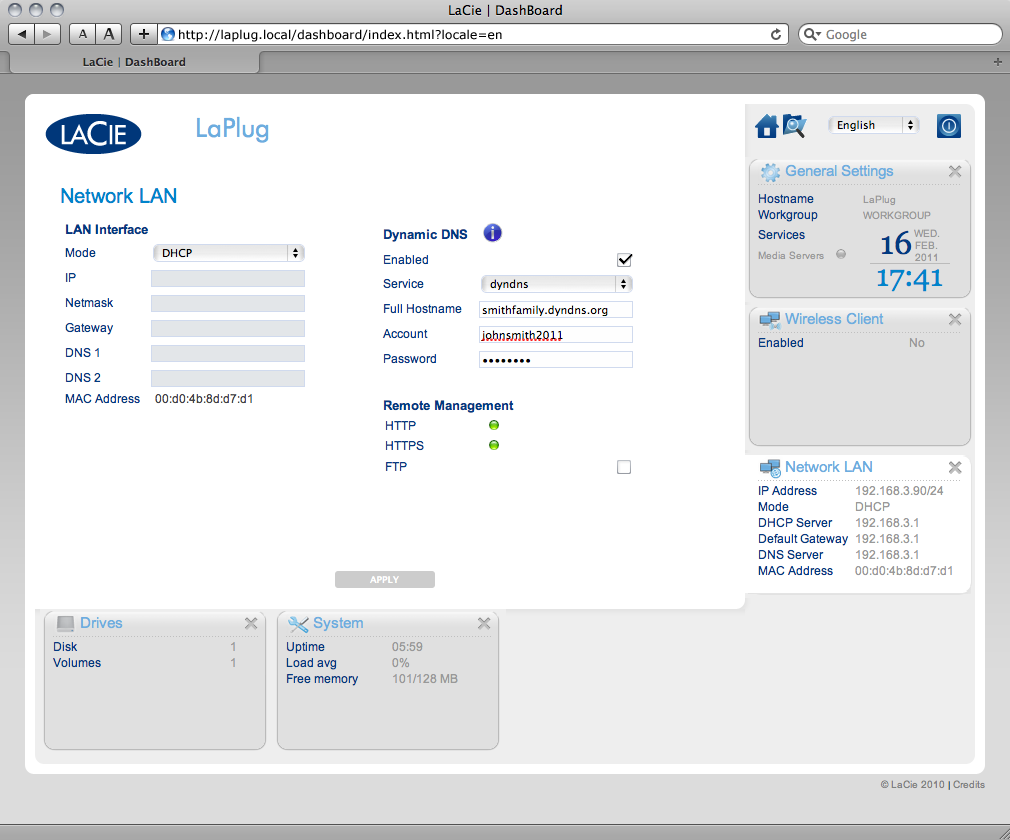
LAN Interface
Mode: Choose whether the LaPlug should be automatically assigned an IP address and other values by your DHCP-managed network (DHCP), or if values should be assigned manually (Static). If you choose static, you will be able to type in the fields below.
Dynamic DNS (Remote Access)
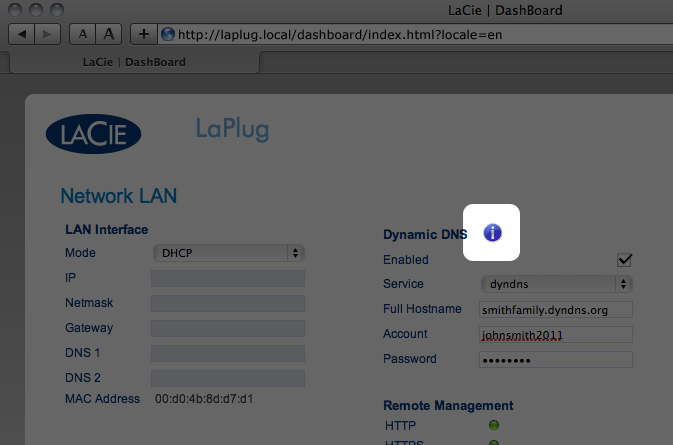
Click the Enabled box, then select a service and fill out the fields below. This function allows you to use a third party Dynamic DNS service to create an easy-to-remember URL for accessing your LaPlug remotely. This service is free and no subscription is required. For details and to watch a screencast which will help you to set up remote access, click the i button next to the headline Dynamic DNS.
Remote Management
- HTTP/HTTPS: These lights will be green if the UPnP IGD server acknowledges port forwarding is successful.
- FTP: Toggle this feature on/off to allow your LaPlug to be accessible via File Transfer Protocol (FTP). See Access USB Devices for details.
After modifying any of the above settings, click the Apply button.
Dashboard - Wireless Client
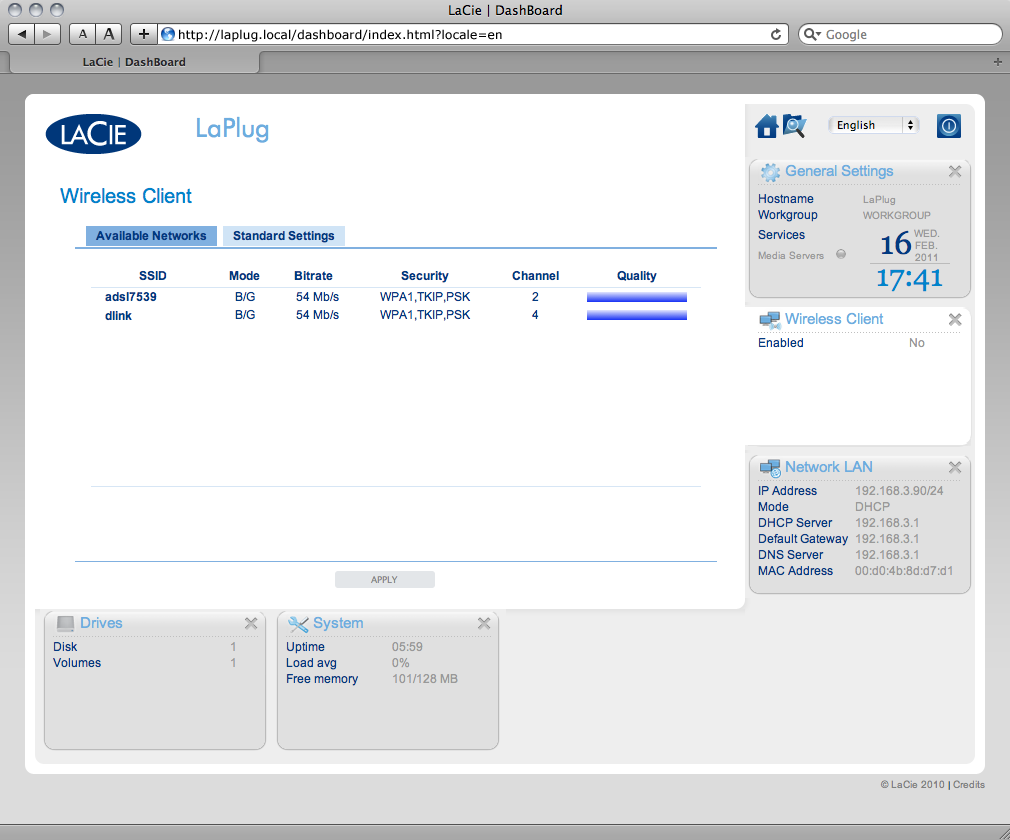
This page will allow you to connect your LaPlug to your wireless network. Note that Ethernet is the default connection, so you must initially connect the LaPlug to your network via the Ethernet cable. After successfully connecting to a wireless network, simply disconnect the Ethernet cable.
Available Networks Tab
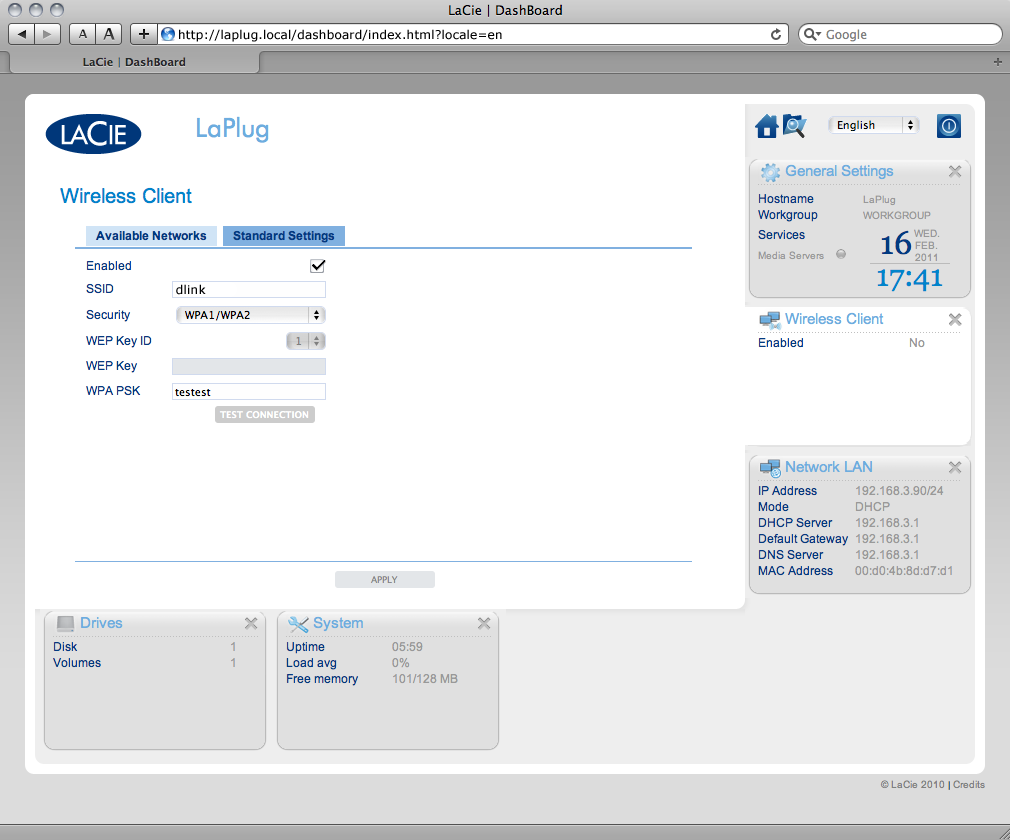
All detected wireless networks will be listed as well as their technical specifications. To connect to a wireless network:
- Select the WEP key ID, fill in the WEP key, or fill in the WEP PSK (whichever is applicable).
- Click the Test Connection button. If successful, a green light will appear.
- Click the Apply button to make the connection.
- Unplug the Ethernet cable.
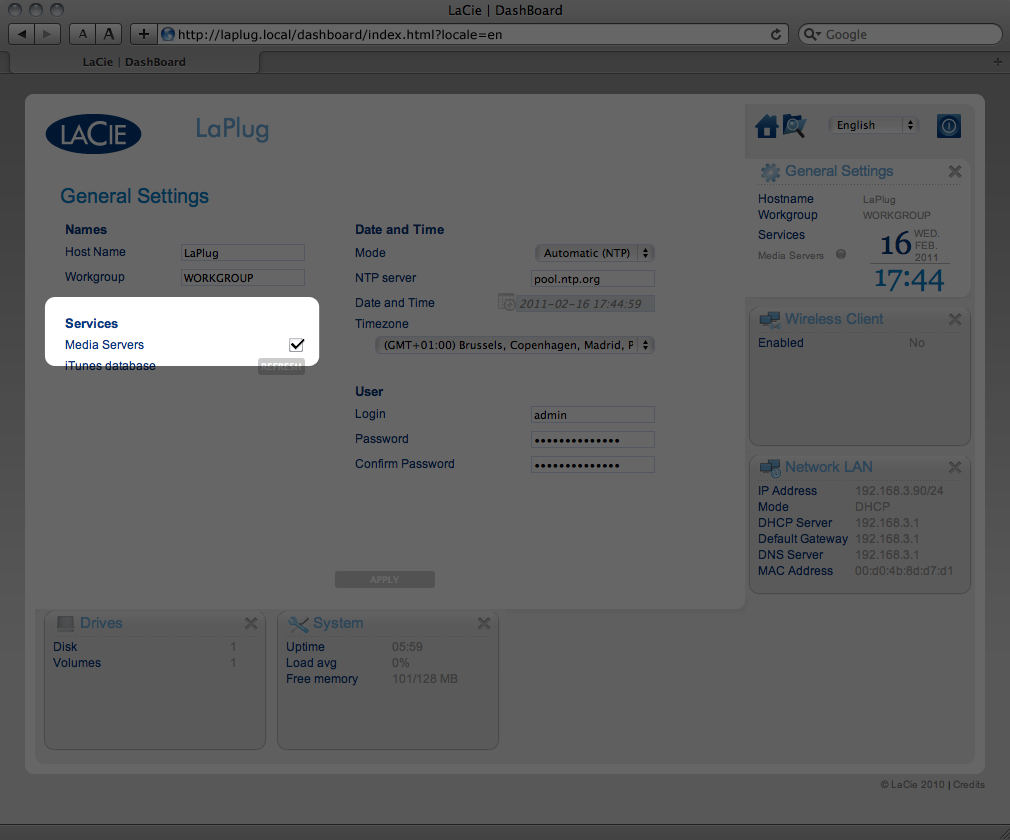
Dashboard - General Settings
Names
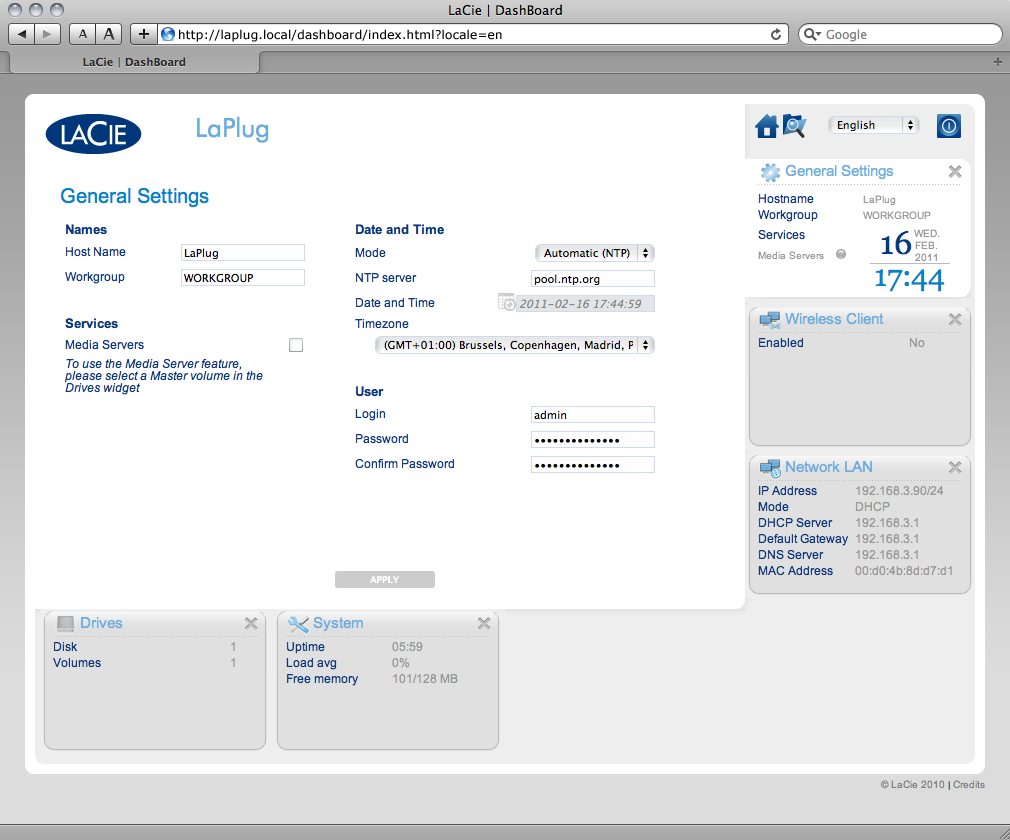
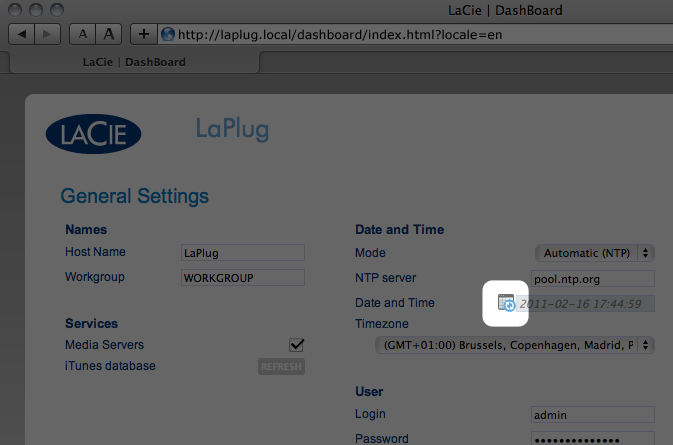
- Host Name: Modify the machine name. The machine name identifies your LaPlug in LaCie Network Assistant and on the local network. The machine name is limited to 15 characters. Please use alphanumeric characters without spaces or symbols.
- Workgroup: Type a Windows workgroup name to connect your LaPlug to a Windows workgroup.
Services
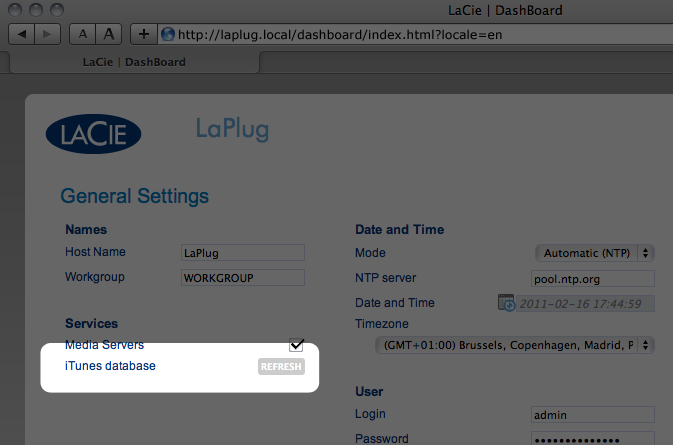
- Media Servers: This feature allows your LaPlug to act as a UPnP multimedia server. Files stored on USB devices connected to the LaPlug will be available to play on UPnP-enabled players (such as cell phones, computers, and game consoles). A master volume must be selected in Dashboard > Drives to use this media server feature. For information on using your LaPlug to stream files to your UPnP devices including iTunes, see Media Servers. Note that if you've just added new content to the LaPlug, it could take a few minutes before they are available to UPnP/DLNA-certified players/adapters.
Date and Time
- Timezone: Choose your timezone.
User
- Login: Change the username used to access the Dashboard and USB devices (using the Finder for Mac users or Explorer Window for Windows users).
- Password: Change the password used to access the Dashboard and USB devices.
- Confirm Password: Retype the password.
After you modify any of the above parameters, click the Apply button.
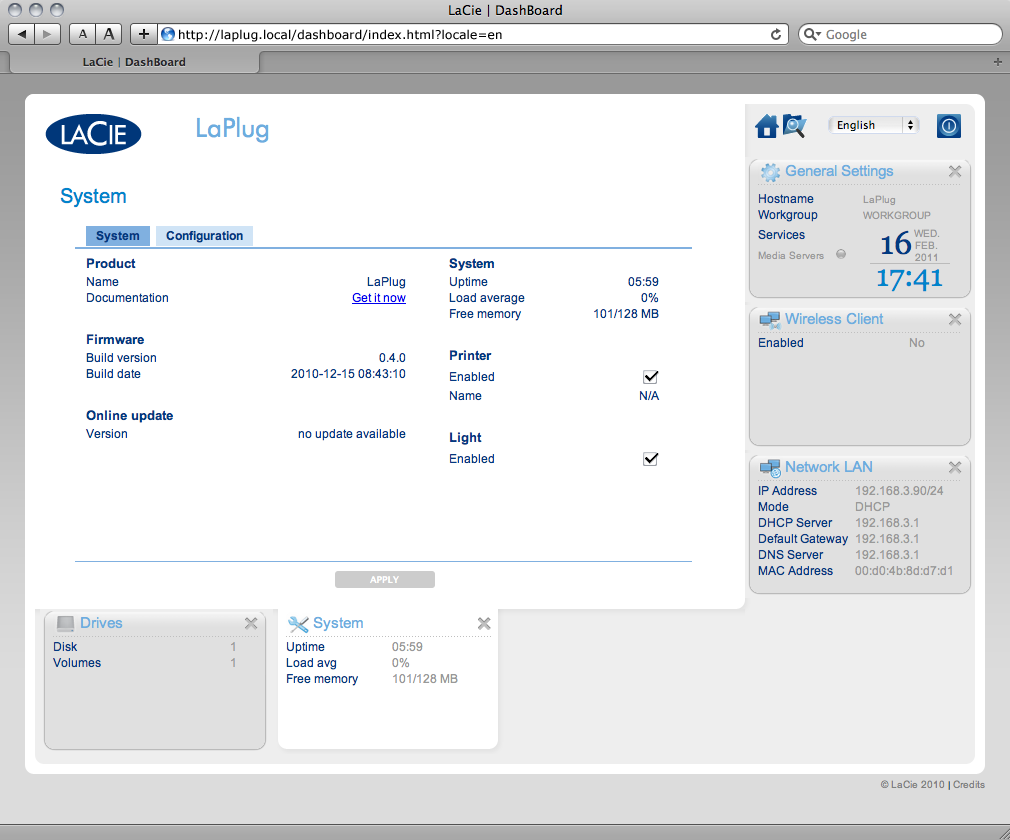
Dashboard - System
System Tab
Online Update
Printer
You can connect a compatible USB printer to one of the LaPlug's USB ports to make that printer available throughout your network. Note that your printer must be compatible with the CUPS (Common Unix Printing System) standard. Check your printer manufacturer's website to verify.
Follow these steps:
- Make sure the LaPlug is connected and visible on your network.
- Make sure that your printer's drivers have been installed on the computer from which you want to print.
- Connect the printer's USB cable to the LaPlug and power on the printer.
- Windows users: To simplify the process of discovering your printer on the network, install Apple's Bonjour Print Services for Windows software. For more information and to download, see support.apple.com/kb/DL999. Once you install the software, it will help you discover and configure your networked printer.
- Print normally.
Light
Uncheck this box to turn off the front LED.
Configuration Tab
Dashboard - File Browser
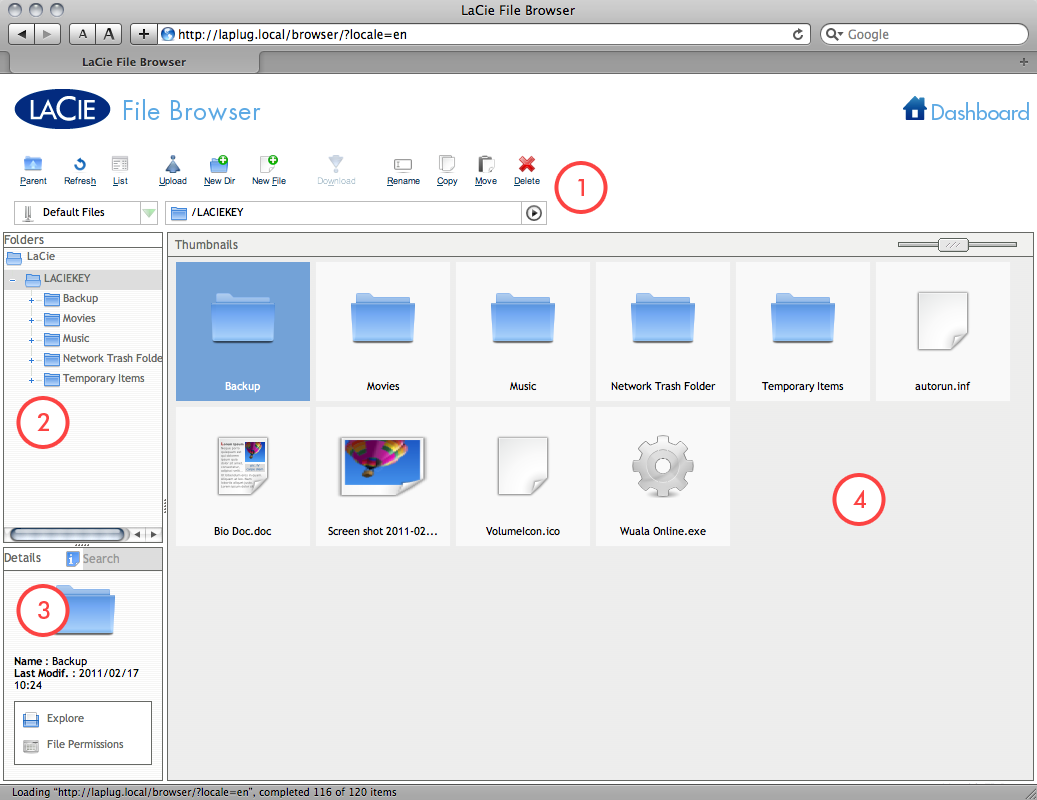
The Dashboard features an interactive file browser that allows you to manage and transfer files via HTTP. Access the File Browser by clicking its icon in the upper right-hand corner of the Dashboard.
The File Browser allows you to transfer, copy, and delete files, as well as view photos in thumbnails and even stream multimedia content such as mp3 or view photos. It is thus a convenient way to interact with files stored on your external hard drives through the network, whether the connection be through the local network or through the internet (see Remote Access). Also, since the File Browser permits faster file transfer than drag-and-drop (SMB), it is most effective for transferring large files.
The File Browser is composed of five parts:
- The toolbar allows you to perform a range of functions, such as changing the way files are displayed and uploading files to streaming files and creating folders.
- Folders shows the folder structure on the selected share.
- Details displays information on a selected file, such as name, thumbnail (image files), file type, dimensions (photos), or duration (videos), while Search allows you to search for files based on file name.
- This section displays the files contained in a selected folder. To view the files as thumbnails, click Thumbs in the Tool bar.
You can view photos full-size as well as stream certain types of music and text files. Select the file, then:
Advanced Accessibility Features
This chapter will describe your LaCie product's advanced accessibility features such as remote access, creating shortcuts to your USB devices on the network, and multimedia streaming.
Remote Access
You can access files stored on the USB devices connected to your LaPlug when you are away from home. You can download or upload files from any computer connected to the Internet, or manage your LaPlug.
LaCie has created a screencast that demonstrates this process. Either click here to follow the link, or alternatively, from the Dashboard > Network page, click the “i” next to the Remote Access heading to access the screencast.
For further information on network settings, see Dashboard - Network LAN.
Once connected, it is easy to access your files using the web browser-based File Browser. You can upload, download, and stream many types of multimedia files such as mp3. For more information on the File Browser, see Dashboard - File Browser.
Creating Shortcuts to USB Devices
Once you successfully set up your LaPlug and connect a USB device(s), you can create shortcuts so you can quickly access stored files. You can do this by using your operating system or LaCie Network Assistant.
Create Shortcut Using LaCie Network Assistant
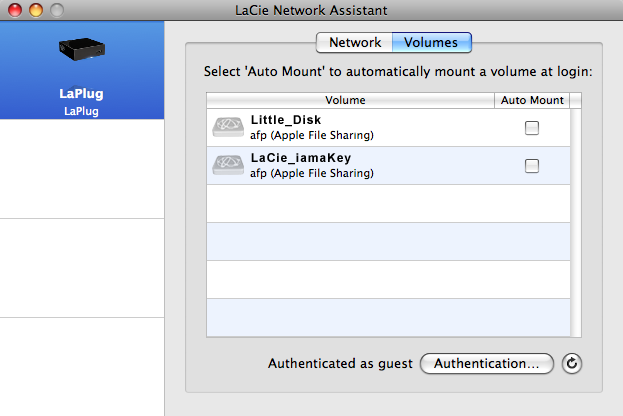
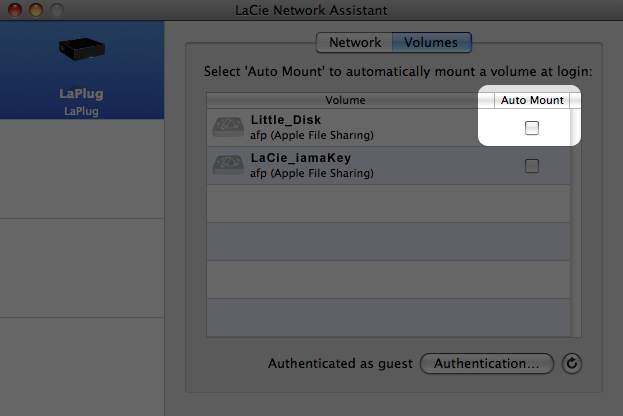
LaCie Network Assistant (LNA) can be configured to automatically mount USB devices on your computer, which allows you quick access to the files they store. To create this shortcut to USB devices using LNA, follow the steps below:
- From the LNA menu, click Configuration Window.
- Select LaPlug from the left-hand column.
- Click the Volumes tab.
- PC users: The USB device will mount in My Computer/Computer automatically when the computer detects it on the network.
Mac users: The USB device volume icon will appear on your desktop and in your Finder automatically when the computer detects it on the network.
Create Shortcut Using Operating System
If you would like a shortcut to accessing USB devices, follow this procedure.
Windows XP, Vista, and Windows 7 Users
- Browse to and select the device you wish to auto mount.
- Windows will offer the option to mount the device each time you log on to the computer.
- Repeat steps 1-3 for other devices.
Mac Users
- Open a new Finder window. On the left of the window, navigate to Shared > LaPlug > [device name]. If prompted, type in your username and password and click Connect.
- Repeat step 1 for each device.
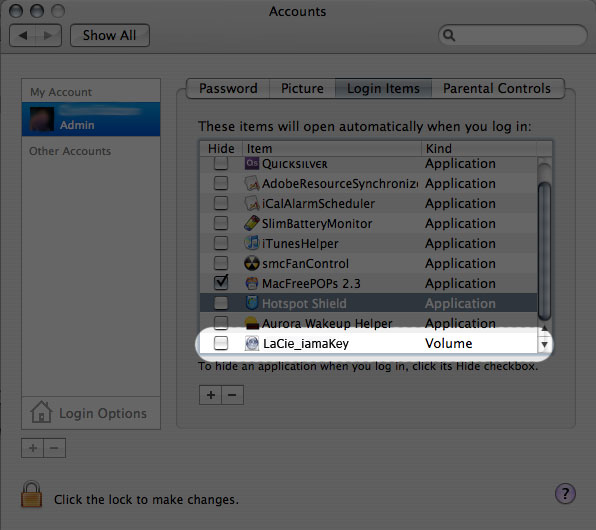
- To mount the device automatically each time you log on to you computer:
- From the Apple icon in the menu bar, select System Preferences > Accounts > Login Items.
- When you log on to the Mac OS, the device(s) will automatically mount on your desktop (as long as you haven't configured your Finder not to display connected servers on your desktop).
Accessing USB Devices via FTP
The FTP protocol is used to transfer files from one computer to another through a local network or over the internet. This protocol allows you to exchange files with your friends or relatives securely, as only people with a user account will have access.
The FTP service is disabled by default, so you must enable it in on the Dashboard - Network LAN page.
To connect to the LaPlug via FTP locally on the LAN, enter in your browser's or FTP client's address field:
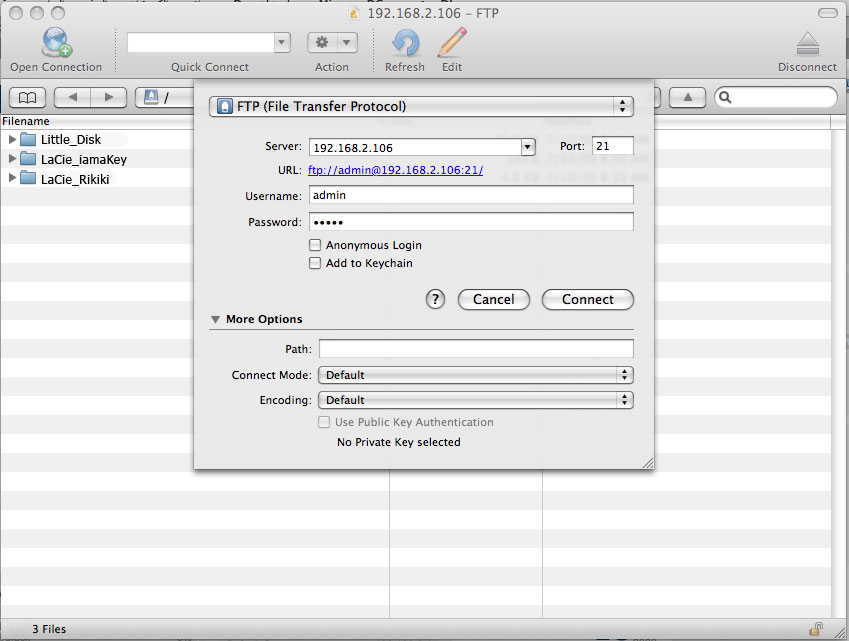
ftp://[IP-address]
Example: ftp://192.168.10.149
OR
ftp://<username:password>@<ip or machine name>/
Example: ftp://ringo:4xtp23@LaPlug/
To login, enter your Dashboard username and password. (By default, admin/admin.)
To remotely access the drive from a computer NOT on your network, refer to Remote Access.
Media Servers
Once you have established the network connection between your computer and the LaPlug, you can configure your LaPlug to share files to UPnP/DLNA devices. Follow these steps:
- Make sure the USB device is properly connected to the LaPlug, and that the LaPlug is connected to your home network as described in Installation.
- Enable Media Servers on the Dashboard (see Dashboard - General Settings).
- Make sure that one of the attached USB devices has been assigned as the Master volume (see Dashboard - Drives.
- Now you will be able to play files located on USB devices connected to your LaPlug on any other UPnP/DLNA-certified player/adapter (such as an XBox 360, Play Station 3, a DLNA mobile phone, etc.).
Media Servers - iTunes
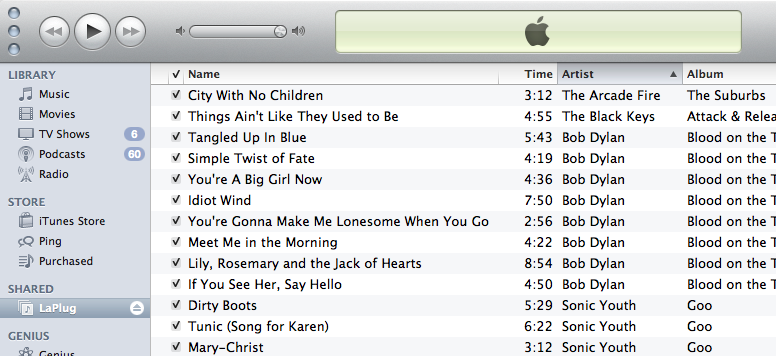
The LaPlug can act as an iTunes Music server, streaming audio files to a computer on the network running iTunes. Once configured, a playlist bearing the machine name of your LaPlug (by default LaPlug) will appear in the Shared category within iTunes, and audio files stored on the LaPlug will be listed in this playlist. Follow these steps:
- Make sure the USB device is properly connected to the LaPlug, and that the LaPlug is connected to your home network as described in Installation.
- Enable Media Servers on the Dashboard (see Dashboard - General Settings).
- Make sure that one of the attached USB devices has been assigned as the Master volume (see Dashboard - Drives.
- In iTunes, make sure Library sharing is enabled in Preferences > Sharing > Look for shared libraries.
Media Servers - Windows Media Player
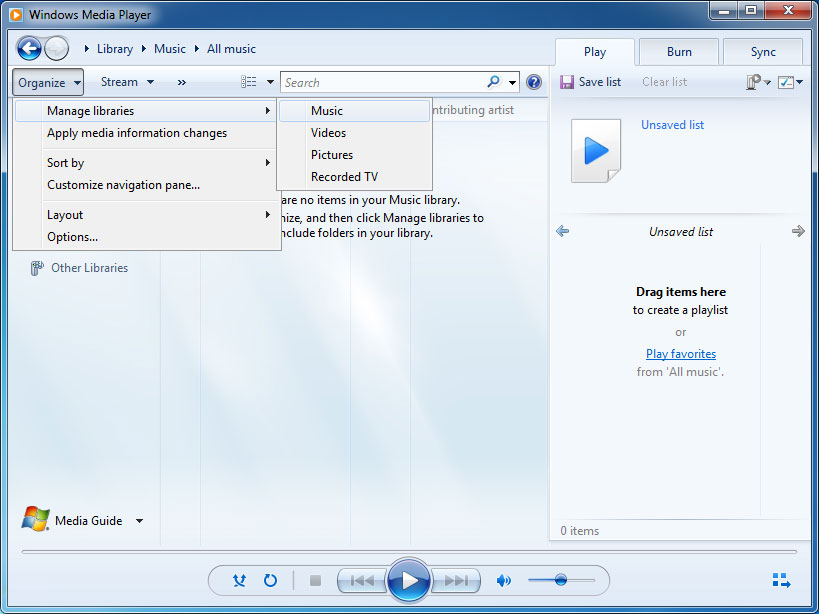
Once configured, Windows Media Player (WMP) can play files located on the LaPlug through the network connection. Follow these steps:
- Make sure the USB device is properly connected to the LaPlug, and that the LaPlug is connected to your home network as described in Installation.
- Enable Media Servers on the Dashboard (see Dashboard - General Settings).
- Make sure that one of the attached USB devices has been assigned as the Master volume (see Dashboard - Drives.
- WMP will begin indexing the media files. Once completed, they will appear in the WMP library.
Using Backup Software
Your LaPlug is compatible with Time Machine, Windows Backup and Restore, and Genie Time Line. A USB hard drive connected to the LaPlug can be set as a backup target for these software. Note that you will achieve much better results with backup software if you connect the LaPlug to your network via Ethernet instead of Wi-Fi.
Update Product Software
LaCie may improve your LaPlug's software or add new features over time. See below for updating information. Note that there are two ways of checking for new product software, from the Dashboard or from the LaCie website.
Note also that the update procedure will not erase files saved to attached USB hard drives, but it will reset settings to the factory defaults.
Check for New Software
Using the Dashboard
- Launch the Dashboard as described in Administer the LaPlug and navigate to the System page.
- Click the System tab, then look under Online update. If a link appears, click it to navigate to the web page hosting the download.
From LaCie.com
Install Product Software
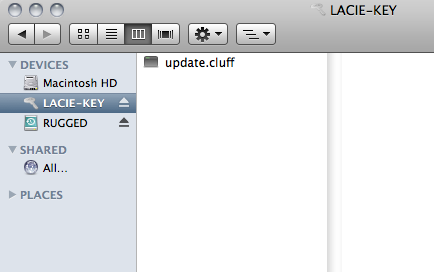
- Make sure the LaPlug is turned off, then connect the USB key or hard drive to the LaPlug.
- Press and hold the power button for 10 seconds. When the LED turns red, release the power button.
- Before two seconds elapse, push and immediately release the power button once again.
- After about two minutes, the LaPlug will reboot automatically.
- Verify that the new software was installed by revisiting the Dashboard > Support page or the LaCie Network Assistant Configuration Window.
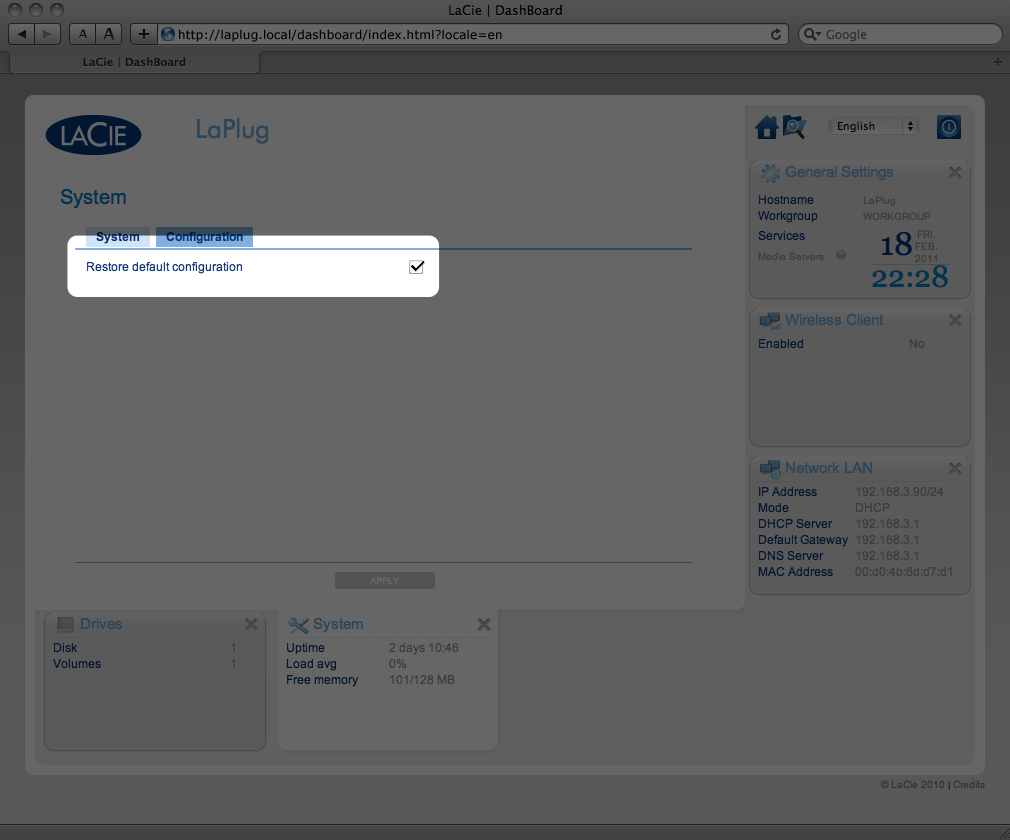
Restore Default Configuration
This process will revert the LaPlug to its factory settings but will not change the product software version.
- Launch the Dashboard as described in Administer the LaPlug and navigate to the System page.
- Click the System tab.
- Click the Apply button.
- Confirm in the popup window. The LaPlug will reboot automatically.
Getting Help
If you are having problems with your LaCie product, consult the table below for a list of available resources.
| Order | Source | Description | Location |
|---|---|---|---|
| 1 | Quick Install Guide | Concise steps to follow for getting your product up and running | Either a printed leaflet or accessory box and included in the product box, or download PDF from the product page |
| 2 | Support Pages | Includes interactive troubleshooting topics for most common problems | www.lacie.com/support/, select your product, then click the “Troubleshooting” tab |
| 3 | User Manual | Includes common troubleshooting topics | See Troubleshooting Topics below |
| 4 | Customer Support | Create an account on lacie.com, register your product, and fill out a support ticket | Create an account here: www.lacie.com/us/mystuff/login.htm?logout&rtn=mystuff |
Software Updates
LaCie frequently releases firmware updates to improve the functionality of products. Please check frequently for recent updates to firmware and to LaCie Network Assistant to ensure optimum product performance. See Update Product Software for details.
Troubleshooting Topics
Troubleshooting the Network Connection
I connected a USB drive to the USB device port, but the drive does not appear on the network and is not listed in LaCie Network Assistant.
The LaPlug doesn't appear on the network.
Q: Does your computer's configuration meet the minimum system requirements?
Q: Is the product's power supply connected and is the LED on the front of the drive on?
Q: Is the LED on the front of the device flickering for an inordinate period of time?
Q: Are both ends of the Ethernet cable firmly connected?
Q: Problems on networks without a DHCP server?
LaCie Network Assistant is not working as described in this manual.
I've noticed a delay in accessing the shares.
Troubleshooting the Multimedia Server
I've activated my LaPlug's multimedia service, but I can't access it using my UPnP/DLNA device.
I can't configure WMP to find files on the USB device connected to the LaPlug.
Certain files located on the LaPlug aren't recognized by WMP.
Some files files stored on the LaPlug appear in my iTunes shared playlist, but some do not.
I've activated my LaPlug's multimedia service, but I don't see its machine name in iTunes.
Some files stored on the LaPlug appear on my Xbox/PS3, but some do not.
Precautions
Health and Safety Precautions
- Only qualified persons are authorized to carry out maintenance on this device.
- Read this User Manual carefully and follow the correct procedure when setting up the device.
- Do not open the casing or attempt to disassemble or modify it. Never insert any metallic object into the casing to avoid any risk of electrical shock, fire, short-circuiting or dangerous emissions. This LaCie product contains no user-serviceable parts. If it appears to be malfunctioning, have it inspected by a qualified LaCie Technical Support representative.
- Never expose your device to rain, or use it near water, or in damp or wet conditions. Never place objects containing liquids on the product, as they may spill into its openings. Doing so increases the risk of electrical shock, short-circuiting, fire or personal injury.
General Use Precautions
- Power requirements 100-240 V~, 50-60 Hz, (supply voltage fluctuations not exceeding ± 10% of the nominal and transient over-voltages according to over-voltage category II).
- Do not expose the LaCie product to temperatures outside the range of 5º C to 30º C (41º F to 86º F); or to operational humidity beyond 10-80%, non-condensing, or non-operating humidity beyond 5-90%, non-condensing. Doing so may damage the LaCie product or disfigure its casing. Avoid placing your LaCie product near a source of heat or exposing it to sunlight (even through a window). Inversely, placing your LaCie product in an environment that is too cold may damage the unit.
- Rated cooling for altitudes up to 2000 meters.
- If your product features a power cable, always unplug it from the electrical outlet if there is a risk of lightning or if it will be unused for an extended period of time. Otherwise, there is an increased risk of electrical shock, short-circuiting or fire.
- Use only the power supply shipped with the device (if applicable).
- Do not use the LaCie product near other electrical appliances such as televisions, radios or speakers. Doing so may cause interference which will adversely affect the operation of the other products.
- Do not place the LaCie product near sources of magnetic interference, such as computer displays, televisions or speakers. Magnetic interference can affect the operation and stability of your LaCie product.
- Never use excessive force on your LaCie product. If you detect a problem, consult the troubleshooting section in this manual.
- Protect your LaCie product from excessive exposure to dust during use or storage. Dust can build up inside the device, increasing the risk of damage or malfunction.
- Never use benzene, paint thinners, detergent or other chemical products to clean the outside of the LaCie product. Such products will disfigure and discolor the casing. Instead, use a soft, dry cloth to wipe the device.
Warranty Information
LaCie offers first-rate service and support through our generous three-tiered warranty policy. Our 1-, 2-, 3-, and 5-year policies include comprehensive, complimentary web-based resources, expert in-house technical support, and worldwide repair and/or replacement coverage. To benefit from this warranty, please contact LaCie Support at www.lacie.com/us/support where you can find online support and contact information. You may also contact representatives at the original point of purchase who will be able to help guide you.
Standard warranties vary depending on the product. To verify your product’s warranty status and to see which standard warranty is included with your product, type in your product’s serial number at www.lacie.com/us/support. If no warranty is listed under your product’s name, this means that the warranty has expired.
Warranty Upgrades
If you wish to extend your warranty coverage, you can purchase Silver, Gold, or Platinum Care or Advanced Exchange. For details, see www.lacie.com/warranties.
Legal Information
A standard LaCie limited warranty is included with all products. Please read the terms and conditions below.
LaCie Limited Warranty Policy
LaCie (“LaCie”) warrants, to the original purchaser, that this equipment shall be free of defects in materials and workmanship for a period of one (1), two (2), three (3), or five (5) years, depending on the model, from LaCie's date of original shipment when the equipment is used normally and is properly serviced when needed. If you discover a defect covered by the warranty set forth above, your sole and exclusive remedy will be for LaCie, in its sole discretion to (i) repair or replace the product at no charge to you; or, if a repaired unit or replacement product is not available, (ii) to refund the current market value of your product. You acknowledge and agree that replacement product, at the sole option of LaCie, may be a new product or a remanufactured product. In order to receive the remedy set forth above, you must return the product during the warranty period and include with each returned product (i) a copy of your original purchase invoice to verify your warranty; (ii) a Return Material Authorization number; (iii) your name, address and telephone number; (iv) a copy of the bill of sale bearing the appropriate LaCie serial numbers as proof of date of original retail purchase; and (v) a description of the problem. The customer must pay all transportation costs for a returned product. The product will need to be returned to LaCie within the country of original retail purchase. This warranty applies only to hardware products; LaCie software, media, and manuals are licensed and warranted pursuant to separate written agreement. This warranty does not apply if the product has been misused or has been damaged by accident, abuse, misuse, or misapplication; if it has been modified without permission of LaCie; or if any LaCie serial number has been removed or defaced. If a customer has purchased a LaCie Advance Care Option (ACO) to go with this equipment, the ACO shall be valid for three (3) years from activation.
EXCEPT FOR THE LIMITED WARRANTY SET FORTH ABOVE, ALL PRODUCTS ARE SOLD “AS IS” AND LACIE EXPRESSLY DISCLAIMS ALL WARRANTIES OF ANY KIND, WHETHER EXPRESS, IMPLIED OR STATUTORY, INCLUDING THE IMPLIED WARRANTIES OF MERCHANTABILITY, NONINFRINGEMENT AND FITNESS FOR A PARTICULAR PURPOSE. WITHOUT FURTHER LIMITING THE GENERALITY OF THE FOREGOING, DOES NOT WARRANT (1) THE PERFORMANCE OR RESULTS OBTAINED FROM USING THIS PRODUCT, (2) THAT THE PRODUCT IS APPROPRIATE FOR THE CUSTOMER'S PURPOSES, (3) THE MANUAL IS ERROR FREE, OR (4) THAT NO DATA WILL BE LOST WHILE USING THE PRODUCT. THE ENTIRE RISK AS TO THE RESULTS AND PERFORMANCE IS ASSUMED BY THE CUSTOMER. THE WARRANTY AND REMEDIES SET FORTH ABOVE ARE EXCLUSIVE AND IN LIEU OF ALL OTHERS, ORAL OR WRITTEN, EXPRESS OR IMPLIED.
EXCLUSIONS AND LIMITATIONS
This Limited Warranty applies only to hardware products manufactured by or for LaCie that can be identified by the “LaCie” trademark, trade name, or logo affixed to them. The Limited Warranty does not apply to any non-LaCie hardware products or any software, even if packaged or sold with LaCie hardware. Manufacturers, suppliers, or publishers, other than LaCie, may provide their own warranties to the end user purchaser, but LaCie, in so far as permitted by law, provides their products “as is”. Software distributed by LaCie with or without the LaCie brand name (including, but not limited to system software) is not covered under this Limited Warranty. Refer to the licensing agreement accompanying the software for details of your rights with respect to its use.
LaCie does not warrant that the operation of the product will be uninterrupted or error-free. LaCie is not responsible for damage arising from failure to follow instructions relating to the product's use. This warranty does not apply: (a) to consumable parts, unless damage has occurred due to a defect in materials or workmanship; (b) to cosmetic damage, including but not limited to scratches, dents and broken plastic on ports; © to damage caused by use with non-LaCie products; (d) to damage caused by accident, abuse, misuse, flood, fire, earthquake or other external causes; (e) to damage caused by operating the product outside the permitted or intended uses described by LaCie; (f) to damage caused by service (including upgrades and expansions) performed by anyone who is not a representative of LaCie or a LaCie Authorized Service Provider; (g) to a product or part that has been modified to alter functionality or capability without the written permission of LaCie; or (h) if any LaCie serial number on the product has been removed or defaced.
No LaCie dealer, agent, or employee is authorized to make any modification, extension, or addition to this warranty.
Any loss, corruption or destruction of data while using a LaCie drive is the sole responsibility of the user, and under no circumstances will LaCie be held liable for the recovery or restoration of this data. To help prevent the loss of your data, LaCie highly recommends that you keep TWO copies of your data; one copy on your external hard disk, for instance, and a second copy either on your internal hard disk, another external hard disk or some other form of removable storage media. LaCie offers a complete line of CD and DVD drives. If you would like more information on backup, please refer to our website.
LACIE IS NOT RESPONSIBLE FOR SPECIAL, INCIDENTAL, OR CONSEQUENTIAL DAMAGES RESULTING FROM ANY BREACH OF WARRANTY, OR UNDER ANY LEGAL THEORY, INCLUDING LOST PROFITS, DOWNTIME, GOODWILL, DAMAGE TO OR REPLACEMENT OF EQUIPMENT AND PROPERTY, AND ANY COSTS OF RECOVERING, REPROGRAMMING, OR REPRODUCING ANY PROGRAM OR DATA STORED IN OR USED WITH LACIE PRODUCTS EVEN IF IT HAS BEEN ADVISED OF THE POSSIBILITY OF SUCH DAMAGES.
Some states do not allow the exclusion or limitation of implied warranties or liability for incidental or consequential damages, so the above limitation or exclusion may not apply to you. This warranty gives you specific legal rights, and you may have other rights, which vary from state to state.
Your opening of your package, your use of the product, or your return of the enclosed Registration Card acknowledges that you have read and agree to the terms of this Agreement. You further agree that it is the complete and exclusive state of the agreement between us and supersedes any proposal or prior agreement, oral or written, and any other communications between us relating to the subject matter of this Agreement.
Read carefully all information related to warranty and precautions of use of your new LaCie product in the user manual.
For products purchased in the United States, you may contact LaCie at 7555 Tech Center Drive, Tigard, Oregon 97223 USA. Email: sales@lacie.com. Website: www.lacie.com. Customer service: 503-844-4503.
Service DOA
On rare occasions, a newly purchased LaCie product may be delivered in non-working order. We are working to avoid these issues, but unfortunately, these situations may arise from time to time. Within the 15 calendar days of purchase, should you experience an issue with your new LaCie product, we ask you to return the product to the place where it was originally bought. You will be required to give a proof of purchase.
Customer Warning
Please be sure to back up your data before returning your drive to LaCie for repair. LaCie cannot under any circumstances guarantee the integrity of data remaining on a returned drive. We make no provisions for data recovery and cannot be held liable for any data loss on drives or media returned to LaCie.
All products returned to LaCie must be securely packaged in their original box and shipped with postage prepaid, except for Products registered under the Advance Care Option.
Note to Australian Customers
Our goods come with guarantees that cannot be excluded under the Australian Consumer Law. You are entitled to a replacement or refund for a major failure and for compensation for any other reasonably foreseeable loss or damage. You are also entitled to have the goods repaired or replaced if the goods fail to be of acceptable quality and the failure does not amount to a major failure.
Contact us:
LaCie Australia, 6/151 Beauchamp Rd, Matraville NSW 2036 AUSTRALIA
Phone: 02 8063 3711
Email: info.au@lacie.com
For fast technical support, create a support ticket after registering your product at www.lacie.com/au/register.
Legal Info
Copyrights
Copyright © 2024 LaCie. All rights reserved. No part of this publication may be reproduced, stored in a retrieval system, or transmitted in any form or by any means, electronic, mechanical, photocopying, recording or otherwise, without the prior written consent of LaCie.
Changes
The material in this document is for information only and subject to change without notice. While reasonable efforts have been made in the preparation of this document to assure its accuracy, LaCie assumes no liability resulting from errors or omissions in this document, or from the use of the information contained herein. LaCie reserves the right to make changes or revisions in the product design or the product manual without reservation and without obligation to notify any person of such revisions and changes.
Federal Communication Commission Interference Statement
This equipment has been tested and found to comply with the limits for a Class B digital device, pursuant to Part 15 of the FCC Rules. These limits are designed to provide reasonable protection against harmful interference in a residential installation. This equipment generates, uses and can radiate radio frequency energy and, if not installed and used in accordance with the instructions, may cause harmful interference to radio communications. However, there is no guarantee that interference will not occur in a particular installation. If this equipment does cause harmful interference to radio or television reception, which can be determined by turning the equipment off and on, the user is encouraged to try to correct the interference by one of the following measures:
- Reorient or relocate the receiving antenna.
- Increase the separation between the equipment and receiver.
- Connect the equipment into an outlet on a circuit different from that to which the receiver is connected.
- Consult the dealer or an experienced radio/TV technician for help.
FCC Caution: Any changes or modifications not expressly approved by the party responsible for compliance could void the user's authority to operate this equipment.
This device complies with Part 15 of the FCC Rules. Operation is subject to the following two conditions: (1) This device may not cause harmful interference, and (2) this device must accept any interference received, including interference that may cause undesired operation.
This transmitter must not be co-located or operating in conjunction with any other antenna or transmitter.
The availability of some specific channels and/or operational frequency bands are country dependent and are firmware programmed at the factory to match the intended destination. The firmware setting is not accessible by the end user.
WEEE
 This symbol on the product or on its packaging indicates that this product must not be disposed of with your other household waste. Instead, it is your responsibility to dispose of your waste equipment by handing it over to a designed collection point for the recycling of waste electrical and electronic equipment. The separate collection and recycling of your waste equipment at the time of disposal will help to conserve natural resources and ensure that it is recycled in a manner that protects human health and the environment. For more information about where you can drop off your waste equipment for recycling, please contact your local city office, your household waste disposal service, or the shop where you purchased the product.
Trademarks
Apple, Mac, Time Machine, and Macintosh are registered trademarks of Apple Computer, Inc. Microsoft, Windows XP, Windows Vista, and Windows 7 are registered trademarks of Microsoft Corporation. Other trademarks mentioned in this manual are the property of their respective owners.
Licences and Free Software
Your LaCie product ships with copyrighted software that are licensed under the GPL, AFL, Apache, Apple, BSD, GNU LGPL, MIT, OpenLDAP, OpenSSL, PHP, Python, and Creative Common. It also includes free software, the source code for which can be downloaded from the LaCie website: www.lacie.com/support/
© 2007-2008, Thomas BERNARD. © 2006 Allan Saddi allan@saddi.com © 2004, Jan Kneschke, incremental. © 2001-2006, Patrick K. O’Brien and Contributors. © 2003-2009 Stuart Bishop stuart@stuartbishop.net. © 2006 Kirill Simonov. © 1996-2006 Julian R Seward. © 2004, 2005 Darren Tucker. All rights reserved. © 1997-2008 University of Cambridge. All rights reserved. © 2007-2008, Google Inc. All rights reserved. © 1990-2003 Sleepycat Software. All rights reserved. © 1995-2004 Jean-loup Gailly and Mark Adler. © 2004 Micah Dowty. ® 1997-2006 by Secret Labs AB ® 1995-2006 by Fredrik Lundh. © 1988,1990,1993,1994 by Paul Vixie. © 2007-2009 Charles du Jeu.
This list of licenses can evolve over time and can be found on the user interface under the heading “Credits.”
Canada Compliance Statement
This Class B digital apparatus meets all requirements of the Canadian Interference-Causing Equipment Regulations.
CAN ICES-3 (B)/NMB-3(B)
Japan Compliance Statement
This is a Class B product based on the standard of the Voluntary Control Council for Interference from Information Technology Equipment (VCCI). If this is used near a radio/TV receiver, it may cause radio interference. Install the equipment according to the manual. This statement does not apply to the LaCie CloudBox.
Manufacturer's Declaration for CE Certification
 We, LaCie, solemnly declare that, under our sole responsibility, this product is in compliance with the essential requirements and other relevant provisions of the European directives 1999/5/EC (R&TTE), 2004/108/EC (EMC), and 2006/95/EC (Safety). The product fulfills the standards and/or documents below:
EN301489-1 v1.8.1 (2008 – 04)
EN301489-17 v2.1.1 (2009 – 05)
EN300328 v1.7.1 (2006-10)
EN 55022: 2006 + A1 2007
EN 61000-3-2: 2006
EN 61000-3-3: 2008
EN 55024: 1998+A1: 2001+A2: 2003
EN61000-4-2: 2008 ED. 2.0
EN61000-4-3: 2006 + A1: 2007 ED. 3.0
EN61000-4-4: 2004 ED. 2.0
EN61000-4-5: 2005 ED. 2.0
EN61000-4-6: 2008 ED. 3.0
EN61000-4-8: 2009 ED. 2.0
EN61000-4-11: 2004 ED. 2.0
EN60950-1 :2006 + A11: 2009
Glossary
802.11b/g/n - The number 802.11 is the IEEE (Institute of Electrical and Electronics Engineers) term for the wireless signal on a land area network (WLAN). The letters that follow indicate the levels of strength. The following lists the maximum throughputs for b and g:
- b = 11 Mb/s
- g = 54 Mb/s
n is the most recent protocol:
- n = well over 50 Mb/s
AFP (Apple Filing Protocol) - Similar to SMB/CIFS and NFS, AFP is a protocol used for requests over a network. Requests could mean accessing shared files, volumes, and devices (such as printers). AFP is used for Apple-based systems, Mac OS 9 and X.
DHCP (Dynamic Host Configuration Protocol) - A computer requires an identity when it connects to a network, otherwise access to the Internet as well as company or home servers will not be possible. That identity is called an IP (Internet Protocol) address, which may be enabled manually (Static IP) in the operating system network settings or assigned by a network management device, such as a DHCP device. Though a generic term, the device could be a server or an active switch, as found in business environments; or, a cable or DSL modem offered by an Internet provider. The LaCie product has the ability to assign IP addresses dynamically, which means it can be configured as a DHCP server. An example of an IP address is 192.168.10.1
DHCP Server Range Start IP/Range End IP - The range of addresses that a DHCP server may assign to the attached systems.
DLNA™ (Digital Living Network Alliance) - A standard (based on UPnP) widely embraced by consumer electronic manufacturers to allow entertainment devices within the home to share movies, music, and photos across a home network.
DNS (Domain Name System or Domain Name Server) - All email and web addresses are domain names. Every web site and email account has a specific place within a server that has a unique IP address (such as 192.168.54.25, IPv4; or 2001:db8:1f70::999:de8:7648:6e8, IPv6). However, when we launch a favorite browser to buy a new hard drive or send an email, we do not type lengthy, hard to remember numerical addresses. Instead, we use company names, www.lacie.com, or email addresses, sales@lacie.com. The domain names in these examples are “lacie.com” or ”@lacie.com”. The server manages the tie between the IP address it requires for a network identity and the domain name for communication.
DSL (Digital Subscriber Line) - Broadband data transmitted digitally over telephone wires. The local telephone company provides a service that includes Internet, telephone, and, for some, cable television. For access to the Internet, telephone companies generally provide an adapter or DSL modem for connection to a computer via Ethernet.
Dynamic DNS - This moves DNS hosting a bit further as it provides access to domain names hosted on servers with varying (hence, dynamic) IP addresses. This means that web sites are not forced to maintain a single IP address, but can be managed within a network that uses DHCP to assign an identity. The Dynamic DNS host is smart enough to read the domain name and find the IP address to which it belongs. Dynamic DNS is a great tool for accessing home network servers, such as the LaCie product, from anywhere outside the home.
Dynamic Port Forwarding - Allows applications to use SOCKS servers on local ports for network communication and Internet access. This can be very convenient as it will avoid having to configure port forwarding each time an application is used. The SOCKS is configured on a server to route traffic while the application, such as a web browser, is assigned a SOCKS in its preferences.
External Port - This port deals with requests outside the LAN, working with the NAT (network address translation) to convert external IP addresses and port numbers to addresses that will be accepted inside the network.
Firewall - One or more programs that act in concert with the gateway server to protect the computers and systems within a network.
Frame - A frame comprises all the data that is sent between network points, including the addressing and network protocol information.
FTP (File Transfer Protocol) - A protocol used to transfer and exchange files over networks that use TCP/IP. With FTP, one person can copy files into a folder within an FTP server for others to access. Permissions are generally set so that anyone seeking to access the files must enter a username and password.
FTP Server - A server that acts as the “host” for FTP transfers and exchanges. A server, such as the LaCie product, can enable FTP access to files stored on its volume(s). The LaCie product can act as an FTP server, allowing the user, or friends and family, to access its files or volumes by Internet hyperlinks. The base addresses are: ftp://IP-address, such as ftp://192.168.15.24; and ftp://username:password@<ip or machine name>/.
Gateway - See Network Gateway
HTTP (Hypertext Transfer Protocol) - The most common protocol for the World Wide Web (the “www” in web addresses). HTTP is a command that aids in defining the messaging for Web servers and browsing, initiating the request to a particular address.
HTTPS (Hypertext Transfer Protocol Secure) - A secure level of HTTP that uses SSL protocol for encryption and identification. Very often seen with online financial websites or when making a purchase on the Internet.
HTTPS Certificate - A digital certificate verifies the identity of a web site or user. When a user logs onto the site, the browser will automatically accept the certificate and indicate that the site is secure (often graphically represented by a lock). HTTPS certificates may be purchased and/or generated from many online vendors.
ICMP (Internet Control Message Protocol) - Another level of address communication, along with TCP and UDP. However, this level is generally not used to send and receive messages between servers or computers. ICMP is implemented mostly for error messages, such as a Web site being unavailable, or the popular ping feature used to search for other IP addresses on a network.
Internal Port - This port deals with requests inside the LAN, such as accessing files or sending emails.
Internet Provider - Broadband Internet service is available with a cable modem provided by the local cable provider. The cable modem is linked to the computer via an Ethernet cable.
IP Address (Internet Protocol) - Each computer must have at least one unique identity to engage in a form of network communication. The IP address has multiple layers that allow a computer to send and receive data, whether looking for web sites on the Internet from home or sending e-mail to a colleague at work.
IPv4 - The most common form of network addressing used today, IPv4 is 32-bit. The format is easily recognizable as xxx.xxx.xxx.xxx, where each “x” only represents the maximum digits in each field between periods. An IPv4 address can be 192.168.1.1 or 84.22.291.652. The maximum number of combinations reaches well over four billion. Even so, due to a world that has become dependent on Internet communication, IPv4 addressing is becoming difficult to maintain.
IPv6 - To combat the seeming inevitability of IPv4 addressing reaching its worldwide limit, IPv6 now offers much larger 128-bit addressing. Examples of the longer length are often seen as xxxx:xxxx:xxx:xxxx:xxx:xxxx:xxxx:xxxx, where “x” can be a letter or a number. However, it is not necessary to use four digits in all eight fields and the address can be truncated when heavily populated with zeros. IPv6 is flexible in understanding the address even when cutting back on leading zero digits or using a double colon to remove them altogether. The address below is an example of the same network identity in all its permutations:
2001:0f34:0000:0000:0000:0000:2002:04fe
2001:f34:000:000:000:000:2002:4fe
2001:f34:00:00:00:00:2002:4fe
2001:f34:0:0:0:0:2002:4fe
2001:f34::2002:4fe
Note that the double colons can be used to replace whole fields that contain only zeros.
ISP (Internet Service Provider) - The service that has installed a cable or DSL modem in a home or business for access to the Internet.
iTunes™ Server - iTunes libraries can be shared over a local network via a computer, network disk, or network device that acts as the iTunes Server. The protocol is used to detect libraries on the computer, network disk, or network device and stream playlists to anyone who requests them. The function must also be enabled on each computer that runs iTunes.
iTunes™ Scan Interval - Periodic scans of the shared music libraries for updates. For example, a LaCie network device automatically performs an iTunes once every 24 hours.
LAN (Local Area Network) - A network within a small or limited geography, such as an office, a school, or a home.
MAC Address (Media Access Control) - A unique identifier assigned by the manufacturer of a computer's network interface card. Though it has a different naming structure, a MAC address works with the IP address for network communication. There are many layers of network communication but, as an oversimplification, the MAC address supports the hardware aspect while the IP deals with the software implementation. An IP address can change while a MAC address is almost always fixed. A MAC address can generally be found in the operating system network settings, also referred to as an ethernet address, hardware address, adapter address, or physical address. The naming structure can be listed in two ways:
MM:MM:MM:SS:SS:SS or MM-MM-MM-SS-SS-SS
The “M” half of the address represents code used to identify the manufacturer of the network interface while the “S” half is a serial number. For example, a common manufacturer “M” prefix is, 00A0C9 since it represents Intel®. A full MAC address example is 00:23:df:99:5e:2a, with 00:23:df pointing to Apple as the manufacturer.
MAC Address Cloning - Internet service providers (ISP) may limit the amount of network connections by counting MAC addresses. Upon seeing more than an arbitrary number of MAC addresses on your home network, access will be denied to additional devices. MAC address cloning enables a router or network device to create a single MAC address for the ISP to see while it manages the computers that are attached via Ethernet or Wi-Fi.
NAT (Network Address Translation) - A router will take addresses that come from public servers and translate them to addresses that are acceptable to the private network. This is helpful for reducing the number of IP addresses on a network or directing welcome traffic into a private network while dismissing unwanted visitors.
NAT-PMP (Network Address Translation-Port Mapping Protocol) - Taking port forwarding a step further, this allows users in a private network to automate network address translation by port number. Addresses outside the private network include a port number that mark them as acceptable. NAT-PMP converts “good” traffic into acceptable IP address within the system.
Netmask - Also known as the subnetwork. A subnet address is part of the IP address information, generally placing a network geography onto one or more computers. That is, everyone with a certain subnet address is hosted or attached to a specific server. A subnet mask has an address listing similar in form to IPv4. A common subnet mask (as it is called in the operating system preferences) is: 255.255.255.0.
Network Gateway - Capable of operating in software, hardware, or a combination of the two, a network gateway assists in enabling communication between networks with different protocols. Often, the network gateway is the Internet access device (such as a broadband router) provided by the ISP. An example would be one network that is using TCP/IP, while a second runs AppleTalk and a third, UDP. The network gateway assures that the translation process between them is transparent to the user.
NTP Server (Network Time Protocol) - A protocol used to synchronize the time for computers that reside on the same network. Public NTP servers are also available on the Internet.
Port Forwarding - Since a port number is part of a network address, it is possible to target specific IP addresses by their port numbers. This way, remote computers or devices with IP addresses can shake hands with a particular address on a LAN. A real world example is a Playstation®3 being used for an online game. That particular game may demand a specific IP address and port number for its network communication.
Port Number - Another layer of network addressing that works with protocols such as TCP/IP or UDP/IP. A port number is represented by a number ranging from 0 to 65535. Under normal conditions, a user does not have to worry about port numbers for network communication since they remain layers in the addressing protocol. However, for advanced use, some port numbers may have to be managed or specifically opened due to the demands of hardware, software, or firewalls. For example, it may be necessary to open Port 80 in order to play a video game online.
Print Server - A network device that is connected to one or more printers and to client computers over a local network. It can accept print jobs from the computers and send them to the appropriate printer(s).
Proxy Server - A special server that aids in client-client, client-server, and/or server-server communications. A common example is a web server that acts as the portal for a company's traffic to the Internet. Each client has the server IP address listed as the proxy server in their network settings in order to access the Internet or use email.
Remote Access - Accessing data or managing a server or workstation from a separate system or network. The remote access feature on your LaCie product includes the creation of a hostname (essentially, a unique web address name, such as www.lacieNAS.dyndns.org) that will enable easy management and access to data stored on the device from a separate network.
SAMBA - Another name for SMB. See SMB/CIFS
SMB/CIFS (Server Message Block/Common Internet File System) - There are many protocols that a network must implement to assure proper communication between systems, servers, and devices (such as printers). In normal operation, a computer requests a shared file or device managed by a server and the server responds to the demand. SMB/CIFS (also called “Samba”) is a protocol that targets the level in which applications will ask to share a file or device. SMB/CIFS is compatible with Linux, Mac, and Windows, meaning that all three operating systems may reside on the same shared network of servers and devices.
SMTP Server (Simple Mail Transfer Protocol) - A networking and Internet standard for email communication via IP addressing. SMTP is used for outgoing mail, often using port 25.
SOCKS (for Sockets) - A protocol that enables client-client and/or client-server communication via a proxy server. For example, two co-workers want to exchange information but one is blocked due to a firewall. Using the SOCKS Internet protocol, a proxy server will allow them to communicate.
SSID (Server Set Identifier) - The network name of the wireless access point. While an SSID contains no built-in security protocol, it can act as a password when kept hidden from outside traffic.
Static IP (Internet Protocol) - As opposed to DHCP, where the IP address on a computer may change based upon how the server or router manages network identities, a static IP rarely varies.
Static Port Forwarding - Configuring port forwarding to handle traffic through an IP address that does not change. A static address must be configured on a system in order to properly configure static port forwarding.
TCP/IP (Transport Control Protocol/Internet Protocol) - TCP is another layer of communication between the Internet and, within companies or organizations, the Intranet. The TCP breaks down the information that is being sent then puts it back together on the receiving end. The IP layer makes certain that the packets reach the correct address.
Time Machine™ - A backup utility for computers using Mac OS X. Using incremental backups, Time Machine offers a simple interface to back up Apple computers on network or desktop attached storage devices. Users can retrieve single or numerous files that have been periodically saved.
TKIP (Temporal Key Integrity Protocol) - An enhanced version of WEP security, TKIP was created to strengthen hardware that was only compatible with WEP. It adds additional security encryption to the existing WEP.
TLS (Transport Layer Security) - An encryption protocol for Internet communication that is stronger than SSL.
UDP/IP (User or Universal Datagram Protocol/Internet Protocol) - An alternative network protocol to TCP that does not have the ability to reorder or assemble packages of data sent via the Internet. UDP generally sends the message packets and relies upon the user software to put them in order. UDP is good for cutting back on processing with smaller files, since there is little to reassemble at the destination address. IP makes certain that the correct address receives the data.
UPnP™/IGD (Universal Plug and Play/Internet Gateway Device) - UPnP enables devices to share media and data on a network. UPnP devices are “plug-and-play” since they automatically announce their address and supported services once connected to a network. Other systems on the network that recognize those services may immediately begin sharing media with the device. UPnP is very popular with gaming systems such as the Playstation 3 or the Xbox.
WLAN (Wireless Land Area Network) - Similar to a LAN but within the network of a wireless access point.
WEP (Wired Equivalent Privacy) - A security protocol for WLANs. Encrypting data over radio waves, WEP is a security standard that was ported from LAN to WLAN. WEP is not the strongest level of protection for a wireless network since it does not include all layers of network addressing. WEP will protect the data and physical layers of an address.
WEP Key - The security code for a Wi-Fi access point using WEP. It is a series of hexadecimal digits (0-9 and A-F).
WEP Key ID - WEP encryption allows four keys. The user and the wireless access point start with the base WEP Key, then add one of the four WEP Key IDs to extend the characters and strengthen security.
WPA (Wi-Fi Protected Access) - A slightly stronger wireless security protocol than WEP.
WPA2 (Wi-Fi Protected Access 2) - Higher level of wireless security than WPA.
WPA PSK (Wi-Fi Protected Access, Pre-Shared Key) - A “key”, or password, that is shared between a wireless access point and the members of the WLAN. In this case, the PSK uses WPA encryption for security.


