User Tools
Site Tools
5big Thunderbolt 2
User Manuals Print page
 Save page as PDF
Table of Contents


Table of Contents
Setting Up - Windows
The LaCie 5big Thunderbolt 2 is shipped with the following installation components:
- LaCie 5big Thunderbolt 2
- Power supply cable
- Thunderbolt cable
Step 1 - Download the Thunderbolt Windows Driver
Perform the steps below on the PC that will use the 5big Thunderbolt 2.
- Download the driver at the following link: Thunderbolt for Windows.
- Unzip the downloaded file and note where it is located. For example, you can unzip the file on your PC’s desktop.
Step 2 - Thunderbolt 2 connection
Connect the included Thunderbolt cable to:
- The LaCie 5big.
- The PC.
Note on a Thunderbolt daisy chain: You can also connect a second Thunderbolt cable to daisy chain compatible devices to the LaCie 5big. A Thunderbolt daisy chain supports up to seven devices, including the computer. See Daisy Chain for further information.
Step 3 - Power connection
Connect the power supply in the following order:
- The LaCie 5big power input.
- A live power outlet.
Step 4 - Power button
If the LaCie 5big is off, apply a short press to the front LED button.
Note: Make certain that the LaCie 5big is connected to a computer that is powered on. The computer must also support Thunderbolt 2 technology or first generation Thunderbolt technology.
Step 5 - Install the Thunderbolt Windows Driver
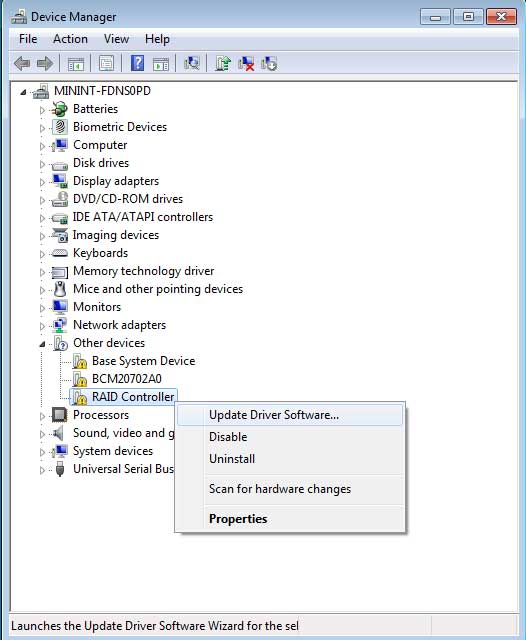
- Go to Start > Control Panel > Device Manager.
- Note that an item named RAID Controller appears in Other devices.

- Right click RAID Controller and choose Update Driver Software.
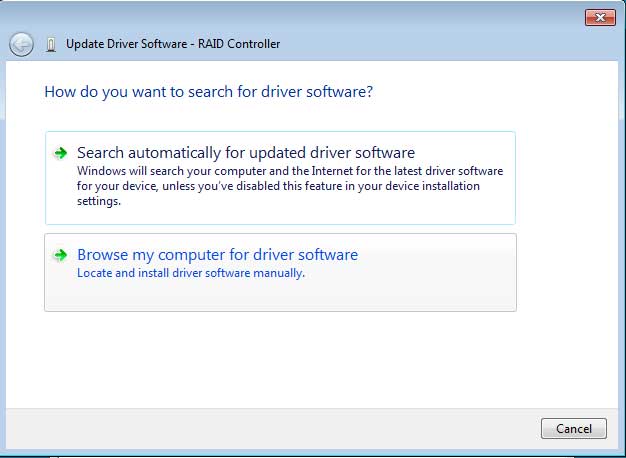
- Choose Browse my computer for driver software and navigate to the driver downloaded in Step 1.
- Choose the folder that applies to your version of Windows and then choose OK:
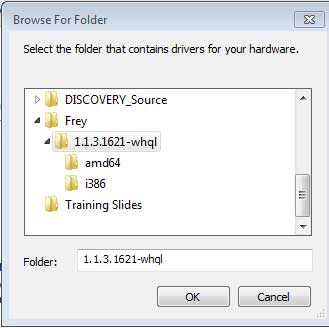
- 64-bit: Choose amd64.
- 32-bit: Choose i386.
- Choose Next to confirm the update.
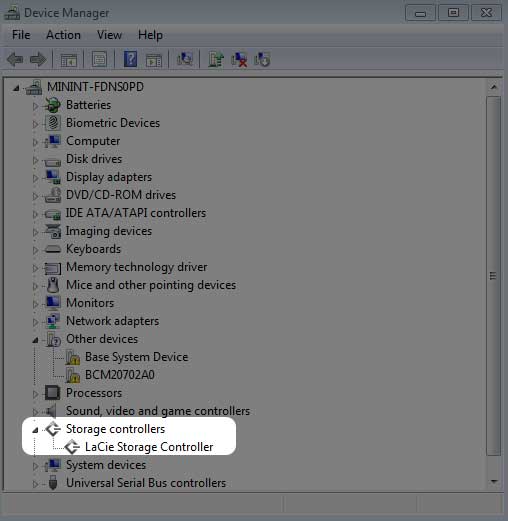
- Device Manager shows that the new driver has been installed.


Step 6 - Clean the hard drives
Since the hard drives are formatted for Mac (HFS+), all partitions must be erased, including the EFI partition. Windows Disk Management cannot erase the EFI partition so you must run Diskpart, a separate Windows utility. For additional information on Diskpart, see the web site.
Clean the hard drives
Important info: Diskpart deletes data from any hard drive that you select. Therefore, to avoid deleting data on other devices, disconnect all external hard drives from your PC except the LaCie 5big. Diskpart cannot delete the System disk.
Additionally, if your LaCie 5big has data, make certain to copy all files before performing the steps below. LaCie is not responsible for lost data.
Additionally, if your LaCie 5big has data, make certain to copy all files before performing the steps below. LaCie is not responsible for lost data.
- Search for and launch Diskpart.
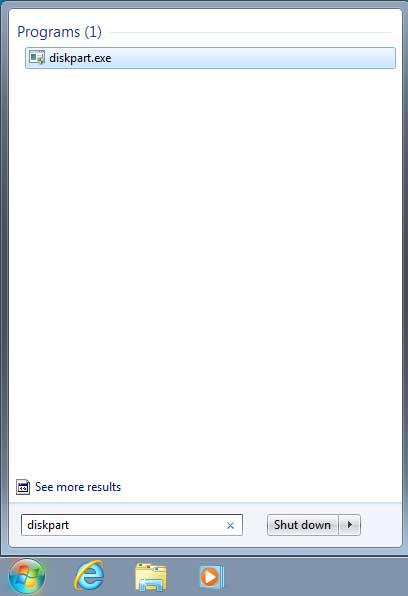
- If you are prompted to authorize Diskpart, choose Yes or equivalent.
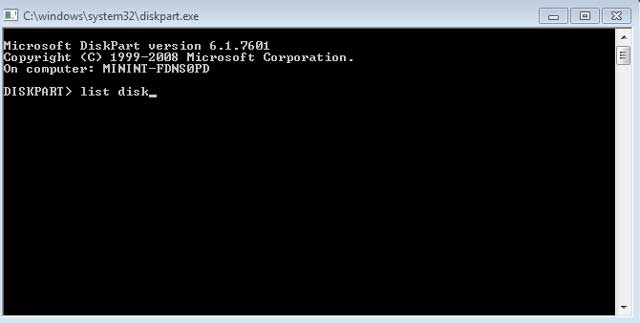
- In the Diskpart prompt, type list disk.
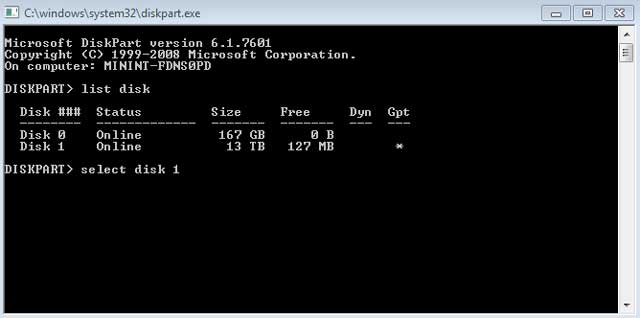
- Locate the disk number for your LaCie device then type select disk n. n is the number for the LaCie hard drive enclosure (1 in the screenshot below). If you are uncertain of the disk number for the LaCie product, launch Disk Management. You should see the number assigned to the LaCie product.
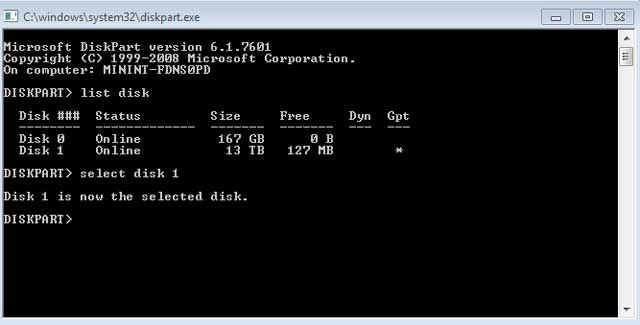
- Diskpart confirms that the disk has been selected.
- To delete all partitions on the enclosure’s hard drives, type clean.
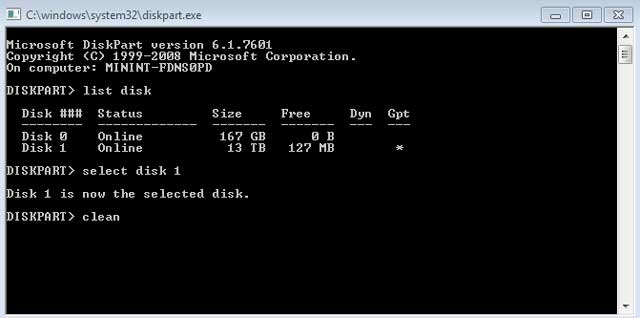


Diskpart confirms that your hard drive is clean, meaning that the partitions have been deleted. The LaCie product is ready to be formatted for your operating system. See Step 7 - Format the hard drives for instructions.
Step 7 - Format the hard drives
Formats
You can customize the storage device by reformatting it with separate file system formats. Review the formats below.
exFAT: exFAT is an update of FAT32, allowing for compatibility with Windows and Mac. While FAT32 is limited in regard to volume and file sizes, exFAT allows for volumes up to 128PB and files up to 16EB. Similar to FAT32, exFAT is not optimized for performance with Windows devices.
NTFS: This acronym stands for New Technology File System, and it is the native file system for Windows 7 and Windows 8. NTFS offers several features that are not available with exFAT: file compression, encryption, permissions, auditing, and mirroring drives. The minimum supported volume size for NTFS is 10MB with a maximum of 2TB when initialized in the MBR format. For greater flexibility, use the GPT format with NTFS to remove limits on file and partition sizes. Volumes created in NTFS are native read and write for Windows 7 and Windows 8. Mac OS X 10.5 or higher can read and write to the NTFS partitions with the help of third-party drivers.
See the table below for a comparison of NTFS and exFAT.
| Windows file system formats |
|---|
| Use NTFS if: |
| …you will be using the storage device only with Windows 7 and Windows 8. NTFS performance is significantly better than exFAT. This file system is also compatible in read-only mode with Mac OS 10.3 and higher. |
| Use exFAT if: |
| …you will be using your storage device with both Windows and Mac computers. Performance is not optimized for Thunderbolt/Thunderbolt 2. |
Formatting Instructions
The steps listed below help you to format the storage device.
Caution: Formatting will erase everything on the storage device. LaCie highly recommends that you back up all data on your storage device before performing the steps below. LaCie is not responsible for any data lost due to formatting, partitioning, or using a LaCie storage device.
Note: Refer to your operating system's documentation for more information on formatting your storage device.
- Make sure the storage device is connected to and mounted on the computer.
- Right click on Computer and choose Manage. From the Manage window select Disk Management.
- From the list of storage devices in the middle of the Disk Management window, locate your LaCie device.
- Right click on the volume and select New Simple Volume. Follow the on-screen instructions when the New Simple Volume Wizard appears.
Step 8 - Download and install LaCie RAID Manager
LaCie RAID Manager is the software utility that manages the LaCie 5big’s storage.
- Download the installer at http://www.lacie.com/support/raidmanager.
- Launch the installer on the computer that will connect to the LaCie 5big.
- Follow the on-screen instructions to complete the installation.
For instructions, see the LaCie RAID Manager user manual.
© LaCie 2024
Last modified : Nov 17, 2015