User Tools
Site Tools
CloudBox
User Manuals Print page
 Save page as PDF
Table of Contents


Table of Contents
Connecting to your Network
This chapter explains how to connect the CloudBox to your network. Please note that your network must have access to the Internet for the CloudBox installation, setup, and general use.
Ethernet
Ethernet is the most widely used local area network (LAN) technology. A Gigabit (Gb) Ethernet cable is included with your LaCie device to connect it to a network. Please note that the images in the table below may not reflect the precise cable or connector positions of your LaCie device or router. However, the ends of the Ethernet cable are the same, allowing for easy connection to the LaCie product and your router.
| Connector Face (to router) | Cable End (to computer) | Cable End (to product) | Connector Face (to router) |
|---|---|---|---|
 |  |  |  |
Setup
STEP 1 - Ethernet and Power
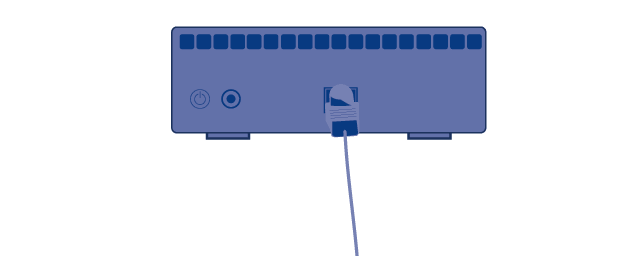
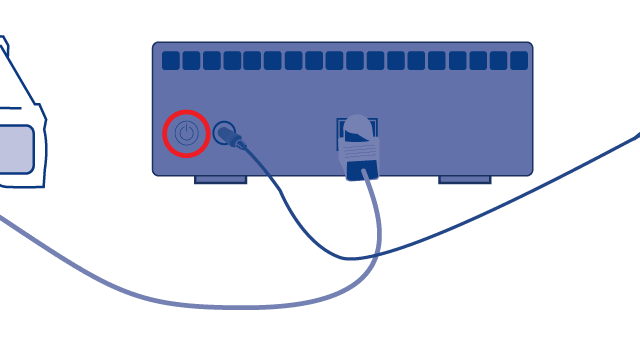
- Connect the Ethernet cable to the Ethernet port on the back of the LaCie CloudBox.
- Connect the other end of the Ethernet cable into an available Ethernet port on your router, switch, or hub. Your network router or switch must support DHCP to run the Setup Wizard. Most consumer and business networks include a DHCP router.

- Connect the power supply to a wall outlet and to the LaCie CloudBox.
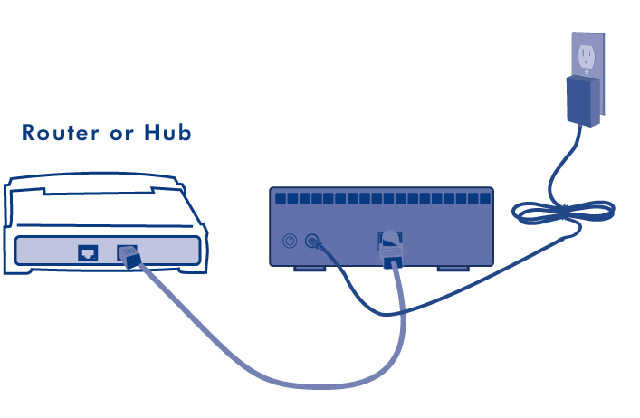
- Press the power button on the back of the CloudBox. The drive is ready to be accessed once the blue LED has stopped blinking. Please be patient while the CloudBox starts for the first time.


Caution: Only use the AC adapter supplied with your specific LaCie device. Since each product is unique, do not substitute a power supply from another LaCie device or another manufacturer for the LaCie CloudBox. Please note that the AC adapter provided with your LaCie device includes connectors for electrical outlets in multiple regions. Thanks to its 100-240 Volt power supply, you may use your device in a foreign country. However, LaCie accepts no responsibility for any damage to the drive resulting from the use of an inappropriate adapter.
Further, your warranty will be void if you: a) Use any other power cable, power supply, or power adapter other than one that has been authorized by LaCie, or b) Keep your AC adapter connected to the LaCie device when transporting it. Doing so may damage the device.
Further, your warranty will be void if you: a) Use any other power cable, power supply, or power adapter other than one that has been authorized by LaCie, or b) Keep your AC adapter connected to the LaCie device when transporting it. Doing so may damage the device.
Important info: Please make certain that your switch or router supports DHCP. The Setup Wizard cannot run in a network that does not support DHCP. You may adjust the IP settings on your CloudBox once the Setup Wizard is complete.
STEP 2 - LaCie Network Assistant
Once installed, LaCie Network Assistant will appear in your system tray (Windows) or in the menu bar (Mac).
LaCie Network Assistant will automatically search for LaCie storage devices on your network. When a new device is found, the icon will blink. LaCie Network Assistant also provides a link to the Dashboard, the Web-based administration tool for the CloudBox (see Administering Your LaCie CloudBox). LaCie recommends using LaCie Network Assistant to launch the CloudBox Setup Wizard.
Technical note: You may be running an earlier version of LaCie Network Assistant if you already own LaCie network storage. To avoid potential conflicts, LaCie recommends launching the Setup Wizard with the version on your CloudBox Utilities CD-ROM. Before loading the CD-ROM, please quit LaCie Network Assistant and uninstall it from your computer.
Windows Vista/7: Start > Control Panel > LaCie Network Assistant, right-click to select Uninstall.
Mac: Go to the Applications folder to drag LaCie Network Assistant to the Trash. Empty the Trash.
Windows Vista/7: Start > Control Panel > LaCie Network Assistant, right-click to select Uninstall.
Mac: Go to the Applications folder to drag LaCie Network Assistant to the Trash. Empty the Trash.
Install
- Insert the LaCie CloudBox Utilities CD-ROM into your computer’s optical drive.
- Windows: the CD should appear in My Computer/Computer.
Mac: the CD should appear on the desktop. Double-click the CD icon, then double-click LaCie Network Assistant Setup. - Complete the LaCie Network Assistant installation.
© LaCie 2024
Last modified : Mar 01, 2013