User Tools
Site Tools
LaCie Thunderbolt Series
User Manuals Print page
 Save page as PDF
Table of Contents


Table of Contents
LaCie RAID Monitor and Replacing a Disk (2big only)
Please note that this section pertains to the 2big Thunderbolt only. LaCie RAID Monitor and replacing disks are supported with enclosures that allow for hot-swapping hard drives.
Technical note: LaCie RAID Monitor is a great utility for the 2big Thunderbolt when it is configured for a Striped RAID Set (RAID 0) or a Mirrored RAID Set (RAID 1). It will not survey the disks when the 2big Thunderbolt is configured in JBOD mode.
LaCie RAID Monitor
LaCie RAID Monitor is a utility optimized for your LaCie Thunderbolt Series storage. Once installed, LaCie RAID Monitor runs in the background to keep tabs on the health of the storage. Should one of the drives experience problems, LaCie RAID Monitor will alert you to take action.
Install LaCie RAID Monitor
If you do not have the LaCie RAID Monitor installer, go to the Downloads page for the latest version.
- Click twice on the installer. It is a .dmg file.
- Click twice on LaCie RAID Monitor.

- Click Continue.

- Click Install.

- Your computer may ask you to enter the Administrator password to continue.

- The software has been successfully installed. Click Close to exit the installer.

- LaCie RAID Monitor will launch automatically.


Using LaCie RAID Monitor
LaCie RAID Monitor will launch automatically following a successful installation. The utility runs in the background while you work, polling the 2big storage to verify the health of the RAID. To view the health of your 2big:
- Go to the menu bar to click on the RAID Monitor icon.

- Select Open LaCie RAID Monitor.


The LaCie RAID Monitor gives you an easy color-coded reference to instantly know if your 2big is in good health:
- Green indicates that the RAID is in working order.

- Red indicates a problem with one or both disks in the RAID.


Early Warning
You do not have to launch LaCie RAID Monitor to receive an alert regarding the health of the RAID. Should one or both disks encounter problems, the LaCie RAID Monitor icon in the menu bar will blink with an exclamation mark inside a triangle.

If you receive the alert, open LaCie RAID Monitor to view the source of the problem.
Important info: If you wish to remove LaCie RAID Monitor from your computer, please run the Uninstaller. Dragging the program icon to the Trash will not completely remove the utility from your computer.


Replacing a Disk (2big)
Important info: While all Thunderbolt Series users should contact LaCie Customer Support if disk failure is suspected, this section pertains to the 2big only due to the type of enclosure.
In the event that an individual hard disk fails in the LaCie 2big Thunderbolt Series, please contact your LaCie reseller or LaCie Customer Support. Failed hard drives within the 2big Thunderbolt Series enclosure should only be replaced by a compatible LaCie disk with equal capacity.
Once you have received your replacement disk, follow the steps below for proper installation.
Caution: After continuous use of the LaCie 2big Thunderbolt Series, drives may be hot. Please use caution when removing the disks.
To Remove a Disk
- Confirm that the 2big Thunderbolt Series enclosure is off.
- Please make certain that you are properly grounded to avoid electrostatic discharge.
- The drive tray may be locked. To unlock it, insert the round end of the included 2-in-1 tool into the slot on the drive lock. Turn the lock until the slot is vertical.
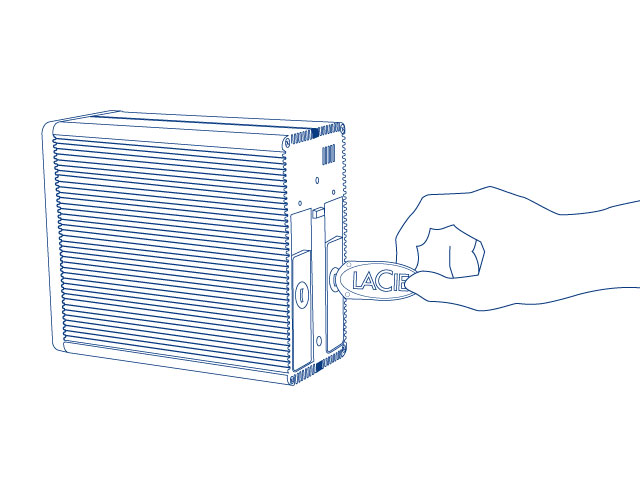 2-in-1 Tool

- Draw out the drive tray by inserting your finger into the space behind the drive tray handle and pulling to disengage the drive.

- Grasp the drive tray handle and carefully extract the drive.

Important info: LaCie highly recommends replacing the disk that has been removed as soon as possible.
To Insert a Disk
- Confirm that the 2big Thunderbolt Series enclosure is off.
- Remove the failed disk according to the instructions above. Please make certain that you are properly grounded to avoid electrostatic discharge.
- Remove the screws from the drive tray to replace the failed drive with the disk that you received from LaCie.
- Fasten the screws back on the drive tray.
- Carefully insert the drive tray into the empty disk bay. When the drive tray is almost flush, you will feel a bit of resistance. Press the drive tray handle firmly until the drive snaps into place and it is in line with the back pane of the 2big Thunderbolt Series.
- Use the 2-in-1 tool to fasten the drive lock. The drive is locked when the line is in a horizontal position.


Rebuilding a RAID Set
Striped RAID Set (RAID 0)
Once the replacement disk is installed in the 2big enclosure, go to Formatting for instructions on building a Striped RAID Set.
Mirrored RAID Set (RAID 1)
The 2big Thunderbolt Series RAID is configured using Mac Disk Utility. Please visit the Apple® Support page for instructions on how to recover from a hard drive failure on a mirrored array (Apple Support).
Important info: LaCie recommends that you do not remove one or both disks in a healthy Mirrored RAID Set. Removing a healthy drive may force you to rebuild the Mirrored RAID.
© LaCie 2024
Last modified : Apr 02, 2013