User Tools
Site Tools
LaCie RAID Manager
User Manuals Print page
 Save page as PDF
Table of Contents


Table of Contents
Create Arrays and Virtual Disks
Use LaCie RAID Manager to create one or more volumes to run with your preferred application.
Creating an array
Your LaCie enclosure must have unassigned hard drives (physical disks) to create a new array. If necessary, you can delete an existing array to make hard drives available for a new array (see Delete Arrays and Virtual Disks for instructions). Since all data will be permanently removed, make certain to back up the existing array before deleting it.
You must know the RAID level that best suits your needs before creating the array. Understanding RAID will help you choose the appropriate number of hard drives for the new array. See Discover LaCie RAID Manager Storage Management for details on RAID.
Follow the instructions below to create a new array:
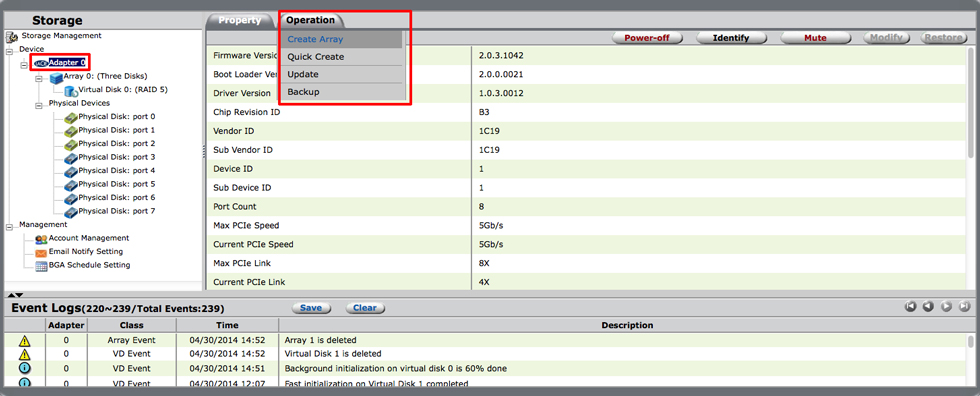
- Select Adapter in the list of Storage pane.
- Roll over the Operation tab and choose Create Array. Note on Quick Create: Selecting Quick Create skips the steps below while choosing the optimal RAID level for the amount of disks in the array. Quick Create allows you to build an array based on performance or protection.
- Add hard drives on the Create New Array page. To select a hard drive, click on its icon. A check mark appears next to a selected hard drive.
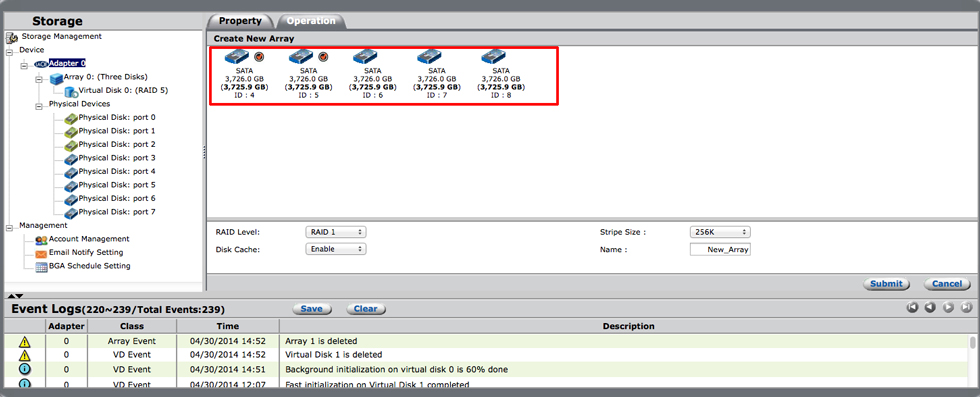
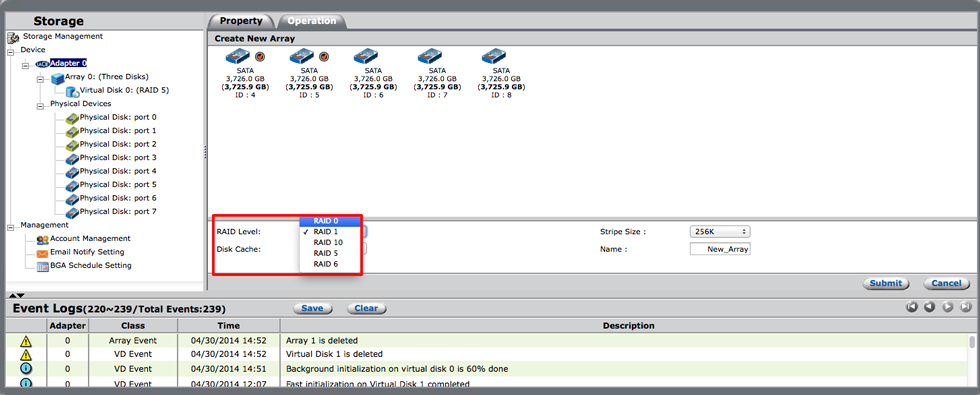
- Once you have selected the hard drives, click on the pull-down menu for RAID Level. Choose a RAID level that is compatible with the amount of hard drives that you selected. For example, you can choose RAID 5 with three or more hard drives. RAID 1 is only available with two hard drives.
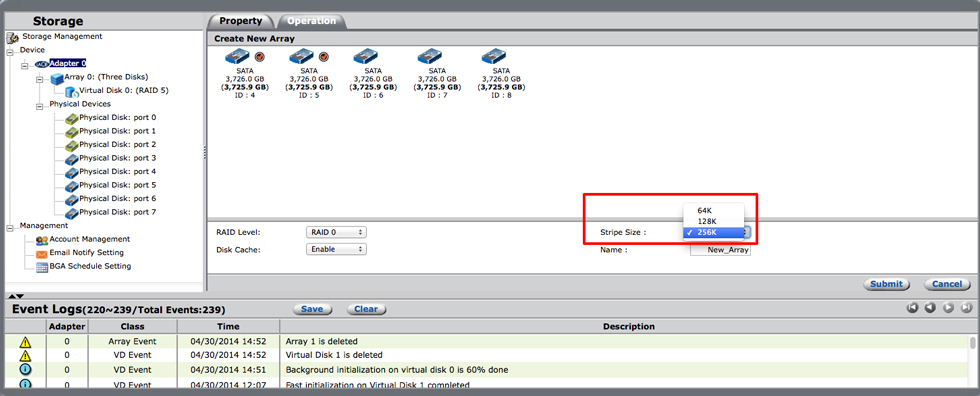
- Click on the pull-down menu for Stripe Size. See the explanation below for help with choosing the optimal stripe size.
- Click on the pull-down menu for Disk Cache. Choose Enable (performance) or Disable (data protection). See the explanation below for help with choosing the optimal disk cache.
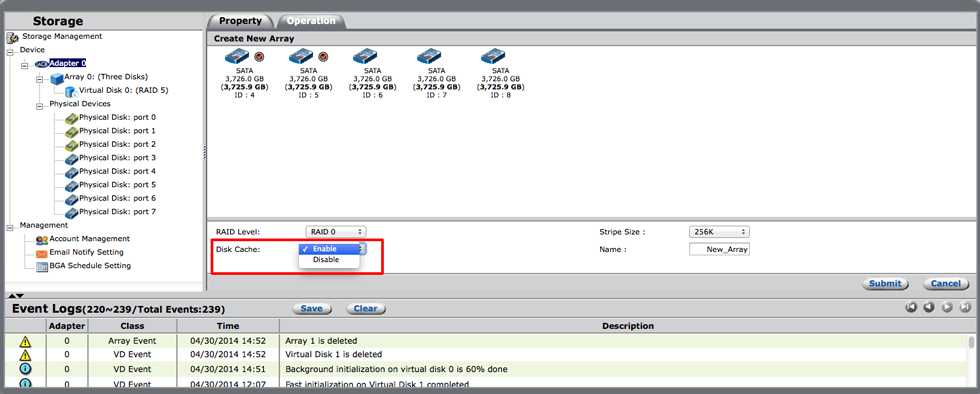
- Enter a name for the array in the Name field.
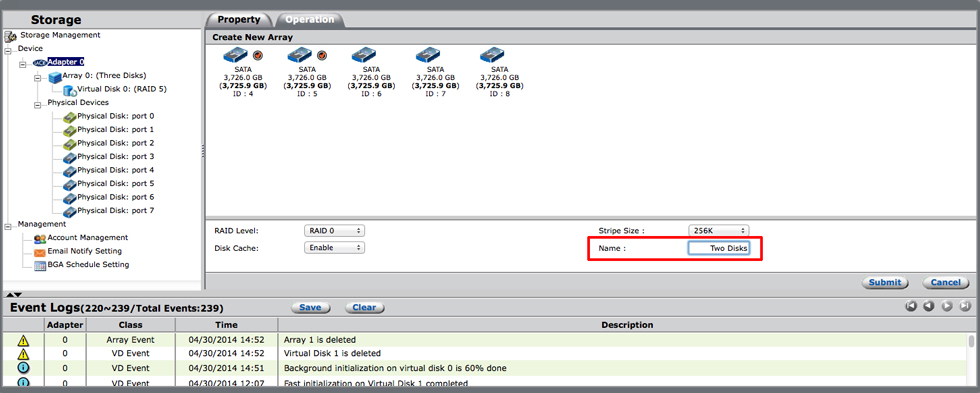
- Choose Submit at the bottom of the screen. If the selected RAID level does not support the selected combination of drives, the submit button remains grey.


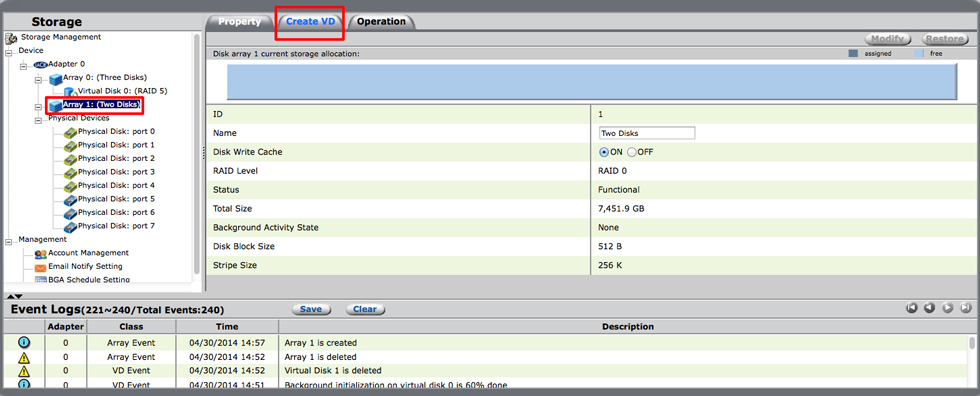
A new array link appears in your left navigation panel, displaying the new array properties.

You can now create a virtual disk to use as storage volumes.
Creating an array notes
Stripe size
Stripe size specifies the size of single data block on the virtual disk. Available stripe sizes are 64K, 128K, and 256K. Support for different stripe sizes can vary.
The larger the stripe size, the longer it takes for the RAID controller to read from and write to data blocks on the physical disks. For best read/write performance, a larger stripe size is recommended for applications requiring large data transfers, such as audio, video, and graphics. A smaller stripe size enhances read/write performance for applications with content much smaller in size, such as emails and documents.
Disk cache
Caching data optimizes your LaCie product for best write performance. Write data is stored temporarily in DDR cache memory and flushed to the hard disk at the appropriate time. This means that transfer speeds can be faster since your computer retrieves data directly from the cache rather than searching on the hard drives. However, in the event of power failure, there is a serious risk of losing data integrity if the transfer of data from the DDR cache to the hard disk is not completed.
When data caching is disabled, all data is accessed from the hard drives. This option is recommended when data protection is critical to your workflow. While access to data is not as fast when disk caching is disabled, transfer rates remain quite high due to the use of a hardware RAID controller and Thunderbolt 2 technology.
Creating a virtual disk
Virtual disks act as storage volumes for your computer. Following the creation of the virtual disk, use Disk Utility to create a single partition or, divide the virtual disk into multiple partitions. For optimal performance, it is recommended that you reduce the number of partitions and always format using HFS+ (Journaled). To review the number of supported partitions and partition size for your operating system, see Mac OS X: Mac OS Extended format (HFS Plus) volume and file limits.
- Select the array in the Storage pane and choose the tab Create VD.
- The Create Virtual Disk window presents options for the virtual disk. Click on the Cache Mode pull-down menu to choose On (performance) or Off (protection). See the explanation below for help with choosing the optimal cache mode.
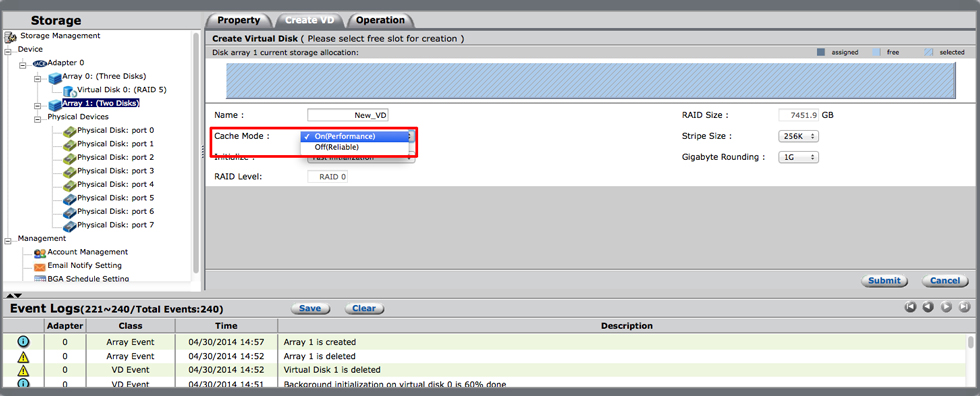
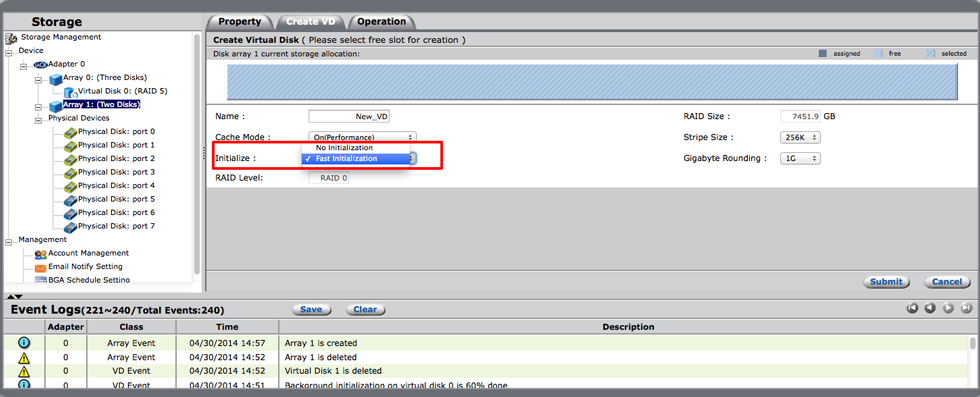
- Click on the Initialize pull-down menu to choose No Initialization, Fast Initialization, Foreground Initialization, or Background Initialization. Options can vary based upon the level of RAID. The screenshot example has only two options since it is a RAID 0 array. See the explanation below for help with choosing the initialization.
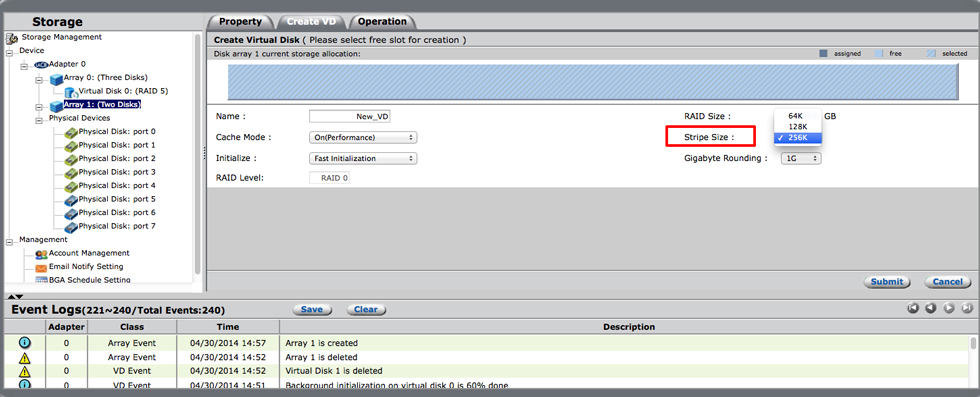
- Click on the Stripe Size pull-down menu to choose 64, 128K, or 256K. See the explanation below for help with choosing the stripe size.
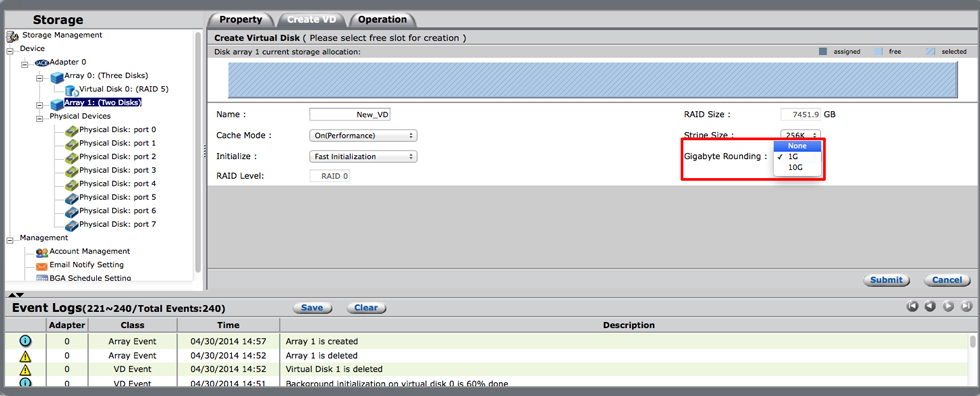
- Click on the Gigabyte Rounding pull-down menu to choose None, 1G, or 10G. See the explanation below for help with choosing the gigabyte rounding.
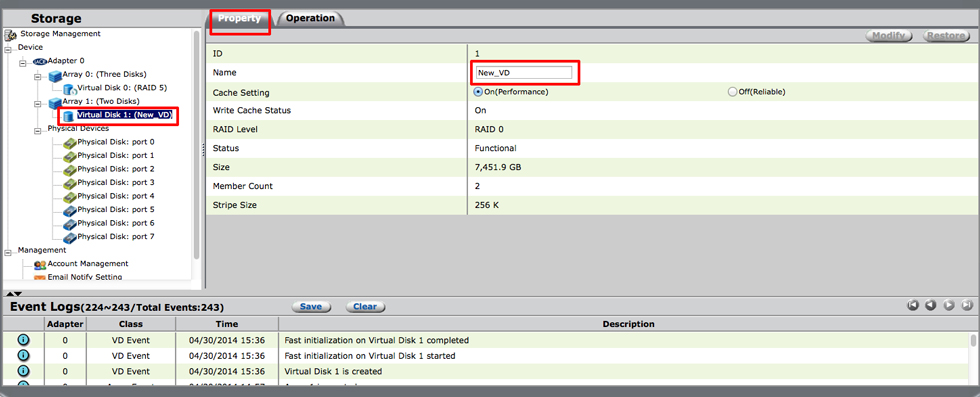
- Choose Submit. LaCie RAID Manager creates the virtual disk and displays the Property tab for the new virtual disk. You can rename the virtual disk by entering a name in the field and selecting Modify.
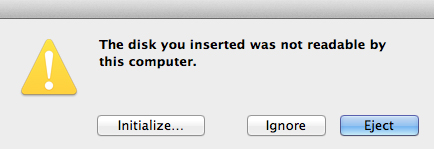
- Following the creation of the virtual disk, a message appears indicating that it is not readable. Choose Initialize to format the virtual disk for Mac.
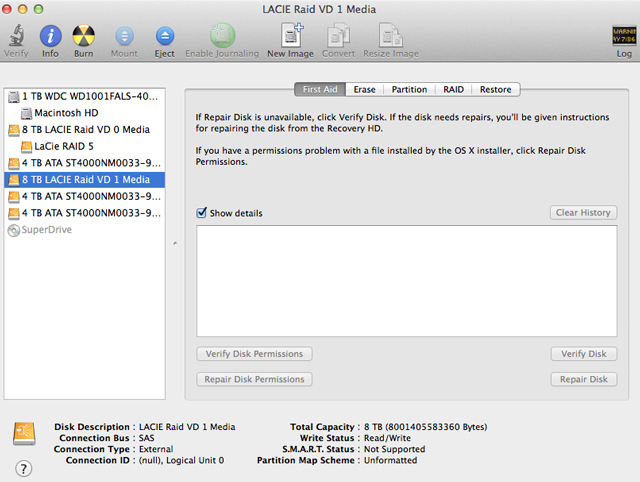
- The operating system launches Disk Utility. While Disk Utility can display a number of partitions, you can identify your virtual disk since it maintains the number used in LaCie RAID Manager. In this example, the new virtual disk in LaCie RAID Manager is 1. Click on your new virtual disk on the left.
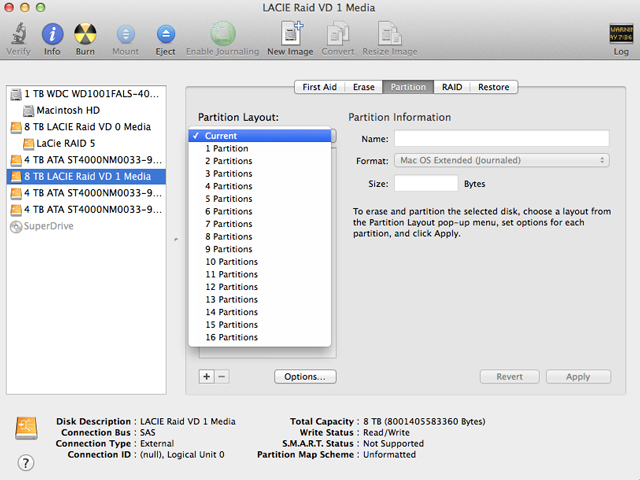
- Choose the Erase tab to quickly create a single partition or, as seen in the screenshot, the Partition tab for additional options regarding partitions on the desktop. Note: Your operating system supports large volume sizes, allowing you to limit the number of partitions on your desktop.
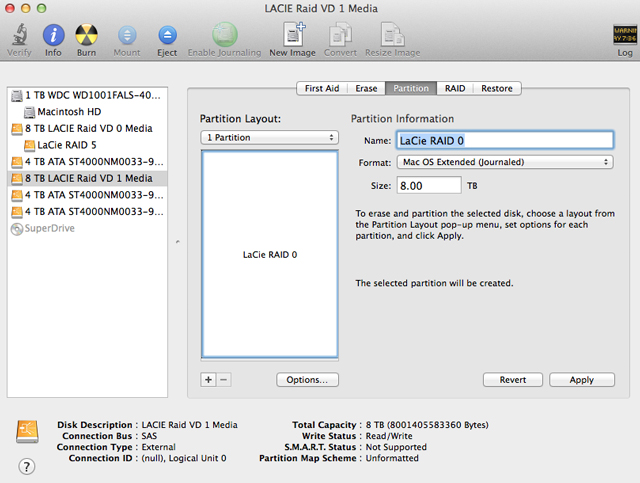
- Enter a name for each partition and select its format using the Format pull-down menu. Choose Apply to create the partitions. You can choose the partition in the Partition Layout section and enter a name in the applicable field. Note: It is highly recommended that partitions are formatted Mac OS Extended (Journaled) for optimal performance. Choosing other formats will impact transfer rates.


Creating a virtual disk notes
Cache mode
Caching data optimizes your LaCie product for best write performance. Write data is stored temporarily in DDR cache memory and flushed to the hard disk at the appropriate time. This means that transfer speeds can be faster since your computer retrieves data directly from the cache rather than searching on the hard drives. However, in the event of power failure, there is a serious risk of losing data integrity if the transfer of data from the DDR cache to the hard disk is not completed.
When data caching is off, all data is accessed from the hard drives. This option is recommended when data protection is critical to your workflow. While access to data is not as fast when disk caching is disabled, transfer rates remain quite high due to the use of a hardware RAID controller and Thunderbolt 2 technology.
Initialize
To help prevent errors handling data, it is recommended that you perform an initialization. During the initialize process, mirror or parity data is checked and updated to ensure consistency of data on the physical disks constituting the virtual disk. Available initialization options during the creation of a virtual disk include:
- No initialization: The data check is skipped. This option is not recommended as you can encounter data errors.
- Fast initialization: Fast initialization is a destructive process that erases all data on the virtual disk including the Master Boot Records (MBR) on all physical disks. This is a good option if you wish to perform a cursory consistency check before starting a project. However, it is not a full initialization that performs a thorough consistency check on the hard drives. See Check the Virtual Disk for Errors for further information.
- Foreground initialization: This option is similar to a fast initialization since the MBR for all the physical disks are erased. Therefore, it is also a destructive process. Since it performs a thorough consistency check, this option can take many hours to several days based upon the total capacity of the virtual disk. As its name indicates, a foreground initialization runs in the foreground and can take a good amount of processing power which will affect performance. Choose foreground initialization if you do not anticipate starting high-end video or graphic projects within the week.
- Background initialization: This option is a thorough, non-destructive consistency check of the physical disks. Since it runs in the background, the demand on the processor is reduced when compare with a foreground initialization. However, performance can be impacted, especially when working on high-end video or graphic projects. A background initialization can take many hours to several days based upon the total capacity of the virtual disk.
Gigabyte rounding
Gigabyte rounding is applicable to RAID levels using mirroring, such as RAID 1 and RAID 10. It defines the flexibility in size for spare drives used to rebuild degraded virtual disks and arrays. Available options for gigabyte rounding are:
- None
- 1G
- 10G
For example, a 120.5 GB physical disk and a 115.7 GB physical disk can create a 115.7 GB RAID 1 virtual disk. If Gigabyte Rounding is set to 1G, then the RAID controller floors the size of the physical disks to the nearest lower GB size. The 120.5 GB and 115.7 GB disks are treated as 120 GB and 115 GB physical disks, resulting in a 115 GB RAID 1 virtual disk. If the 115.7 GB physical disk fails, the virtual disk can be rebuilt with a spare drive sized between 115GB and 115.7 GB, providing flexibility in size up to 0.7 GB. If 10G is select, the rounding would go to the nearest lower 10GB size, which is 110. This would allow the spare to range between 110GB and 115.7GB.
Stripe size
Stripe size specifies the size of single data block on the virtual disk. Available stripe sizes are 64K, 128K, and 256K. Support for different stripe sizes can vary.
The larger the stripe size, the longer it takes for the RAID controller to read from and write to data blocks on the physical disks. For best read/write performance, a larger stripe size is recommended for applications requiring large data transfers, such as audio, video, and graphics. A smaller stripe size enhances read/write performance for applications with content much smaller in size, such as emails and documents.
Data security
Any loss, corruption, or destruction of data while using a LaCie hard drive or a LaCie hard drive system is the sole responsibility of the user, and under no circumstances will LaCie be held liable for the recovery or restoration of this data. To help prevent the loss of your data, LaCie highly recommends that you keep TWO copies of your data: one copy on your LaCie storage device; and, a second copy on one of the following:
- Direct-attached storage (DAS)
- A NAS
- Some form of removable storage or archival media
Important Info: 1GB = 1,000,000,000 bytes. 1TB = 1,000,000,000,000 bytes. Once formatted, the actual available storage capacity varies depending upon the operating environment (typically 10-15% less).
© LaCie 2024
Last modified : Oct 02, 2014