User Tools
Site Tools
2big NAS | 5big NAS Pro
User Manuals Print page
 Save page as PDF
Table of Contents


Table of Contents
Manage RAID - LaCie 5big NAS Pro

Your LaCie 5big NAS Pro optimizes disk performance and capacity using LaCie SimplyRAID. No matter the capacity of your disk(s), LaCie SimplyRAID will prepare the LaCie 5big NAS Pro storage for immediate use as well as future expansion. LaCie SimplyRAID accommodates your storage needs, allowing you to:
- Install disks of varying capacities (1TB, 2TB, and 3TB)
- Replace smaller capacity disks with larger capacity disks
- Upgrade storage capacity without deleting or moving data
- Protect data without compromising performance
While LaCie recommends the benefits of LaCie SimplyRAID, the Dashboard RAID page also gives you the option to manually configure RAID.
Review your RAID settings
RAID mode

This box shows you the current RAID scheme for your LaCie NAS, as well as the number of disks involved in the scheme.
RAID Status

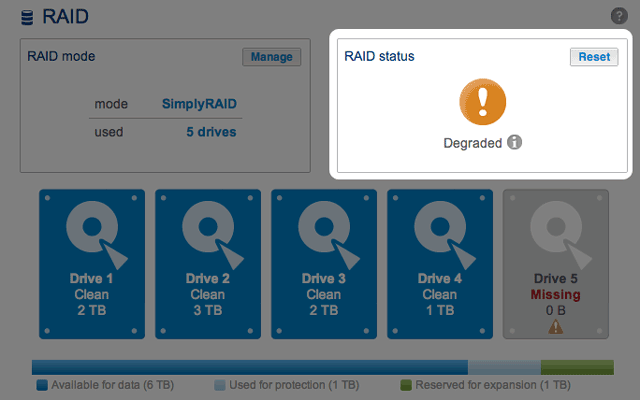
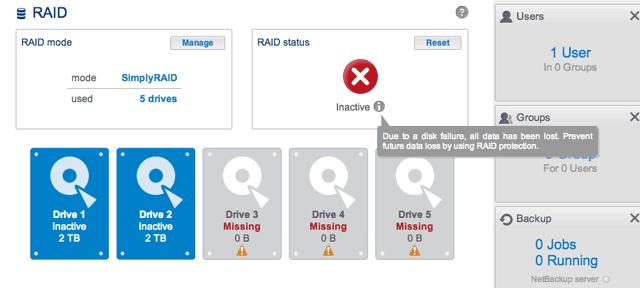
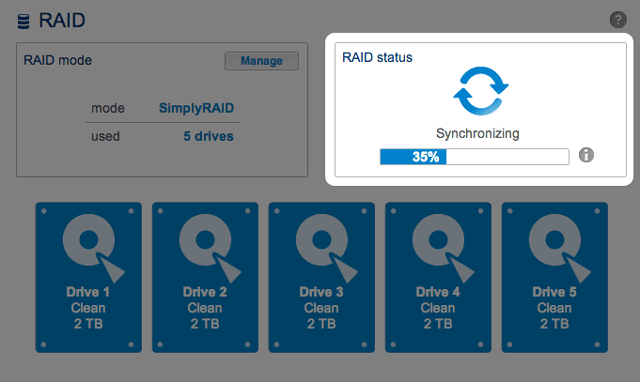
This box lets you know whether the array is healthy, degraded, or synchronizing.
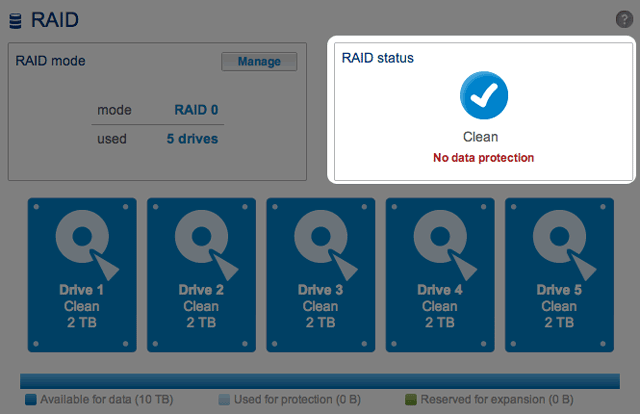
- RAID 0 (no data protection).
- RAID degraded due to a missing disk.
- RAID failure due to missing or bad disks.
- RAID synchronizing following a disk replacement.


See RAID Status: Expand, Replace, and Reset for instructions on expanding your array and replacing disks.
Hard Drive Map

Click the illustration of the disk to see which slot in the LaCie NAS the disk occupies.

Click on the Hard Drive to see its physical location
Storage Distribution

The multicolor bar below the disks provides a fast reference on how LaCie SimplyRAID distributes the LaCie 5big NAS Pro storage.
- Dark blue: Storage capacity for your data.
- Light blue: Protection in case one or two disks fail. The light blue indicator will vary in size depending upon single or double disk protection.
- Green: Disk capacity that spans beyond the level of RAID assigned by LaCie SimplyRAID. This space is reserved for expansion should you add new or larger capacity disks.
Storage capacity and distribution
Factors that determine available data capacity include:
- The amount of disks in the enclosure
- The storage capacity of each disk (see note below on mixed capacities)
- RAID Mode
- Single disk or double disk security
Examples:
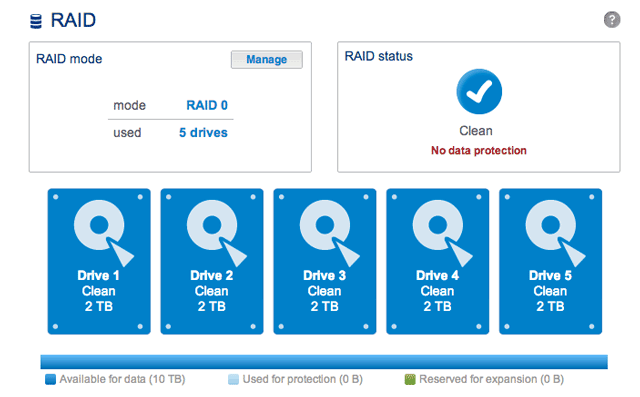
- Manual RAID 0 configuration with five disks. The only color is dark blue since RAID 0 has no protection and all the disks are of equal capacity (2TB).
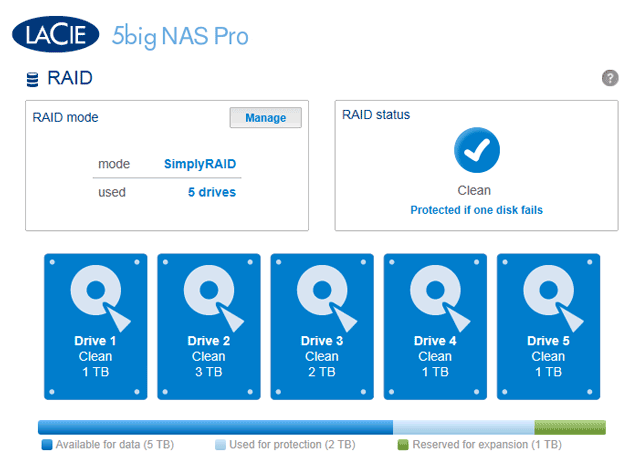
- LaCie SimplyRAID configuration with five disks. All colors are represented since the RAID array uses single disk security and the disks are of mixed capacities.
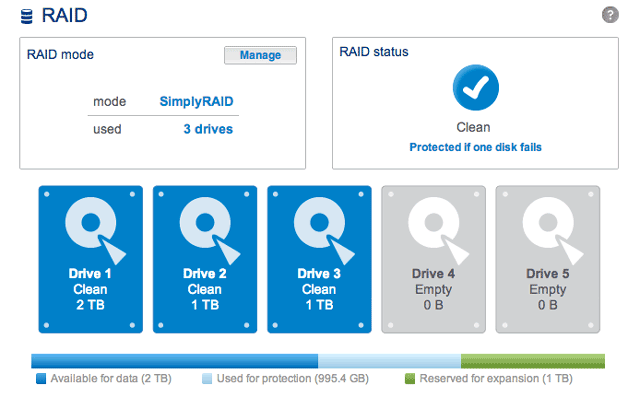
- LaCie SimplyRAID configuration with three disks. All colors are represented since the RAID array uses single disk security and the disks are of mixed capacities.


About RAID Modes
Refer to the table below for an overview of the different RAID modes, and see the descriptions for details. Note that this information is summarized in the RAID Setup Wizard on the Dashboard.
| RAID Mode | Minimum Hard Drives | Data Capacity | Protection | Performance | Factory Default |
|---|---|---|---|---|---|
| SimplyRAID | 2 | Optimized |  |  | Yes |
| RAID 0 | 2 | 100% |  | | – |
| RAID 1 | 2 | 50% | |  | – |
| RAID 5 | 3 | 60% - 75% (estimate varies by disk configuration) | |  | – |
| RAID 6 | 4 | 60% (estimate varies by disk configuration) | | | – |
Note on RAID 0 and 4TB hard drives: RAID 0 configurations with five hard drives cannot surpass 16TB. LaCie recommends against using five 4TB hard drives in a RAID 0 configuration.
Note on RAID 1: RAID 1 will not be available in four- and five-disk configurations.


RAID Setup Wizard
Follow the directions to run the RAID Setup Wizard. You may select:
- LaCie SimplyRAID: LaCie's smart RAID configuration agent.
- Manual RAID: Configure your array using standard RAID models based upon the amount of disks in your enclosure.


Rebuilding Times
Rebuilding a protected RAID array can take many hours, depending on the capacity of the hard disks and your LaCie NAS's available resources (concurrent tasks such as backups or torrent downloads will slow rebuilding). Changing to an unprotected RAID mode (e.g. RAID 0) takes less than five minutes. Note that data is accessible during rebuilding.
RAID Status: Expand, Replace, and Reset
The RAID Status box will inform you of changes to your array that may require action on your part. Follow the instructions below to:
- Remove and/or insert a disk
- Perform one of the following:
- Expand your RAID with a new disk
- Replace a missing or failed disk
- Reset the RAID configuration with the available disks
Important info: If a hard disk that you have purchased from LaCie fails, please contact your LaCie reseller or LaCie Customer Support.
Hard Disk Replacement/Expansion with Unprotected and Protected Arrays
Unprotected RAID Arrays and Swapping/Expanding Hard Disks:
- Removing a hard disk from a RAID 0 array while the device is powered on may cause you to lose data. To avoid problems, shut down the LaCie NAS before removing healthy disks. Return the hard drives to their proper bays before powering on the LaCie NAS.
- In cases where a hard drive has failed or you wish to expand storage capacity, data will be lost when replacing/swapping hard disks.
Protected RAID Arrays and Swapping/Expanding Hard Disks: If your array is protected (e.g. RAID 1), you can remove a hard disk while the product is turned on without damaging the array and losing data, a process also referred to as “hot-swapping”. In most instances, LaCie recommends hot-swapping when replacing or expanding hard disks in the LaCie NAS. For example, if you swap or insert unclean hard drives (with data) from another LaCie NAS (e.g. a LaCie 2big NAS to a LaCie 5big NAS Pro), you may experience problems when first booting your current LaCie NAS.
When replacing or expanding hard drives in a protected RAID array:
- Perform the operation while the LaCie NAS is powered on (hot-swapping).
- Use clean hard drives (without data).
Remove/Insert a Hard Disk


Expand your RAID array Hard Disk Capacity


Replace a failed or missing disk
If you have configured your RAID as Standard (Manual as opposed to SimplyRAID), the new disk must have equal or greater capacity than the disk it is replacing.
- Remove the failed disk and insert a new hard drive per the instructions above.
- Go to Dashboard > RAID. The recently inserted hard disk will be labelled New.
- If the LaCie 5big NAS Pro RAID configuration is SimplyRAID, RAID 1, RAID 5, or RAID 6:
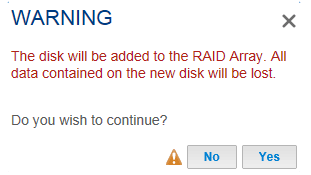
- Click the Replace button below the New Disk. DO NOT click on Reset.
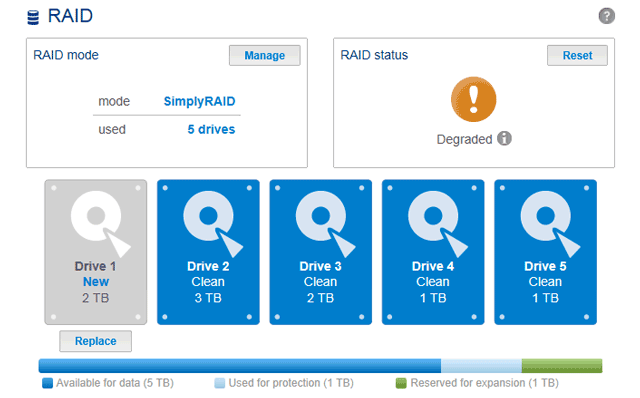
- Confirm the addition and complete the RAID Setup Wizard.
- You may continue to use the LaCie NAS during the RAID synchronization.
- If the LaCie 5big NAS Pro RAID configuration is RAID 0:
- Click the Manage button and complete the RAID Setup wizard.


The Dashboard will become unavailable for a brief period of time as the system configures the RAID. On protected RAID arrays, you may continue to access files stored on your LaCie NAS during the RAID synchronization.
Reset the RAID array (SimplyRAID only)

If a hard drive in the array fails and you do not have a replacement disk, you can use the Reset button to reconfigure the RAID. The Reset button will optimize the RAID configuration using the remaining disks. LaCie recommends that you back up your files since all data will be deleted while creating the new RAID array.
© LaCie 2024
Last modified : Mar 14, 2014