User Tools
Site Tools
2big NAS | 5big NAS Pro
User Manuals Print page
 Save page as PDF
Table of Contents


Table of Contents
Network
| LaCie 2big NAS | LaCie 5big NAS Pro |
|---|---|
 |  |
Connection tab
If your network is DHCP-enabled, your LaCie NAS will automatically be assigned an IP address and other values.
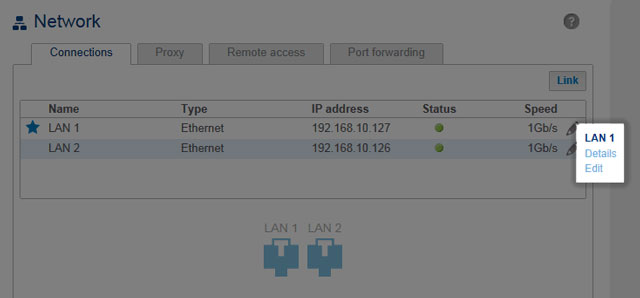
The LaCie 2big NAS has a single LAN port while the LaCie 5big NAS Pro includes two LAN ports (see below). If you wish to review or modify the values of a LAN port:
- LaCie 2big NAS: Choose the Edit button.
- LaCie 5big NAS Pro: Select the configuration icon (pencil) then choose Details or Edit.
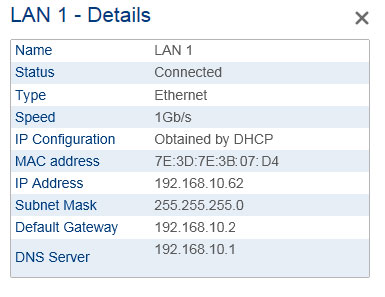

LAN Details - 5big NAS Pro


Selecting Edit allows you to modify certain network parameters. You can manually adjust network values by choosing Manual configuration and give the LAN port a unique name (LaCie 5big NAS Pro only). Make certain to check the box next to Default gateway to enter or revise a gateway address. For the manual address to take effect, all fields (including Default Gateway and DNS Server) must be completed before selecting Apply. The LAN port will revert to automatic if a field is left blank.


Important info on network addressing: Changes to the IP address must be consistent with the values of the router and/or network. You can lose contact with your LaCie NAS by typing addresses that are not available on your network.
LaCie 2big NAS users: Skip to Proxy Tab.
LaCie 5big NAS Pro Ethernet ports

Icons representing the two LAN ports on the Connections tab indicate connection to the network:
- Connected: a
- Not connected: b
Port aggregation: multiple networks, load balancing, and fault tolerance
The LaCie 5big NAS Pro is equipped with two LAN ports for enhanced network performance. Review the instructions below to learn how to configure the LaCie 5big NAS Pro LAN ports for your network.
Two networks: Bridge the data on your LaCie 5big NAS Pro


Load balancing: enhanced speed


Fault tolerance: failover protection


Note on failover for bonding versus fault tolerance: Both bonding and fault tolerance can save you from losing productivity in the event that a single LAN fails (e.g. port, router port, cable, etc.). While the bonded ports can adapt to the loss of one Ethernet signal, it can take a few minutes for the NAS to switch to single LAN mode. Fault tolerance will make the switch instantly, allowing for uninterrupted communication with the NAS.
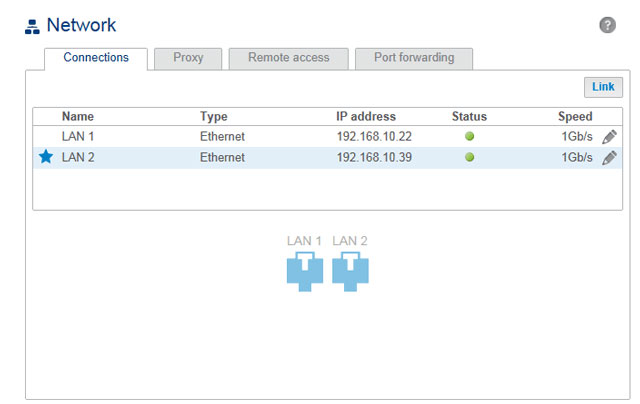
LAN priority: primary LAN interface
The primary Ethernet port is marked by a star next to the LAN number. In the example below, LAN 1 is the primary Ethernet port.

The primary Ethernet port:
- Carries the data when the LaCie 5big NAS Pro is configured in Fault Tolerance
- Acts as the gateway to the internet when the LaCie 5big NAS Pro is connected to two separate networks
LAN interface and LaCie Network Assistant: LAN Port 1 must be enabled to use LaCie Network Assistant.
You can change the priority order by reassigning the role of primary port.
- Select the configuration icon (pencil) for the port you wish to assign as the primary.
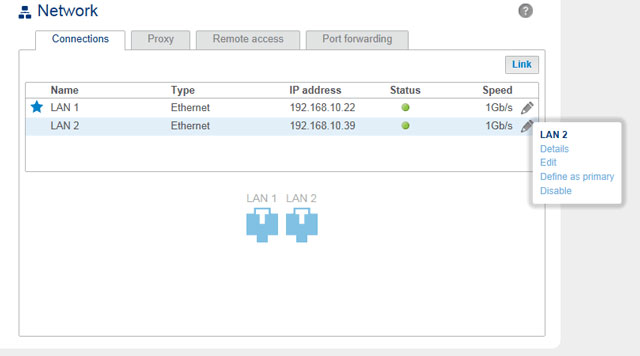
- Choose Define as primary.
- The star icon will move to the port to reflect the change.


Proxy tab

A proxy server may be used to connect compatible network devices to the internet. If necessary, your LaCie NAS can be configured to use a proxy server. First, activate the feature by selecting the Proxy server option from the drop-down menu, then fill in the proxy server address, port, and optional authentication information. Choose Apply for your changes to take affect.
Remote access tab
Port forwarding tab

Use this page to manage your LaCie NAS's port forwarding.
To access the internet, file and application services (e.g. HTTP, HTTPS, remote access (see LaCie MyNAS), download machine, and more) use port numbers on the LaCie NAS and the network router. As seen in the screenshot above, automatic port forwarding is turned on by default and the port numbers are the same for both the NAS port and Router port columns.
In most instances, automatic port forwarding should help you access services on the NAS. However, enterprise-level network security or port availability on your router can prevent access to ports. Therefore, it may be necessary to change the router port numbers manually for services. Before adjusting numbers in this tab, confirm that the ports you wish to use are available on your router. For example, if you intend to change download machine to router port number 8800, you must make certain that port 8800 is available on your router. Additionally, your router must be compatible with UPnP-IGD/NAT-PMP protocols. See your router's user manual for details.
To change the router port for a service on the NAS, choose its value in the Router port column.

To disable port forwarding for a service, select its configuration icon (pencil) and then choose Disable.
Note on Services in the Port Forwarding tab: Download machine and other services will appear in this tab once they have been enabled.
© LaCie 2024
Last modified : Mar 14, 2014