User Tools
Site Tools
2big NAS | 5big NAS Pro
User Manuals Print page
 Save page as PDF
Table of Contents


Table of Contents
![]()
LaCie 2big NAS | LaCie 5big NAS Pro User Manual
of this document. You will find the most recent content as well as expandable illustrations, easier navigation, and search capability.
| LaCie 2big NAS | LaCie 5big NAS Pro |
|---|---|
 |  |
Introduction
This manual covers:
| Products | Operating System Version |
|---|---|
| LaCie 2big NAS | LaCie NAS OS 3 (learn more here) |
| LaCie 5big NAS Pro | LaCie NAS OS 3 |
Congratulations on your purchase of a LaCie professional NAS (network-attached storage device). Designed to satisfy the data sharing and backup needs of small, medium, and branch offices, your product belongs to a new generation of NAS.
This manual will guide you through the process of connecting the LaCie NAS to your network and will assist you in troubleshooting any issues that might arise. If you encounter problems, check Getting Help. Note that most of the problems users encounter can be resolved by resetting the product to factory conditions (see 2big NAS Reset or 5big NAS Pro Recovery).
Box content
| LaCie 2big NAS | LaCie 5big NAS Pro | |
|---|---|---|
| Product | | |
| Ethernet cable | | |
| External Power supply | | |
| Utilities CD-ROM with software | | |
| Drive stand for upright use | | –– |
| Disk drawer key | | |
| USB Key for install and recovery | –– | |
| Cable management clip | –– | |
Important info: Please save your packaging. In the event that the drive should need to be repaired or serviced, it must be returned in its original packaging.
Minimum system requirements
- Latest version of Windows® XP, Windows Vista®, Windows 7, Windows 8 / Mac® OS X 10.5 or higher
- Web browsers: Internet Explorer™ 7.0 or higher, Firefox™ 3.0 or higher, Safari™ 3.0 or higher, or Chrome 2.0 or higher
- Computer with an Ethernet network adapter
- Ethernet switch or router 10/100/1000 (Mb/s)
Important info:
Your LaCie product's performance can be affected by such external forces as network activity, hardware, distance, and setup.
For optimal performance, use a Gigabit Ethernet router and a Gigabit Ethernet board in your host computer.
Your LaCie product's performance can be affected by such external forces as network activity, hardware, distance, and setup.
For optimal performance, use a Gigabit Ethernet router and a Gigabit Ethernet board in your host computer.
Views of the Product
Front view
| LaCie 2big NAS | LaCie 5big NAS Pro |
|---|---|
 |  |
- Front LED button: The LED button signals the status and health of the device. For further details, see LED Behavior and Button Functions.
Rear view
LaCie 2big NAS

- Left drive status LED (see LED Behavior and Button Functions)
- ON/OFF
- Gigabit Ethernet
- USB 2.0 expansion
- eSATA expansion
- Right drive status LED (see LED Behavior and Button Functions)
- Drive tray handle
- Drive lock
- Power connector
LaCie 5big NAS Pro

- Drive status LED (see LED Behavior and Button Functions)
- Drive tray handle
- Drive lock
- USB 2.0 expansion (x2)
- USB 3.0 expansion (x2)
- Gigabit Ethernet (x2)
- VGA port (for maintenance)
- Power connector
- Reset button (see LaCie NAS Rescue: 5big NAS Pro)
LED Behavior and Button Functions
General LED Behavior
The list of colors below will help you identify the general status of your NAS:
| Color | State |
|---|---|
| Solid blue | Ready |
| Blinking blue | Startup; shutdown; activity |
| Blinking red and blue | RAID synchronization; software update |
| Blinking red | Warning |
| Solid red | Error |
Front and disk LEDs
The front and rear LEDs indicate drive status and activity. This section describes the behavior of the LED indicators. Note that even if you have turned off the front LED using Dashboard > Eco Management, events triggering a red light will always cause the front LED to turn on.
| Front LED Color | Rear LED Color | State |
|---|---|---|
Blinking blue  | Activity LED for working disk(s) (until they are fully initialized)  | Occurs as the device is booting; will cease once the drives are fully initialized |
Solid blue  | Activity LED for working disk(s) | Device is functioning properly and the drives are working (read/write) |
Blinking blue/red  | Blinking blue/red | RAID synchronizing; will cease once operation has concluded |
| Activity LED for working disk(s) | Operating system update in progress | |
Blinking red  | Solid red for non-functional disk(s)  | RAID is degraded; data is intact but the array is no longer protected should another disk fail |
| Activity LED for all disks | Temperature alert | |
| Fan is not spinning | ||
| The NAS is receiving its power via a connected UPS | ||
| Solid red | Activity LED for working disk(s) | Temperature alert (critical level) – the product will shut off |
| Power supply has been cut and the UPS has run out of reserve power – the product will shut off | ||
| Solid red for non-functional disk(s) | RAID has failed and data has been lost | |
| Off in disconnected disk(s) | Disk(s) is/are disconnected |
Front button
Short push
5big NAS Pro only: When the the product is operating, a short push of the on/off button will turn the 5big NAS Pro off or, place the 5big NAS Pro into deep sleep mode if the option has been configured in NAS OS. See Eco Management for details on deep sleep mode.
Long push
5big NAS Pro only: A long push of more than four seconds will cut the power from the 5big NAS Pro, forcing it to shut down immediately. A long push is not recommended as it may result in data loss.
Factory settings/rescue
LaCie 2big NAS: The front LED button can be used in tandem with the ON/OFF switch to revert the device to its factory settings (see Reset to Factory Conditions: 2big NAS).
LaCie 5big NAS Pro: The front LED button can be used in tandem with the reset button on the rear of the device to launch the LaCie NAS Rescue (see LaCie NAS Rescue: 5big NAS Pro).
Hard Disk Heat Management
Heat dissipation design - 2big NAS
The LaCie 2big NAS Pro's metal body is ideal for naturally dissipating internal drive heat. Its unique design draws heat away from the internal drive toward the external casing. The large surface area of the heat sink casing absorbs internal heat and dissipates it, keeping the drive safe and prolonging its life and reliability.
As a consequence, it is normal that the external casing is warm to the touch. Make sure that the vent on the back bezel is not obstructed and that there is a natural airflow across the casing.

Upright, stack & rackmount configuration
Heat dissipation is maximized when this LaCie product is in the upright position. When stacking the LaCie 2big NAS, you must attach rubber feet (if included) on the under side of your drives. This will allow for airflow between the enclosures so that the heat dissipation can work effectively. LaCie does not recommend stacking or racking more than two LaCie 2big NAS enclosures on top of each other.
Dual cooling - 5big NAS Pro
With its dual cooling design, the LaCie 5big NAS Pro's is built to protect against overheating. The 5big's solid aluminum casing diverts and dissipates heat, keeping the drives cooler even after extended periods of activity. Within the casing, a whisper-quiet, thermo-regulated Noctua® fan automatically adapts its speed to the internal temperature. As a result, the fan cools the components, which is vital for long-term use.

Connect to the Network
Connect your LaCie NAS to a network.
Enclosure without disks: If you purchased an enclosure that did not include disks, go to Connect to the Network: Diskless LaCie 2big NAS or Connect to the Network: Diskless LaCie 5big NAS Pro for instructions on how to connect to your device to the network.
Step 1: Connect the Ethernet cable and power supply


Step 2: Power on the LaCie NAS


Next steps
- Simplify NAS access: LaCie recommends that you install the software utility LaCie Network Assistant before moving forward with the device configuration. LaCie Network Assistant gives you instant information on your LaCie NAS, such as firmware version, IP address, and hardware address. It will also provide quick access to shares (volumes) and the Dashboard. See LaCie Network Assistant for instructions.
- Configure your NAS: For details on how to configure and use your LaCie NAS, go to Shares: Access and Transfer Files and NAS OS Administration.
Connect to the Network: Diskless LaCie 2big NAS
Users who purchased a LaCie 2big NAS enclosure without hard disks should follow the instructions below.
Enclosure with hard disks: If you purchased an enclosure with hard disks, see Connect to the Network for instructions on how to connect to your network.
Choose compatible hard drives
Review the following before adding hard drives to your LaCie 2big NAS:
- When adding a new hard drive to the enclosure, consider a LaCie 2big Spare Drive. LaCie hard drives are specially prepared and optimized for use with LaCie NAS.
- LaCie NAS are compatible with most SATA II and SATA III hard drives. Go to Network Hard Drives for a list of hard drives tested with the 2big NAS. If you have any issues with hard drive compatibility and LaCie products, please contact our tech support.
- LaCie recommends selecting disks that are equal in storage capacity. For example, if the first disk slot has a 1TB hard disk, fill the second slot with a 1TB hard disk.
Installation steps
Step 1: Connect and power on the diskless 2big NAS

Step 2: Remove the disk tray sticker and empty disk tray(s)


Step 3: Install the disks into the disk trays

Step 4: Insert the full disk trays


Step 5: Initialize the new disks
Step 6: Access the LaCie NAS Dashboard

Next steps
- Simplify NAS access: LaCie recommends that you install the software utility LaCie Network Assistant before moving forward with the device configuration. LaCie Network Assistant gives you instant information on your LaCie NAS, such as firmware version, IP address, and hardware address. It will also provide quick access to shares (volumes) and the Dashboard. See LaCie Network Assistant for instructions.
- Configure your NAS: For details on how to configure and use your LaCie NAS, go to Shares: Access and Transfer Files and NAS OS Administration.
Connect to the Network: Diskless LaCie 5big NAS Pro
Users who purchased a LaCie 5big NAS Pro enclosure without hard disks should follow the instructions below.
Enclosure with hard disks: If you purchased an enclosure with hard disks, see Connect to the Network for instructions on how to connect to your network.
Choose compatible hard drives
Review the following before adding hard drives to your LaCie 5big NAS Pro:
- When adding new hard drives to the enclosure, consider LaCie 5big Hard Drives. LaCie hard drives are specially prepared and optimized for use with LaCie NAS.
- LaCie NAS are compatible with most SATA II and SATA III hard drives. Go to Network Hard Drives for a list of hard drives tested with the 5big NAS Pro. If you have any issues with hard drive compatibility and LaCie products, please contact our tech support.
Installation steps
Step 1: Update the LaCie USB key


Step 2: Connect the Ethernet cable, power cable, and LaCie key


Step 3: Remove the sticker and power on the 5big NAS Pro

Step 4: Install hard drives into the enclosure


Next steps
- Simplify NAS access: LaCie recommends that you install the software utility LaCie Network Assistant before moving forward with the device configuration. LaCie Network Assistant gives you instant information on your LaCie NAS, such as firmware version, IP address, and hardware address. It will also provide quick access to shares (volumes) and the Dashboard. See LaCie Network Assistant for instructions.
- Configure your NAS: For details on how to configure and use your LaCie NAS, go to Shares: Access and Transfer Files and NAS OS Administration.
LaCie Network Assistant
LaCie Network Assistant is a software utility that will help you detect and access LaCie NAS connected to your network. Use LaCie Network Assistant for instant information on the device's:
- IP address
- Version of software/firmware
- MAC address (hardware ID number)
LaCie Network Assistant can also help you:
- Launch the Dashboard
- Mount one or more shares
- Auto-mount one or more shares
- Update your product's firmware (2big NAS only, see Update Firmware)
Important info on LaCie Network Assistant and the LaCie 5big NAS Pro LAN Ports: LaCie Network Assistant will always provide information on LAN 1, even if you have connected the NAS to your network using LAN 2.
Install LaCie Network Assistant
LaCie Network Assistant is already installed: To avoid NAS detection conflicts, make certain that you are running the latest version of LaCie Network Assistant. If you have already installed LaCie Network Assistant, go to the product website to confirm it is up to date.
Choose one of the options below:
Install Using the included CD-ROM
Launch LaCie Network Assistant
LaCie Network Assistant will automatically detect your LaCie device(s) on the network. Review the steps below to access your device.
- Windows Users:
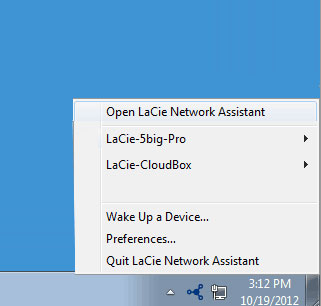
- Select LaCie Network Assistant in Start > All Programs/Programs. The application icon will appear in the system tray.
- Right-click on the icon in the system tray.

- Mac Users:
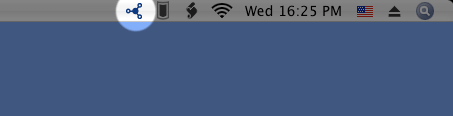
- Select LaCie Network Assistant at Go > Applications > LaCie Network Assistant. The application icon will appear in the menu bar.
- Select the icon in the menu bar.


Find your LaCie NAS's address information
- Launch LaCie Network Assistant.
- Windows users: Select the LaCie Network Assistant icon to choose Open LaCie Network Assistant.
Mac users: Choose the LaCie Network Assistant icon in the menu bar to select Open LaCie Network Assistant…
- If you have more than one LaCie network device, select your LaCie NAS from the list of devices in the left-hand column.
- Choose the Configuration tab.
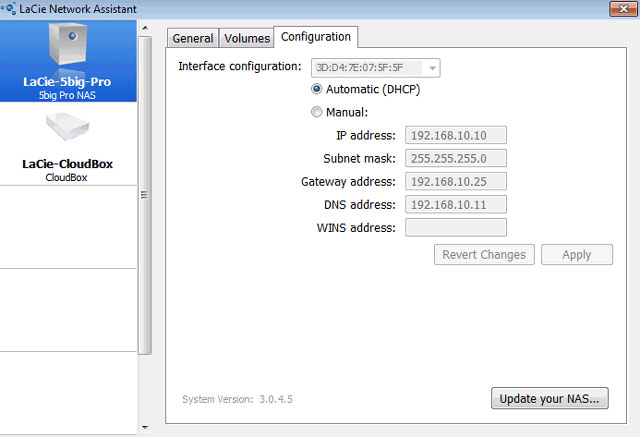
- Review the device's:
- IP address
- MAC address (hardware ID)
- Version of software


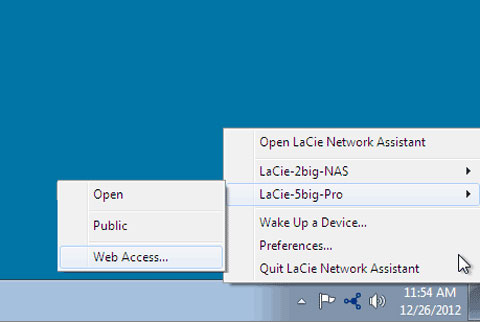
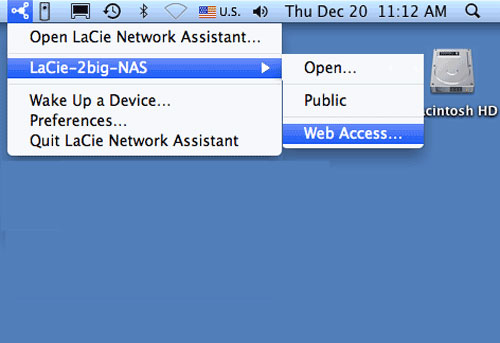
Access the Dashboard with LaCie Network Assistant
- Launch LaCie Network Assistant.
- Choose your device:
- Windows: Right-click on the LaCie Network icon in the system tray to select your LaCie NAS.
- Mac: Choose the LaCie Network Assistant icon in the menu bar to select your LaCie NAS.
- Select Web access.
- The Dashboard login page will launch in an internet browser.
Mount shares
LaCie Network Assistant gives you many options to access your LaCie NAS's public and private shares.
Quick access
- If LaCie Network Assistant is not running, launch the program.
- To select the LaCie NAS on your network, do one of the following.
- Windows: From the system tray, right-click on the LaCie Network Assistant icon and select the LaCie NAS.
- Mac: From the menu bar, select the LaCie Network Assistant icon and choose your LaCie NAS.
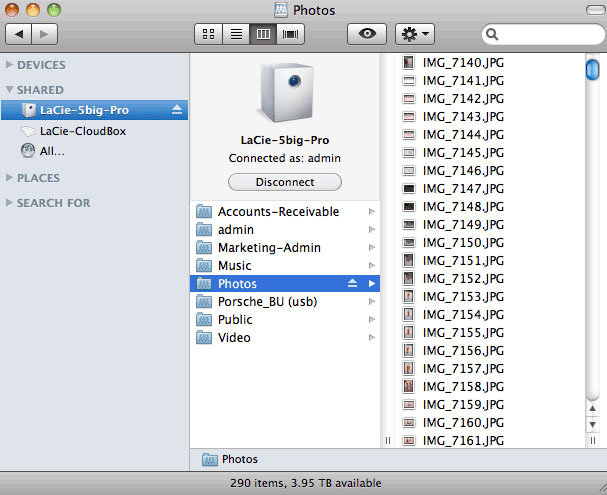
- Choose the share you want to access.
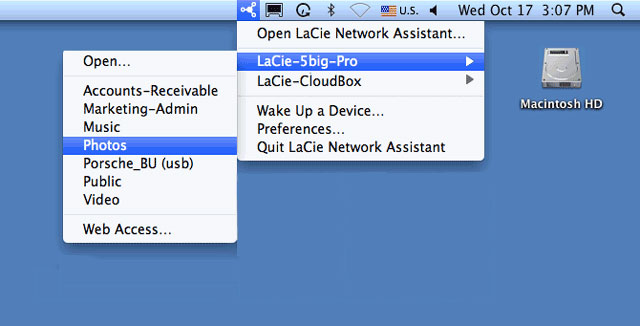
- The share will open in an Explorer window (Windows) or a Finder window (Mac).
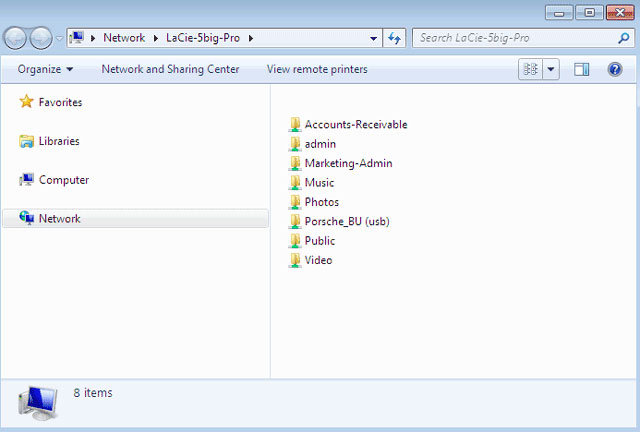
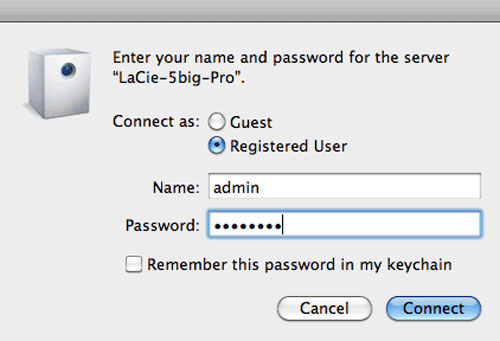
- Public shares are available to everyone on the network. Private shares will prompt a user for a username and password (see Authenticate private shares to learn how to avoid entering the password). The administrator should use the credentials created during the initial setup or Dashboard login (see Connect to the Network/Connect to the Network: Diskless LaCie 2big NAS/Connect to the Network: Diskless LaCie 5big NAS Pro and NAS OS Administration). A user should type the login and password prepared by the administrator (see Users).
- Transfer files normally between your computer and the share. Mac users: If the share does not open in a Finder window, simply navigate in the Finder to SHARED > [machine name] > [share name].


Note on Quick Access to shares: Private shares require a valid username and password (see Authenticate for Private Shares).
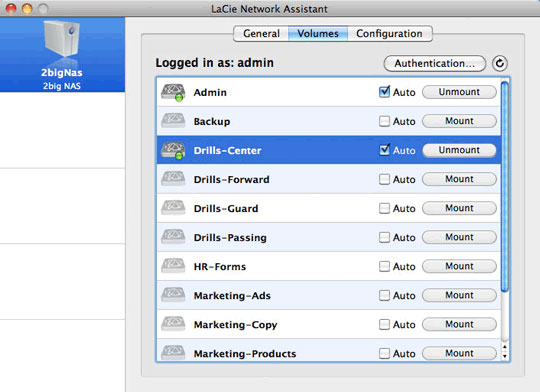
Mount
- If LaCie Network Assistant is not running, launch the program.
- Right-click on the icon in the system tray (Windows) or choose the icon in the menu bar (Mac) and select Open LaCie Network Assistant.
- Select your LaCie NAS's machine name from the list of devices in the left-hand column, then choose the Volumes tab.
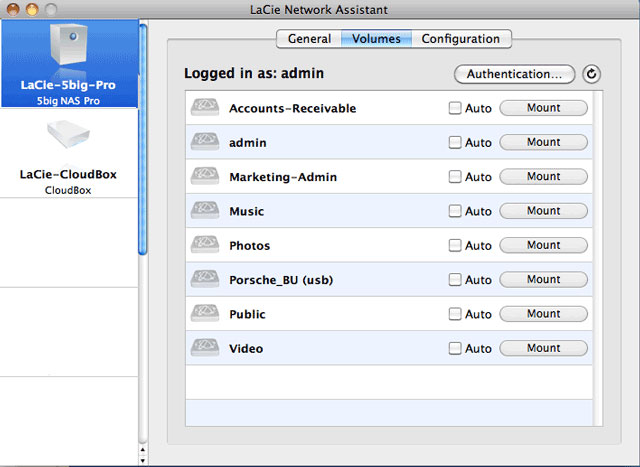
- Double-click the share you wish to access. The share will open in an Explorer window (Windows) or a Finder window (Mac). Transfer files normally from your computer to the share.

Technical note: Mac users: If the share does not open in a Finder window, simply navigate in the Finder to Network > [machine name] > [share name].
Note on mounting shares: Private shares require a valid username and password (see Authenticate for Private Shares).
Authenticate private shares
- If LaCie Network Assistant is not running, launch the program.
- Right-click (Windows) on its icon in the system tray or select it in the menu bar (Mac).
- Choose Open LaCie Network Assistant.
- If you have more than one LaCie NAS, select the device you wish to access from the list in the left-hand column.
- Choose the Volumes tab.
- Select Authentication…
- In the pop-up window, choose Registered User and enter your Username and Password. Select OK.
- All available shares will appear in the list of volumes.
- Select Mount as drive (Windows) or Mount (Mac) to open the share.
- The share will be available in an Explorer window (Windows) or a Finder window (Mac).
Auto-mount
- If LaCie Network Assistant is not running, launch the program.
- Right-click (Windows) on its icon in the system tray or select it in the menu bar (Mac).
- Choose Open LaCie Network Assistant.
- If you have more than one LaCie NAS, select the device you wish to access from the list in the left-hand column.
- Choose the Volumes tab.
- If the share you wish to auto-mount is private, choose Authentication… to enter your credentials. In the pop-up window, choose Registered User and enter the Username and Password for the share. Click OK. All available shares will appear in the list of volumes.
- Select the checkbox for Auto to open the share. The share will now mount each time you boot the computer. To cancel auto-mount, uncheck the box for Auto.
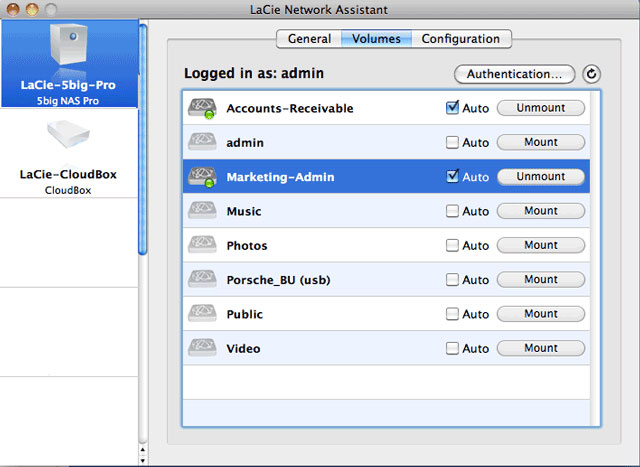
- Windows users: The share will mount in Computer/My Computer automatically when the computer detects it on the network.
Mac users: The share icon will appear in your Finder automatically when the computer detects it on the network.


Shares: Access and Transfer Files
About default shares
A share is a network volume that you can configure to store and share data. Your LaCie NAS has two shares by default: admin and Public. Following the initial login, the share admin will change to the name used by the administrator. For example, if the administrator changes the default login “admin” to “John”, the share admin will become John.
The following table sums up the differences between them:
| Name | Accessibility | Login | Availability |
|---|---|---|---|
| admin | Private, accessible only to admin by default | Password-protected (user password) | Computers on the network and remote access (must be enabled) |
| Public | Public, accessible to any user on the network | None | Computers on the network and remote access (must be enabled) |
It is also possible to create new shares and/or to delete the default shares. See Shares for details.
Access shares
You have several options for accessing shares on your LaCie NAS.
Option 1: LaCie Network Assistant - quick share access
Use LaCie Network Assistant for quick access to public shares. See Quick Access for details.
Option 2: LaCie Network Assistant - authenticate for private shares
Use LaCie Network Assistant to enter your username and password. See Authenticate Private Shares for details.
Option 3: Operating System
Use your operating system to open your LaCie NAS's shares.
Windows
In an Explorer window address field, type \\[machine name] or \\[IP address]] and choose Go. Alternatively, from the Start menu, select Run then type \\[machine name] or \\[IP address]]. Choose OK.

Windows Vista, Windows 7, and Windows 8

Windows XP
Mac
- From the Finder, navigate to Go > Connect to Server.
- In the dialogue window, type one of the following:
afp://[machine name].local
smb://[machine name].local
afp://[IP address]
smb://[IP address]

Creating Shortcuts to Shares
Once you successfully set up your LaCie NAS, you can create shortcuts so you can quickly access stored files. You can do this by using your operating system or LaCie Network Assistant.
Create Shortcut Using LaCie Network Assistant
LaCie Network Assistant can be configured to automatically mount shares on your computer, which allows you quick access to the files they store. See Auto-Mount for details.
Create a Shortcut Using the Operating System
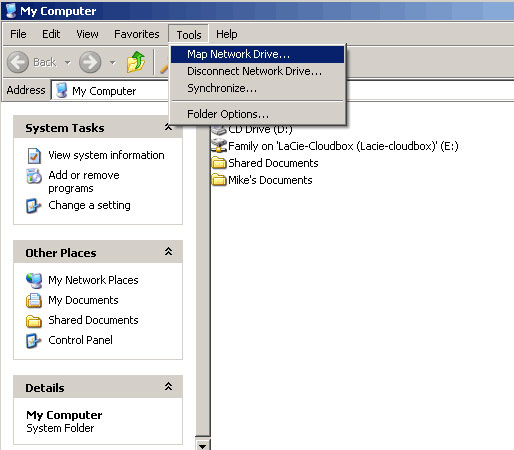
Windows XP, Vista, and Windows 7
- From an Explorer window in Windows XP, select Tools > Map Network Drive. For Windows Vista and Windows 7, open an Explorer window, navigate to Computer, and choose Map Network Drive.
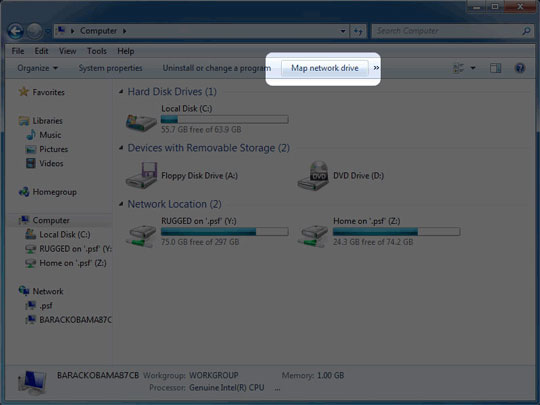
- Browse to and select the share you wish to auto mount.
- Windows will offer the option to mount the share each time you log on to the computer.
- Repeat steps 1-3 for other shares.


Mac
- Open a new Finder window. On the left of the window, navigate to Shared > [machine name] > [share]. If prompted, type in your username and password and click Connect.
- Repeat step 1 for each share.
- To mount the share automatically each time you log on to you computer:
- From the Apple icon in the menu bar, select System Preferences > Accounts > Login Items.
- Choose the ”+” sign to add a new item to the list and browse for the share. Please note that the shares must be mounted in order to add them to the list.
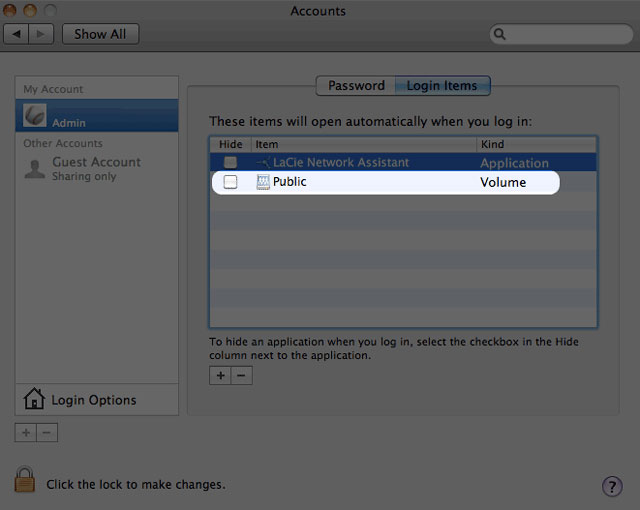

When you log on to the Mac OS, the share(s) will automatically mount on your desktop. If the shares do not mount, check your Finder preferences to confirm that the system will display connected servers on your desktop.
Backup: LaCie NAS and PC/Mac
Back up your LaCie NAS
See Backup for a complete explanation on how to automate backups of data stored on your LaCie NAS. You can back up your data to:
- Direct-attached storage (DAS)
- Another LaCie NAS or rsync-compatible server on your local network
- Another LaCie NAS or rsync-compatible server on a remote/offsite network
Important info on NAS backup: It is recommended that all users back up data to DAS or another NAS as further protection against disk failure or secondary points of failure (e.g. hardware, network, etc.) See Backup Jobs for details.
Back up your computer(s)
Your LaCie NAS is fully compatible with popular backup solutions such as:
- Windows Backup and Restore® and Genie Timeline® (Windows)
- Time Machine® and Intego Backup (Mac)
Professional versions of Genie Timeline and Intego Backup are available on the included Utilities CD-ROM with software.
A share on your LaCie NAS can be set as a backup target for these and other backup software. Make certain that the user has access to the target share meant for his computer. Additionally, deleting a share that is used as a backup target will delete all associated computer backups.
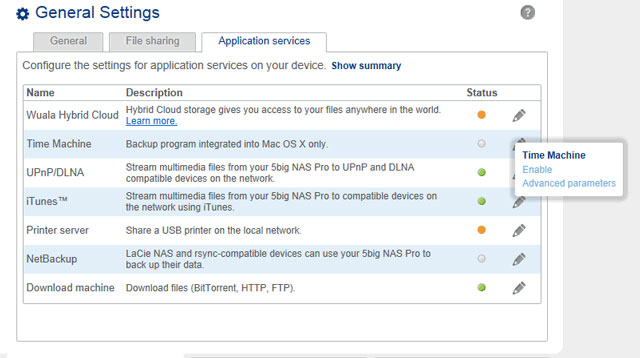
Note on Time Machine: Time Machine must be enabled on your LaCie NAS before it can be used as backup software. Go to Dashboard > General Settings > Application Services to review the Time Machine service. See General Settings for details on services.

Media (UPnP/DLNA) Servers
You can configure your LaCie NAS to share files (read-only) with UPnP/DLNA devices connected to the same network. Follow these steps:
- Make sure your LaCie NAS is connected to your network as described in Connect to the Network.
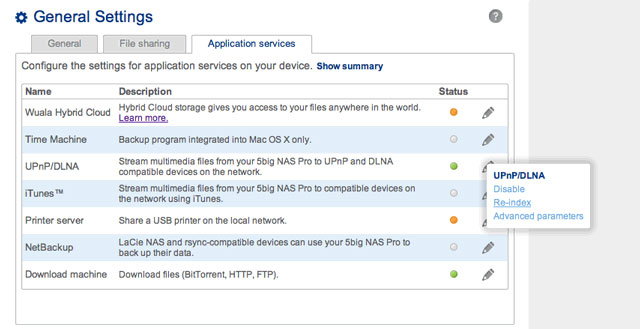
- Enable the UPnP/DLNA service from the Dashboard > General Settings > Application Services tab (see General Settings).
- Now you will be able to play files located on your NAS's share onto any other UPnP/DLNA-certified player/adapter that is connected to your network (e.g. Xbox 360, PlayStation 3, mobile devices that support DLNA, etc.).
Reindex the Media Server
To take an inventory of available multimedia files, you can Reindex your LaCie NAS and all connected desktop-attached storage (DAS).
- If applicable, make certain that your DAS are connected to your LaCie NAS.
- Confirm that UPnP/DLNA is enabled at Dashboard > General Settings > Application services (see General Settings).
- Select the configuration icon (pencil) to the far right of the UPnP/DLNA row and choose Reindex.

Start a Reindex as described above if files seem missing on your multimedia share(s) or connected devices.
The time for indexing to complete depends upon the total capacity of your storage and the size of your multimedia library. If you have created many shares on your NAS, reindexing can tax the CPU's resources. Before starting the Reindex, consider shutting off multimedia support for shares that do not store media files. See General Settings and Shares for further information on how to manage services.
iTunes
Your LaCie NAS can act as an iTunes Music server. Simply copy your iTunes library to a share on your LaCie NAS and audio files will be available to compatible devices on the network. For easy access on the entire network, use a share with public access. To limit access to an iTunes library, use a private share with LaCie Network Assistant's Authentication (see Authenticate Private Shares).
To turn on network sharing, follow the steps below for your version of iTunes.
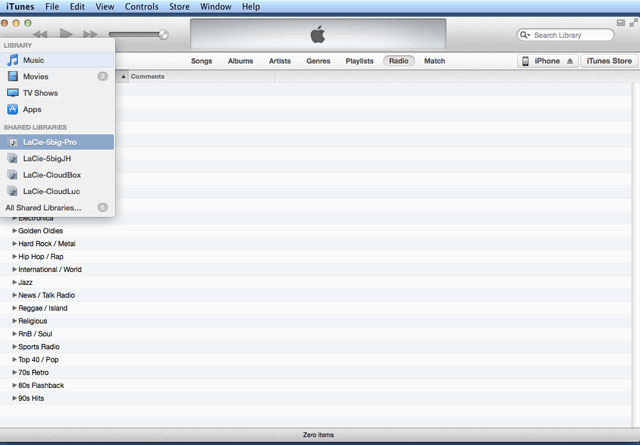
iTunes 11
- Make sure your LaCie NAS is connected to your network as described in Connect to the Network.
- Enable the iTunes service from Dashboard > General Settings > Application Services (see General Settings).
- To review the iTunes library on the LaCie NAS, launch iTunes on the computer and select the pulldown menu on the left.

Technical note: The iTunes Server Service supports the following file types: .mp3, .wav, .aac, .pls, and .m3u.
Computers with access rights to the iTunes library share can play its audio files. However, sharing must enabled in the iTunes application for iOS devices. See the steps below:
- Mount the share with the iTunes library
- Launch iTunes
- Enable sharing in iTunes Preferences
The audio files should be available on the iOS device in Shared.
Windows Media Player
Once configured, Windows Media Player (WMP) can play files located on the LaCie NAS through the network connection. Follow these steps:
- Make sure your LaCie NAS is connected to your network as described in Connect to the Network.
- Enable the UPnP/DLNA service from Dashboard > General Settings > Application Services (see General Settings).
- In WMP, choose Organize > Manage Libraries > Music (or Video or Pictures).
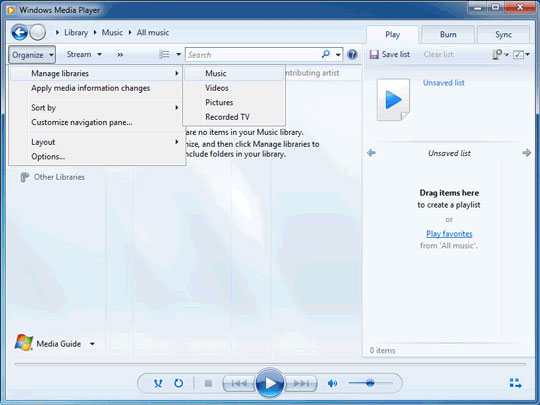
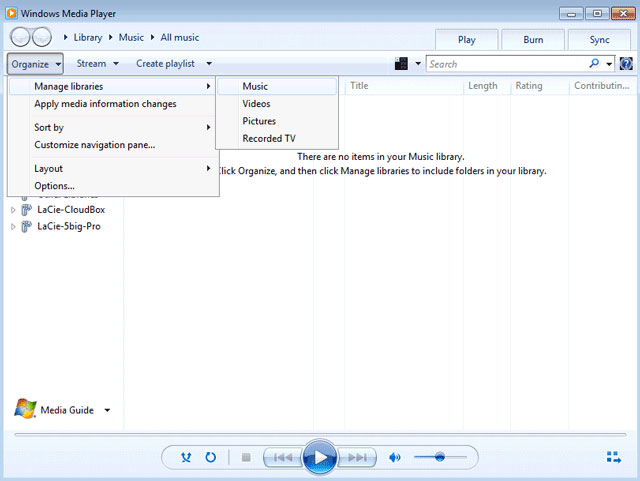
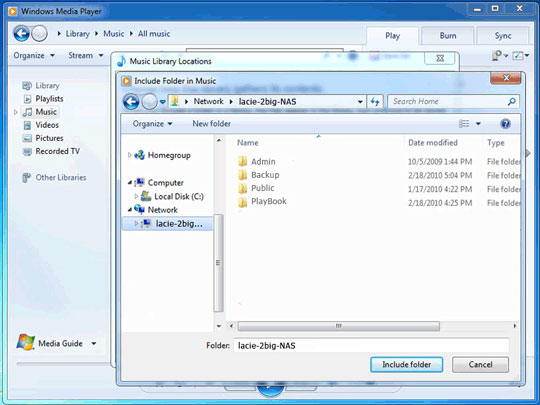
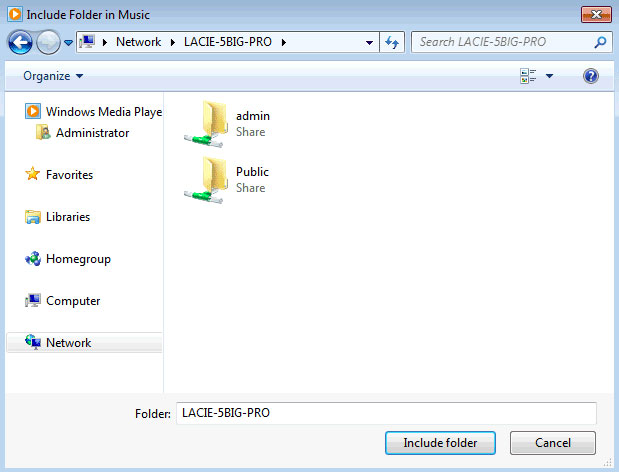
- In the dialogue window, choose Add, select your LaCie NAS's machine name under the Network section, and click Include Folder.
- WMP will begin indexing the media files. Once completed, they will appear in the WMP library.


Remote Access: LaCie MyNAS

Remote access to your LaCie NAS is available using:
- LaCie MyNAS
- FTP (see Accessing Shares via FTP)
LaCie MyNAS gives users remote access to the Dashboard, including the File Browser to upload and download files via the internet.
Follow the directions below to configuring LaCie MyNAS.
Set Up Remote Access
For a video demonstration, see here (youtube).
Important info: In order to prevent unauthorized access, it is critical to protect each of the user and administrator accounts registered to your LaCie NAS with a strong password BEFORE setting up remote access. Since LaCie MyNAS lets you access your data with a simple URL, malicious users could guess the URL and access the LaCie NAS's files unless each user is protected by a strong password.
- Navigate to Dashboard > Network > Remote Connection tab.
- In the Remote Access drop-down menu, choose LaCie MyNAS.
- Type a name for your LaCie NAS in the Name field.
- Click Apply. The Dashboard will query the mynas.lacie.com server to see if the name you chose is available. If so, you will receive a message confirming the connection.
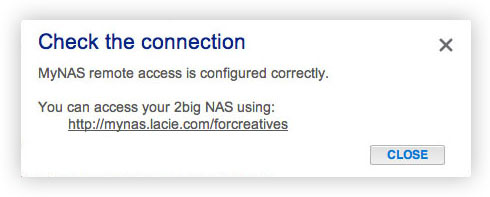

If your name is already chosen, type a new one and click Apply until you find an available name.
Failed Connection
If you receive an error that your LaCie NAS is unable to connect to the internet:
- You may require a proxy server to access the internet. Please contact your network administrator or internet provider then review Network for further instructions on how to add your proxy server's address.
- You may need to configure port forwarding on your router. See the steps below.
If the issue is related to your router, you will need to access its administration page in order to forward a port (by default, 8080), which will create a path from your LaCie NAS to the internet. Refer to your router's documentation for details.
- Navigate to the Dashboard > Network > Remote Access tab.
- Next to the Name field, click the configuration icon, then select Advanced settings.
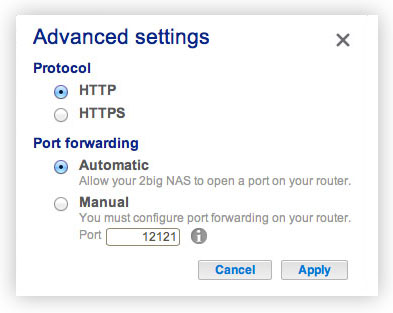
(If you do not see the configuration icon next to the Name field, first type a name and then click Apply, and the icon will appear.) - In the dialogue window that appears, click Manual.
- Next, identify which port you intend to forward in your router.
- Click Apply.
- Access your router's administration page in order to forward this port.
- Retry the remote access connection.

Using Remote Access
Once configured, simply type your LaCie NAS's URL into any browser, anywhere.

Your URL will be: mynas.lacie.com/name
After you input the URL, you will be asked to log in to the Dashboard. Note that this username and password are the credentials created by the administrator in Dashboard > Users.
Once logged in, you will be able to access the Dashboard in order to administer your LaCie NAS (if you have administrative privileges) or access the File Browser. The File Browser lets you upload, download, and stream many types of multimedia files such as mp3 (see File Browser).
Mobile Devices
LaCie MyNAS is compatible with iOS devices. See the iOS App Store for details.
Accessing Shares via FTP
FTP (file transfer protocol) is used to transfer files from one computer to another via the local network or the internet. This protocol allows you to exchange files with your colleagues, clients, or business partners securely, as only people with a user account will have access. For a detailed explanation of the benefits of using FTP, see http://en.wikipedia.org/wiki/FTP.
The FTP service is disabled by default but you can enable it on the Dashboard > General Settings page (see General Settings).
Once FTP is enabled, your LaCie NAS can be accessed using an internet browser or FTP client software. FTP client software is very helpful if you wish to share, download, and upload data within a dedication application rather than an internet browser. Examples of FTP client software include Filezilla and Cyberduck.
Local FTP Access
To use the FTP service on your local network, enter your LaCie NAS's IP address or device name in the FTP client's address field or in an internet browser's address field. Your LaCie NAS's IP address is available on the Dashboard > Network page or LaCie Network Assistant.
Public Access Folders (non-password protected):
ftp://[IP-address] (For example, ftp://192.168.10.149)
ftp://[machine name]/ (For example, ftp://lacie-5big-pro/ or ftp://lacie-5big-pro.local/)
Private Access Folders (password protected):
When following the directions below, usernames and passwords can vary depending upon the user. For example, the administrator's username and password are not the same as another user's name and password.
ftp://[username:password@IP-address] (For example, ftp://admin:adminpassword@192.168.10.149)
ftp://[username:password@machine name]/ (For example, ftp://admin:adminpassword@lacie-5big-pro/ or ftp://admin:adminpassword@lacie-5big-pro.local/)

Access files via FTP using an internet browser

Access files via third-party FTP applications
Remote FTP Access
You can access and share your LaCie NAS's files from a computer outside of your home network. To gain access using FTP, you will need to know your router's public IP address.
- From a computer on the same local network as the LaCie NAS, visit this page: http://www.whatismyip.com/.
- Note your public IP address.
- Launch an internet browser or FTP client software.
- Within the internet browser or FTP client's address field, type:
- Public folders only: ftp://[Public IP-address] (For example, ftp://94.10.72.149)
- Public and private folders: ftp://[username:password@Public IP-address] (For example, ftp://admin:adminpassword@94.10.72.149)
For further information on the public IP address for your router, see your router's user manual or your internet service provider.
SFTP
SFTP is a secure version of the FTP service. Data is more secure when using SFTP but transfer rates are slower. Similar to FTP, SFTP is disabled by default but you can enable it on the Dashboard > General Settings page (see General Settings).
Note on Network Backup Server and SFTP: Activating Network Backup server will disable SFTP (see Backup for details).
Accessing Shares via NFS
Network File System (NFS) is a distributed file system protocol allowing a system to share directories and files with others over a network. Like SMB, NFS grants file-level access to users and programs.
NFS is widely distributed to host VMWare datastores or share network folders in a Linux/UNIX environment.
When enabling NFS service on a share, it can be accessed with the following path:
NAS_NAME_OR_IP_ADDRESS:/shares/SHARE_NAME
The NFS protocol is not active by default. To activate it, go to Dashboard > General Settings > File Sharing (see General Settings). Select the configuration icon (pencil) to choose Enable.
Important info: All NFS shares are public and available to everyone on the network. See Shares: Access and Transfer Files for details on public and private shares.
Wake on LAN (WOL)
Your LaCie NAS can conserve energy by entering deep sleep mode. Use the Dashboard to schedule deep sleep mode when no one accesses the LaCie NAS and wake it up when your office is ready to work. See Eco Management for more information on deep sleep mode.
You can also use LaCie Network Assistant to wake your LaCie NAS from deep sleep mode. This feature is called Wake on LAN (WOL). Follow the steps below:
- Right click the LaCie Network Assistant icon in your system tray (Windows) or choose it in the menu bar (Mac).
- Select Wake Up a Device…
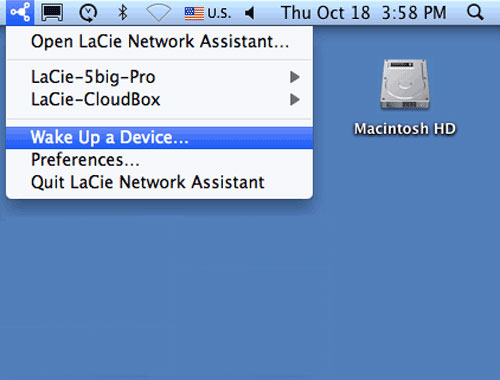
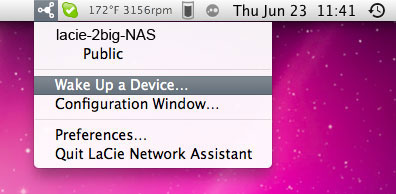
- Choose the LaCie NAS product you wish to wake up from the pull-down menu.
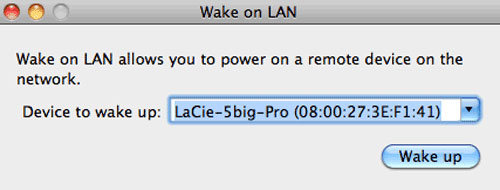
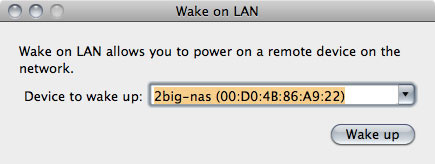
- Choose Wake up.


Note on the MAC address list: The list will be empty the first time you launch Wake Up a Device. Enter the device's MAC address in the field to select Wake up. Once entered, LaCie Network Assistant will keep the device's MAC address on the list.
NAS OS Administration
All LaCie NAS feature an easy-to-use browser-based administration tool, called the Dashboard. Launch the Dashboard to manage storage, users, shares, and much more.
Access the Dashboard
There are two ways to access the Dashboard: LaCie Network Assistant and an internet browser.
Access the Dashboard: LaCie Network Assistant
See LaCie Network Assistant for instructions on software installation.
- Windows: Right-click on the LaCie Network Assistant icon in the system tray (Windows users). Mac: Choose the LaCie Network Assistant icon in the menu bar.
- Select [machine name] > Web Access.
- The login page will open in a new browser window or tab. If your browser is not open, LaCie Network Assistant will open it for you.


Access the Dashboard: Internet browser
- Launch your preferred internet browser and type the default address for the LaCie NAS:
- Windows workstations (no Bonjour) - http://lacie-2big-nas or http://lacie-5big-pro
- Mac OS X and Windows workstations running Bonjour - http://lacie-2big-nas.local or http://lacie-5big-pro.local.
You can also type your LaCie NAS's IP address in the browser's URL (web address) field.
For example: http://[IP-address].

The IP address may be found in LaCie Network Assistant (see Find the IP Address).
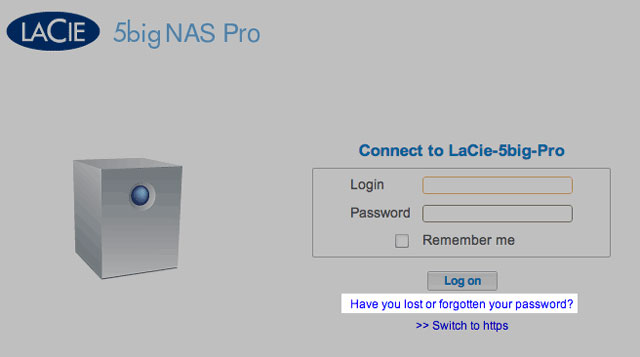
Log in
The first time you access the Dashboard, complete the Authentication and Timezone fields. (The password should be from 4-20 alphanumeric characters and symbols, and the username should be from 1-20 alphanumeric characters. Consider using a strong password that is difficult for others to guess.)

In subsequent logins, simply enter your username and password, then choose Log on.

For added security, choose Switch to HTTPS at the Dashboard login.
Recover a lost password
If a user has forgotten his/her password, it can be recovered if the administrator has:
If the above conditions have been met, the administrator and/or user can follow the steps below to recover a password:
- On the login page, choose Have you lost or forgotten your password?.
- On the next page, type the login. Then type the word you see in the image on the right (this ensures that the request is coming from a person) and choose send.
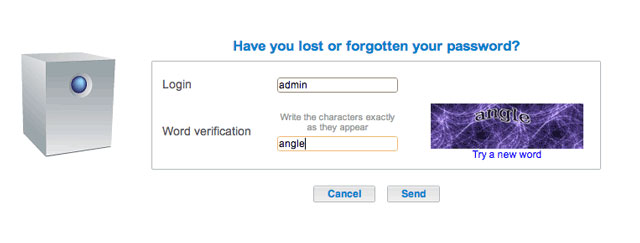
- The email will arrive in the user's email inbox. In the email, choose the click here link.
- In the Reinitialize your password screen, type your login and new password, then choose Send.


Restart, deep sleep mode, and shutdown
To restart or put the LaCie NAS into deep sleep mode, select the power button, then choose between Restart and Deep Sleep mode. Deep sleep mode must be enabled or the option will not be available (see Eco Management).

2big NAS Restart and Deep Sleep Mode

5big NAS Pro Deep Sleep Mode, Restart, and Shutdown
The LaCie 5big NAS Pro has the added option to Shutdown the device. To shut down the LaCie 2big NAS, use the switch on the back of the device (see Views of the Product).
Note: Shut down your LaCie NAS only when it is not being accessed.
Log out
To log out of the Dashboard, choose the log out button.

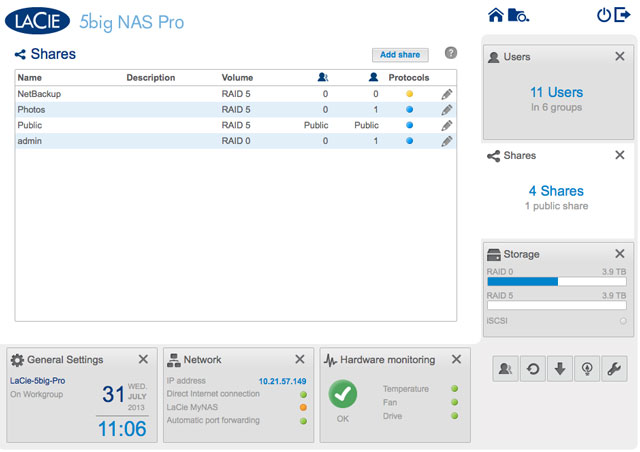
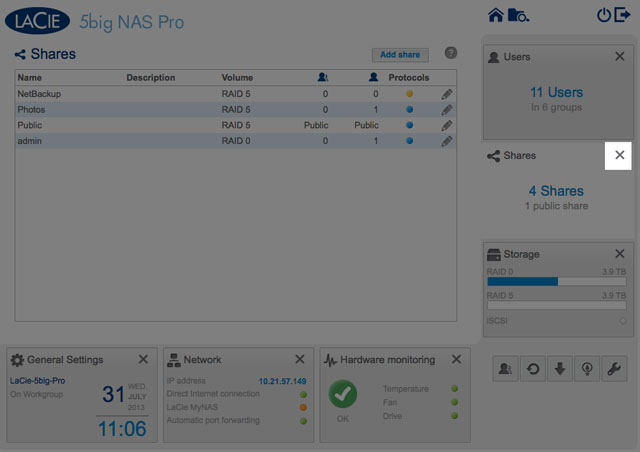
Navigate the Dashboard

The Dashboard is made up of:
- The central pane that hosts all management pages
- Visible widgets, or small boxes that represent the different pages. A visible widget provides a summary of the page's management function. For example, the Hardware monitoring shows the health status of the NAS, including the Temperature, Fan, and Drive states.
- Minimized widgets
Navigation
- To navigate to a page, choose its widget or, drag and drop the widget to the center of the window.
- To minimize a widget, choose the X next to its title.
- To expand a minimized widget, drag its icon over an expanded widget, or to an open widget space.
- To rearrange widgets, drag the minimized widget icon or the expanded widget onto the place of another widget.


File Browser

The Dashboard features an interactive File Browser that allows you to manage and transfer files via HTTP. Access the File Browser by choosing its icon in the upper right-hand corner of the Dashboard.

You can use the File Browser to transfer, copy, and delete files, as well as view photos in thumbnails and stream multimedia content such as mp3 files and view photos. It is thus a convenient way to interact with files stored on your external hard drives through the network, whether the connection be through the local network or through the internet (see Remote Access: LaCie MyNAS).

File Browser window:
- The toolbar allows you to perform a range of functions, such as changing the way files are displayed, creating folders, uploading files, and streaming files.
- The folder structure on the selected share.
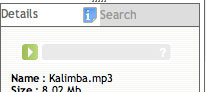
- The information on a selected file, such as the name, thumbnail, type, dimensions (photos), or duration (videos). You can also search for files.
- The files within a selected folder. To view the files as thumbnails, choose Thumbs in the toolbar.
Open files
- Photo: Choose the View button in the toolbar.

- Music: Choose the play button in the Details panel (mp3 files only).
- TXT files: Choose the Edit button in the toolbar.


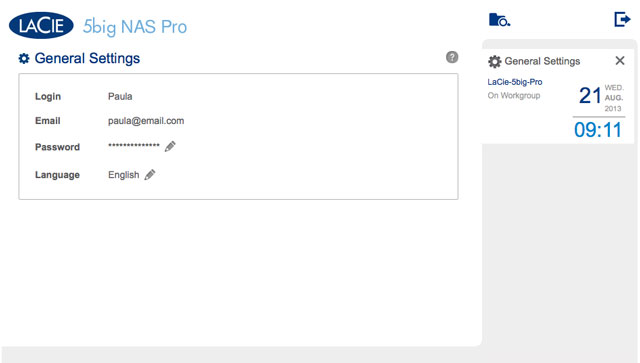
General Settings
General tab

- Machine Name: The machine name identifies your LaCie NAS on your network. You can change it from the default by choosing the pencil icon and typing a new one. If a duplicate name exists on the network, alternate names are automatically created to avoid conflicts. For example, a second LaCie 5big NAS Pro on your network will automatically be called LaCie-5big-P-1. The machine name is limited to 15 characters and case-sensitive. You must also use alphanumeric characters without spaces or symbols.
- Date: The date and time are set automatically if you assign an NTP server (see below). If not, select the pencil icon and choose a day from the calendar.
- Language: Choose the pencil icon to change the Dashboard language.
- Time: If the time is not set by the NTP server, select the pencil icon and choose the proper time.
- Temperature unit: Select the pencil icon to choose Celsius or Fahrenheit.
- Time zone: Select the pencil icon for the listed time zone, then choose your timezone from the drop-down window.
- Time synchronization: Sync the time and date with an NTP (network time protocol) server. NTP will automatically adjust the time settings for daylight savings.
Domain
You LaCie NAS can join a Windows Workgroup or a Windows Active Directory:
- Workgroup: Select the radio button for Workgroup and choose the pencil icon to type its name (use from 1 to 15 alphanumeric characters).
- Domain: Select the radio button for Domain if you intend to join a Windows Active Directory (see the next paragraph for instructions on entering your Active Directory credentials). When joining an Active Directory, existing users/passwords in the domain are respected by the LaCie NAS and treated exactly as if they were created in the Dashboard. Once you have joined the Active Directory, domain users may be assigned access to the LaCie NAS's shares.
Active Domain Troubleshooting: The information below provides general information on joining and leaving a domain. For additional information, see Troubleshooting the Active Directory Connection.
Connect to an Active Directory
- Select the Domain radio button.
- At the prompt, fill in the Fully-qualified domain name, Administrator login, and Administrator password. For more complex network configurations, choose the Advanced Criteria arrow and fill in the Server name and Server IP fields.
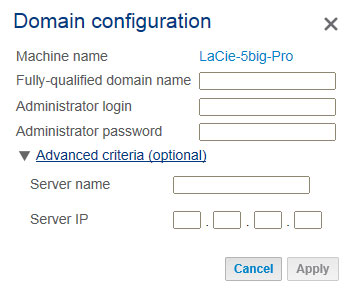
- Once connected, you can import users from the domain at Users.

Synchronize Users/Groups
Except for access rights to shares on the LaCie NAS, users and groups imported from a domain are managed by the domain's administrator. If a user's/group's account has been changed by the domain administrator within the Windows Active Directory server (e.g. password revision, deleted from the domain, etc.), you can update the account on the LaCie NAS by choosing on the button Synchronize imported users/groups.

Leave the domain
To remove the LaCie NAS's connection to a domain:
- Choose the Leave button.
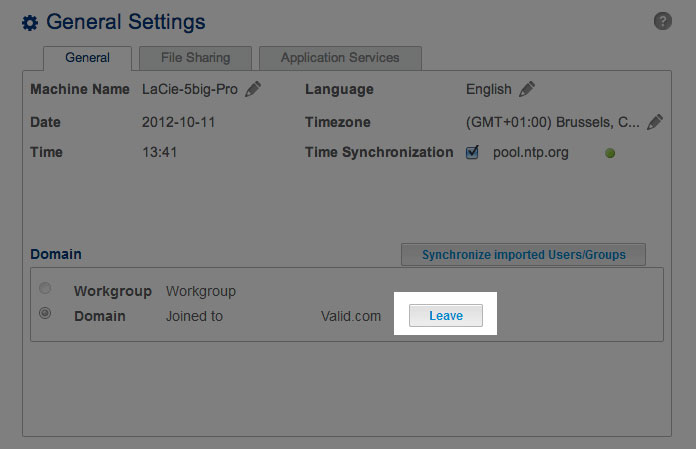
- Authenticate by inputting the domain administrator's username and password.


Services
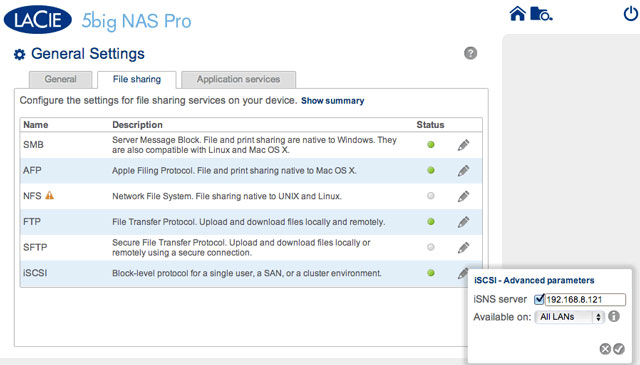
File sharing tab

The File sharing tab offers a list of file protocols available to the LaCie NAS. Based upon the needs of computers and workstations on the network, the administrator can choose to maintain certain services while leaving others turned off. Examples:
- The administrator may wish to turn AFP (Apple Filing Protocol) off if there are no Macintosh computers on the network.
- The administrator can enable the FTP service in order to provide access to the LaCie NAS via a third-party FTP application. See Accessing Shares via FTP for details.
iSCSI: iSNS servers and LAN
The iSCSI service should be used to direct iSCSI target volumes to an iSNS (Internet Storage Name Service) server on the network. Doing so will allow workstations (initiators) to discover the LaCie NAS's iSCSI volume(s) via the iSNS server rather than using a direct connection. Using an iSNS server is ideal when managing multiple iSCSI volumes (targets) and compatible workstations (initiators). To enter the iSNS server IP address:
- Go to Dashboard > General Settings > File sharing.
- Select the configuration icon for iSCSI and then Advanced parameters.
- Choose the checkbox and enter the IP address of the iSNS server.

For instructions on creating iSCSI volumes on your LaCie NAS, see iSCSI Target.
You can also limit the iSCSI service to a single LAN:
- Go to Dashboard > General Settings > File sharing.
- Select the configuration icon for iSCSI and then Advanced parameters.
- Select the pull-down menu choose LAN 1 or LAN 2.
Important info regarding iSCSI volume sharing: Mounting an iSCSI volume on multiple workstations at the same time will lead to serious file corruption. An exception can be found with SAN cluster environments that include servers and software dedicated to managing iSCSI volume sharing.
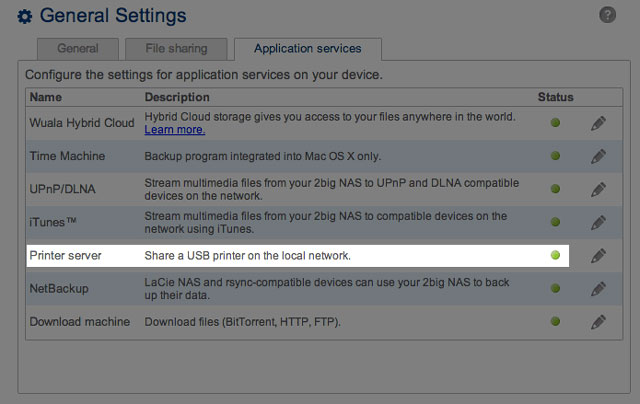
Application services tab

The Application services tab provides a list of services that may be used with the Dashboard or third-party programs.
- Time Machine: See Backup: LaCie NAS and PC/Mac for details.
- UPnP/DLNA: See Media (UPnP/DLNA) Servers for details.
- iTunes: See Media (UPnP/DLNA) Servers for details.
- Network Backup: See Remote Backups: Enable Network Backup Server for details. Activating Network Backup server will disable SFTP in the File sharing tab.
- Download machine: See Download Machine for details.
Printer server
Your LaCie NAS features a printer server. Follow the directions below to share a printer on the network via the LaCie NAS:
- Connect your printer to a USB port on your LaCie NAS.
- In Dashboard > General Settings > Application services, check the status of the Printer server. A green light indicates that the LaCie NAS has discovered the printer.

Computer(s) on your network may require specific drivers to use the printer. See the user manual for your printer for details.
Important info: For multi-function printers, only the print feature is supported. If your printer has a scan feature, for example, it will not work when connected to the LaCie NAS.
In addition, only PostScript printers are supported. If your printer does not display in the Application services tab, it is likely that the printer does not support PostScript printing. This is frequently the case with multi-function and photo printers. LaCie cannot guarantee that your printer supports the proper protocols to make it a networked printer.
In addition, only PostScript printers are supported. If your printer does not display in the Application services tab, it is likely that the printer does not support PostScript printing. This is frequently the case with multi-function and photo printers. LaCie cannot guarantee that your printer supports the proper protocols to make it a networked printer.
Service activation
There are three levels of service activation: enable/disable, global service activation, and share protocols. The File Sharing and Application Services tabs allow you to manage the settings for enable/disable and global service activation. The share protocols are managed per share on the Shares page.
In all cases, enabling/disabling a service will override global service activation and share protocols. If a service is enabled, a green light will be listed in the Status column. Not all services are enabled by default.
To Disable a service, select the configuration icon for the service.

Perform the same action to Enable a service.

To view the Global service value, select the configuration icon for Advanced parameters. The pulldown menu allows you to deactivate/activate the global service value.


The global service level is, by default, set to Activated. This means that the service is ready for use by all shares as long as it is enabled. An administrator can also choose to deactivate a service at the global service activation level while enabling it. Doing so allows the administrator to limit the service to individual shares by adjusting the protocol value in Shares. For example, the administrator may wish to limit the Time Machine service to a single share that is only available to Macintosh computers on the network.
See the table below for examples of service settings:
| Enable/Disable | Global Service Value | Share Protocols | Use |
|---|---|---|---|
| Enable | Activated | Set to Global. | The service is ready for use. |
| Disable | Activated | Set to Global. | The service is not available. |
| Enable | Deactivated | Set to Activated. | The service is available to the specific share. |
| Enable | Activated | Set to Deactivated. | The service is not available to the specific share. |
See Shares for instructions on adjusting the settings for share protocols.
Ethernet ports (LAN) and services (5big NAS Pro only)
The administrator can limit certain services to a LAN port by selecting the configuration icon and then Advanced parameters. Use the pulldown menu to select the preferred LAN port for the service.

Services summary
Review the status for all services by choosing Show summary in the File sharing or Application services tabs.


Network
| LaCie 2big NAS | LaCie 5big NAS Pro |
|---|---|
 |  |
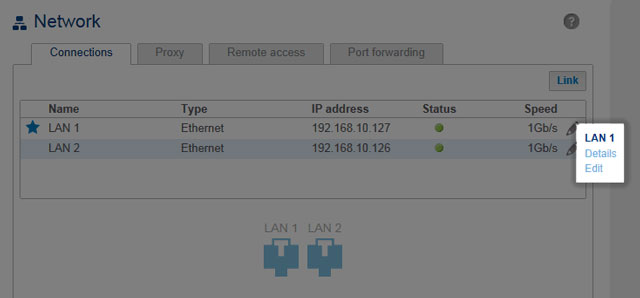
Connection tab
If your network is DHCP-enabled, your LaCie NAS will automatically be assigned an IP address and other values.
The LaCie 2big NAS has a single LAN port while the LaCie 5big NAS Pro includes two LAN ports (see below). If you wish to review or modify the values of a LAN port:
- LaCie 2big NAS: Choose the Edit button.
- LaCie 5big NAS Pro: Select the configuration icon (pencil) then choose Details or Edit.
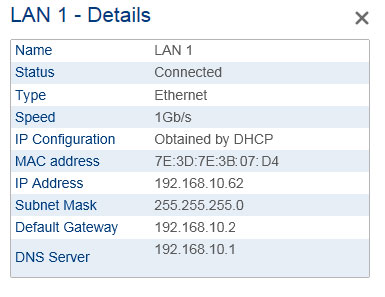

LAN Details - 5big NAS Pro


Selecting Edit allows you to modify certain network parameters. You can manually adjust network values by choosing Manual configuration and give the LAN port a unique name (LaCie 5big NAS Pro only). Make certain to check the box next to Default gateway to enter or revise a gateway address. For the manual address to take effect, all fields (including Default Gateway and DNS Server) must be completed before selecting Apply. The LAN port will revert to automatic if a field is left blank.


Important info on network addressing: Changes to the IP address must be consistent with the values of the router and/or network. You can lose contact with your LaCie NAS by typing addresses that are not available on your network.
LaCie 2big NAS users: Skip to Proxy Tab.
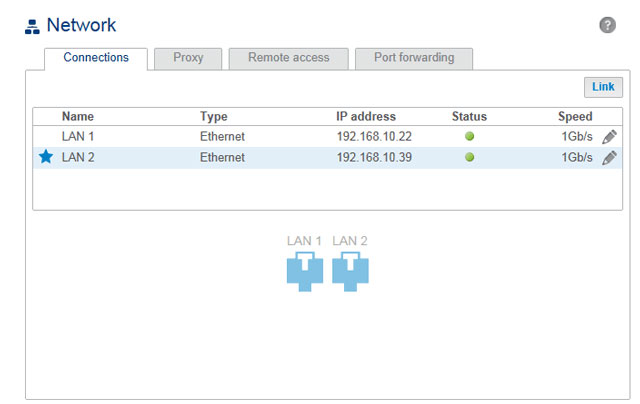
LaCie 5big NAS Pro Ethernet ports

Icons representing the two LAN ports on the Connections tab indicate connection to the network:
- Connected: a
- Not connected: b
Port aggregation: multiple networks, load balancing, and fault tolerance
The LaCie 5big NAS Pro is equipped with two LAN ports for enhanced network performance. Review the instructions below to learn how to configure the LaCie 5big NAS Pro LAN ports for your network.
Two networks: Bridge the data on your LaCie 5big NAS Pro


Load balancing: enhanced speed


Fault tolerance: failover protection


Note on failover for bonding versus fault tolerance: Both bonding and fault tolerance can save you from losing productivity in the event that a single LAN fails (e.g. port, router port, cable, etc.). While the bonded ports can adapt to the loss of one Ethernet signal, it can take a few minutes for the NAS to switch to single LAN mode. Fault tolerance will make the switch instantly, allowing for uninterrupted communication with the NAS.
LAN priority: primary LAN interface
The primary Ethernet port is marked by a star next to the LAN number. In the example below, LAN 1 is the primary Ethernet port.

The primary Ethernet port:
- Carries the data when the LaCie 5big NAS Pro is configured in Fault Tolerance
- Acts as the gateway to the internet when the LaCie 5big NAS Pro is connected to two separate networks
LAN interface and LaCie Network Assistant: LAN Port 1 must be enabled to use LaCie Network Assistant.
You can change the priority order by reassigning the role of primary port.
- Select the configuration icon (pencil) for the port you wish to assign as the primary.
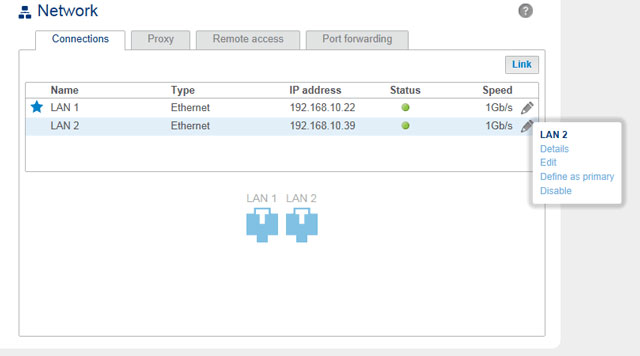
- Choose Define as primary.
- The star icon will move to the port to reflect the change.


Proxy tab

A proxy server may be used to connect compatible network devices to the internet. If necessary, your LaCie NAS can be configured to use a proxy server. First, activate the feature by selecting the Proxy server option from the drop-down menu, then fill in the proxy server address, port, and optional authentication information. Choose Apply for your changes to take affect.
Remote access tab
Port forwarding tab

Use this page to manage your LaCie NAS's port forwarding.
To access the internet, file and application services (e.g. HTTP, HTTPS, remote access (see LaCie MyNAS), download machine, and more) use port numbers on the LaCie NAS and the network router. As seen in the screenshot above, automatic port forwarding is turned on by default and the port numbers are the same for both the NAS port and Router port columns.
In most instances, automatic port forwarding should help you access services on the NAS. However, enterprise-level network security or port availability on your router can prevent access to ports. Therefore, it may be necessary to change the router port numbers manually for services. Before adjusting numbers in this tab, confirm that the ports you wish to use are available on your router. For example, if you intend to change download machine to router port number 8800, you must make certain that port 8800 is available on your router. Additionally, your router must be compatible with UPnP-IGD/NAT-PMP protocols. See your router's user manual for details.
To change the router port for a service on the NAS, choose its value in the Router port column.

To disable port forwarding for a service, select its configuration icon (pencil) and then choose Disable.
Note on Services in the Port Forwarding tab: Download machine and other services will appear in this tab once they have been enabled.
Users

This page allows you to manage user accounts.
Add a user
Choose the Add user button and fill out the required fields. Your LaCie NAS can have up to 2048 users.

Important info:
The password is case-sensitive.
In text fields, you may enter from 4 to 20 characters using letters, numbers, symbols, hyphen, and underscores. Do not begin or end with a hyphen or underscore.
The password is case-sensitive.
In text fields, you may enter from 4 to 20 characters using letters, numbers, symbols, hyphen, and underscores. Do not begin or end with a hyphen or underscore.
Delete a user
Removing a user will delete all the user's settings but not his data.
To delete a user, choose the configuration icon (pencil) at the far-right of the user's row, then choose Remove. Confirm in the dialogue window.
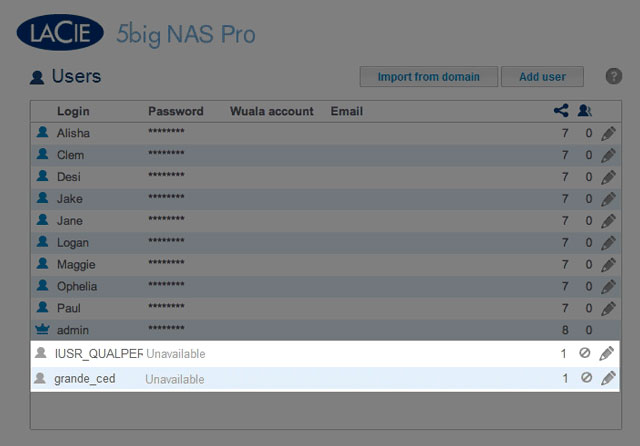
Users table
User data is organized in a table.
- The icons in the far left of the table indicate a user's rights:
- Crown: Administrative privileges.
- Blue user: Standard user privileges.
- Grey user: Standard user privileges and the user was imported from an active directory.
- Choose the text in the Login column to change the user name.
- Choose the text in the Password column to change the user's password.
- Choose the text in the Email column to change the user's email address.
- The number in the Shares (icon) column indicates how many shares the user can access. Choose the number to view the assigned share(s).
- The number in the Groups (icon) column shows to how many groups the member belongs. Choose the number to view the group(s).
- Choose on the the configuration icon (pencil) to remove a user or adjust his access rights.
User rights
A user can access NAS shares that have been assigned to him by the administrator (see Shares). When accessing the shares, the user will be prompted for the password created by the administrator on the Users page (see Shares: Access and Transfer Files). In addition, a user can log on to the NAS OS Dashboard using his login and password, which is very helpful with LaCie MyNAS remote access. However, Dashboard rights for a user are limited to:
- The File Browser to upload and download files via the internet (see File Browser)
- Changing his password and preferred language

An administrator has access to all Dashboard features, including the ability to revise a password that has been changed by a user.
An administrator can upgrade a user to an administrator. Select the configuration icon (pencil) for the user and choose Set Administrator. To revert an administrator to a user, perform the same action and select Set local user.
Importing users from Active Directory
- If you have successfully connected to an active directory domain (see General Settings), you will see a button on the Dashboard > Users page labelled Import from domain. Choose the button.
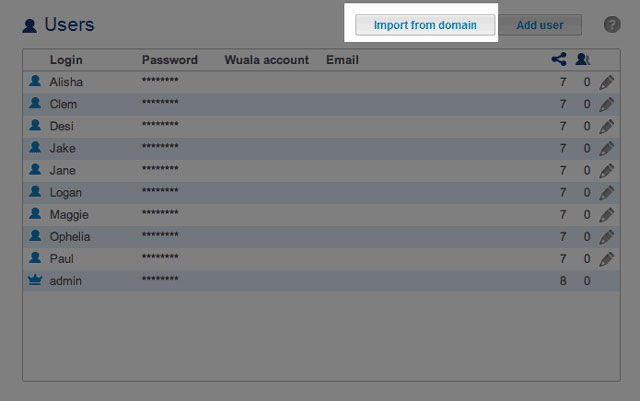
- At the prompt, type a few characters in the text field to find the user(s) you wish to import.
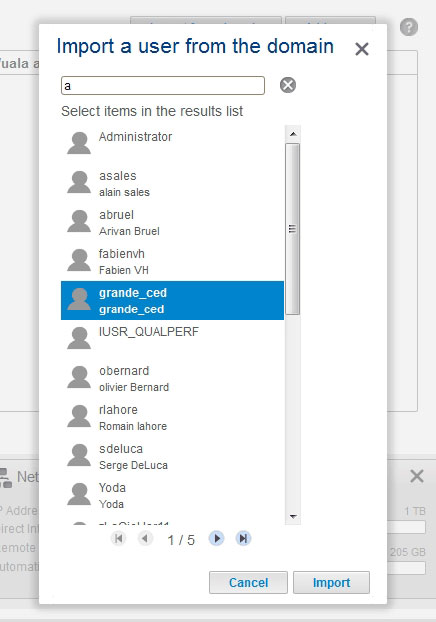
- Hold down the Ctrl key (Windows users) or Command key (Mac users) to select multiple users.
- Choose the Import button.
- The imported users will appear in the table. You can identify users imported from the domain by their grey icons.


Managing users imported from an Active Directory
Users imported from an active directory are managed by the administrator of the original domain. For example, passwords, email accounts, and groups are all determined within the original domain. However, the administrator of the LaCie NAS can remove an imported user from the device by selecting the configuration icon (pencil) at the far-right of the user's row and choosing Remove.
Users and groups imported from an active directory may have their rights adjusted by the administrator of the original domain. See Synchronize Users/Groups for instructions on synchronizing changes from an active directory.
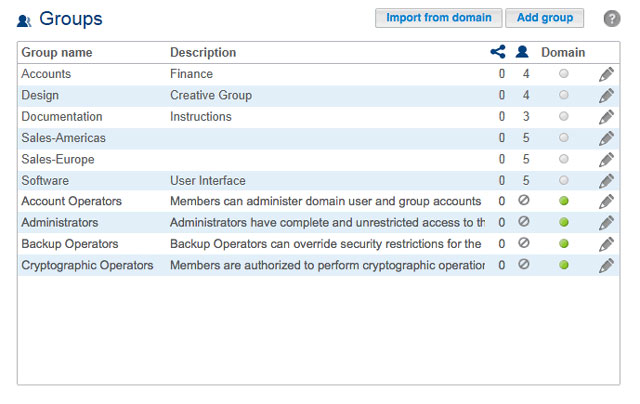
Groups

Assigning users to groups gives you powerful tools to manage large numbers of users and their privileges. Administrators can set access rights to entire groups rather than individually.
Important info: In text fields, you may enter 1 to 20 characters using letters, numbers, hyphen, and underscore. No other symbols, special characters, punctuation, or spaces may be used. Do not begin or end with a hyphen or underscore.
New group
Choose Add group and fill out the required fields. Your LaCie NAS can have up to 256 groups.

Delete a group
To delete a group, choose the configuration icon (pencil), then select Delete. Confirm in the dialogue window.
Deleting a group will not affect the data created by users in the group.
Existing group
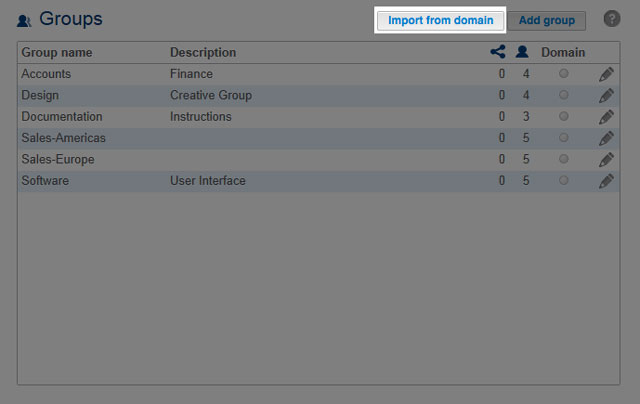
Group data is organized in a table.
- Choose the text in the Group name column to change the group name.
- Choose the empty space or text in the Description column to add or revise details for the group (optional).
- The number in the Shares column (connected dots icon) shows how many shares the group has access to. Choose the number to view the share(s).
- The number in the Users column (user icon) shows how many users belong to the group. Choose the number to view the user(s).
- A green light in the Domain column indicates that the group has been imported from a domain.
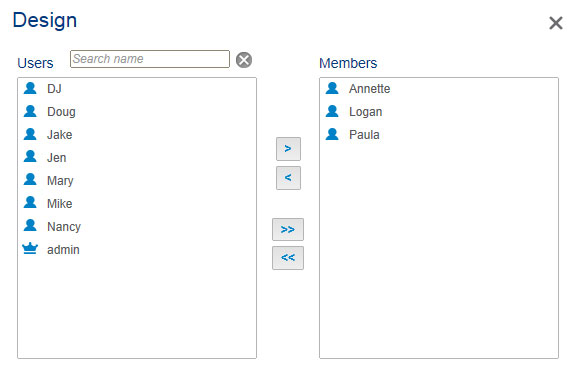
- Select the configuration icon (pencil) and choose:
- Users to modify group members. In the resulting window, highlight a user, then choose the arrows to join/disjoin a user from the group.
- Delete to remove the group.

Importing groups from Active Directory
- If you have successfully connected to an active directory domain (see General Settings), you will see a button labelled Import from domain. Choose the button.
- A prompt allows you to search for groups on the domain. Begin by entering a the first letter of the group.
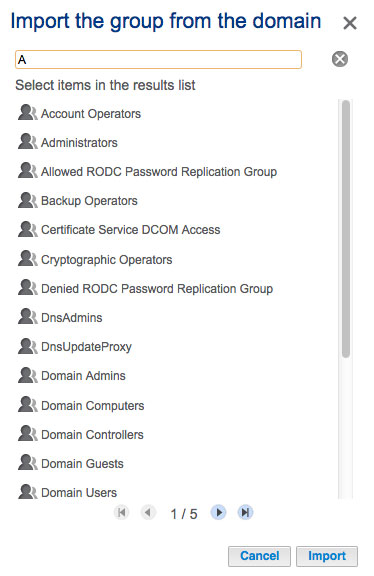
- To select multiple groups, hold down the Command key (Mac users) or Control key (Windows users).
- Choose the Import button.
- The imported groups will appear in the table with a green circle in the Domain column.


Managing groups imported from an Active Directory
Groups imported from an active directory are managed by the administrator of the original domain. However, the administrator of the LaCie NAS can delete an imported group from the device by selecting the configuration icon (pencil) and Delete.
Users and groups imported from an active directory may have their rights adjusted by the administrator of the original domain. See Synchronize Users/Groups for instructions on synchronizing changes from an active directory.
Shares

Your LaCie NAS's storage is divided into shares, also known as network folders. This page allows you to create new shares, assign access rights to users and groups, and to adjust share protocols. By default, your LaCie NAS has two shares, admin and Public. You can begin working with these shares immediately or create new shares.
Note on the admin share name: The name of the share admin will update automatically if the administrator changes the login name from the default admin (see Connect to the Network).
Important info: In text fields, you can enter 1 to 20 characters using letters, numbers, hyphen, and underscore. No other symbols, special characters, punctuation, or spaces may be used. Do not begin or end with a hyphen or underscore.
Public and private shares
The following table shows the differences between public and private shares:
| Name | Accessibility | Login | Availability |
|---|---|---|---|
| Private | Accessible only to assigned users | Password-protected (user password) | Computers on the network and remote access (must be enabled) |
| Public | Public, accessible to any user on the network | None | Computers on the network and remote access (must be enabled) |
New share
Choose Add share and fill out the required fields. If you have more than one volume, a pulldown menu allows you to select the volume for the share. Your LaCie NAS can have up to 256 shares.

Single volume

Multiple volumes
Existing shares
Shares are organized in a table.
- Click on the text in the Name column to change the share name.
- Click on the empty space or text in the Description column to add or revise details for the share (optional).
- The number in the Groups column (two silhouettes) shows how many groups have access to the share. Click on the number to view and edit the group. Public indicates that the share is available to everyone on the network.
- The number in the Users column (one silhouette) shows how many users have access to the share. Click on the number to view and edit the user. Public indicates that the share is available to everyone on the network.
- Click on the blue circle in the Protocols column to open the Access protocols dialogue window. See Share Protocols.
- Click on the configuration icon (pencil) for the share's settings menu. Most of the options in this menu are explained above, except for the ability to make the share public/private or to delete the share.
Share protocols: specific values for services
For a full description of services, please see Service Priority.
The blue circle in the Status column indicates that a service follows the global service value. The circle will become white if the service for the share does not adhere to the global service value. A red circle means that the service has not been turned on in General Settings.

An administrator will change the share protocol when the:
- Global service value is deactivated.
- Enable/Disable is set to Enable.
Both settings are available in General Settings. To change a protocol for a specific share:
- From Dashboard > Shares, locate the share you want to change and then select one of the following:
- Click on the circle (blue/yellow)
- Select the configuration icon (pencil) to choose Access protocols.
- Select the radio button in the Activated or Deactivated columns to turn the service on or off for the share.
Manage share access

- Choose the configuration icon (pencil) in the right-hand column and select either the Users or Groups tab. You can also click on the numbers in the Users or Groups columns associated with the share.
- In the left-hand column of the resulting window, the users or groups without access to the share are listed. Select the user or group to be granted access, then choose the add arrow (pointing right) either to the Read + Write access cell or to the Read access cell.
To withdraw access, select a user or group in the Read + Write access or Read access cell and choose the remove arrow (pointing left).
Check the box next to Enable Read access to guests on the network to give read-only access to anyone on the network, including non-users.
Delete a share
Deleting a share and data: Note that deleting a share also deletes all files on the share and will cause any associated backup jobs to fail.
- Select the configuration icon (pencil) to choose Delete.
- Confirm in the dialogue window.
Hardware Monitoring
| LaCie 2big NAS | LaCie 5big NAS Pro |
|---|---|
 |  |
Hardware monitoring provides a summary of the LaCie NAS's hardware and the health of its components.
System tab


Drive tab


Backup

The Backup page helps the administrator configure Backup and Restore Jobs of data stored on the LaCie NAS. A job configured on the Backup page can be:
- One-time and/or manual backups.
- An automated backup that runs daily, weekly, or monthly.
- A restore of all or select files from a backup.
For further information on backing up your NAS and instructions on how to create a backup job, go to Backup Jobs.
Important info on NAS backup: It is recommended that all users back up data to DAS or another NAS as further protection against disk failure or secondary points of failure (e.g. hardware, network, etc.) See Backup Jobs for details.
External Ports

This page provides you with information on devices connected to one of the LaCie NAS's USB or eSATA expansion ports.
| Port | LaCie 2big NAS | LaCie 5big NAS Pro |
|---|---|---|
| eSATA | 1 | – |
| USB 2.0 | 1 | 2 |
| USB 3.0 | – | 2 |
USB Printer

Your LaCie NAS features a printer server. Follow the directions below to connect your printer to the network via the LaCie NAS:
- In Dashboard > External ports, confirm that the box next to Activate the printer server is checked.
- Power on the printer and connect it to a USB expansion port on the rear of your LaCie NAS.
- Once connected, the printer will be listed and available throughout your network.
Please note that computer(s) on your network may require specific drivers to use the printer. See the user manual for your printer for details.
Important info: For multi-function printers, only the print feature is supported. If your printer has a scan feature, for example, it will not work when connected to the LaCie NAS.
In addition, only PostScript printers are supported. If your printer does not display on Dashboard > External Ports, it is likely that the printer does not support PostScript printing. This is frequently the case with multi-function and photo printers. LaCie cannot guarantee that your printer supports the proper protocols to make it a networked printer.
In addition, only PostScript printers are supported. If your printer does not display on Dashboard > External Ports, it is likely that the printer does not support PostScript printing. This is frequently the case with multi-function and photo printers. LaCie cannot guarantee that your printer supports the proper protocols to make it a networked printer.
External Drives
Connect
Connect an external hard drive to the LaCie NAS via either USB or eSATA, and it will be listed on this page. Once connected, an external hard drive acts as a share on your LaCie NAS. It will be listed at Dashboard > Shares and can be accessed using your operating system's file system (Explorer Window for Windows users, and Finder for Mac users). Please note that connected external hard drives are public shares on the network and their names cannot be changed.
Technical note: External USB or eSATA hard disks must be formatted in one of the supported systems to be compatible with your LaCie NAS: MS-DOS (FAT32), NTFS, HFS+ (non-journaled only), EXT3, or XFS.
Disconnect
To avoid damaging your external hard drive's file system, click the Eject button before disconnecting it from your LaCie NAS.

Multimedia Indexing
You can take an inventory of available multimedia files on your LaCie NAS and all connected external hard drives. See Reindex the Media Server for details.
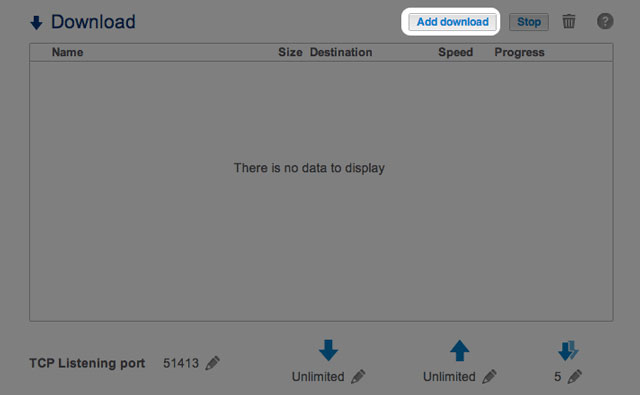
Download Machine

The LaCie NAS Dashboard features a download server that allows you to download files from the internet or the local disk (e.g. PDF, torrent, binary, etc). For more information on torrents, see http://en.wikipedia.org/wiki/BitTorrent_protocol.
Create a Download
- If the download service has not been turned on, choose the Start button.
- To initiate a download, choose the Add download button.
- At the prompt, choose whether the file source can be found at a URL (web address) or if it is a Local File.
- URL: Type or paste the web address.
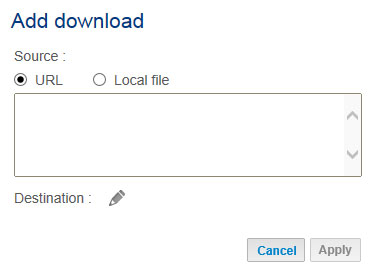
Download: URL radio button
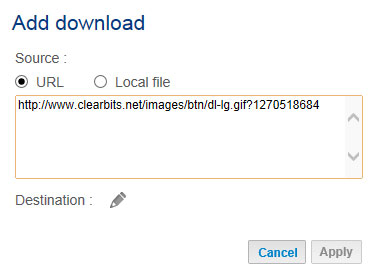
Paste the URL address
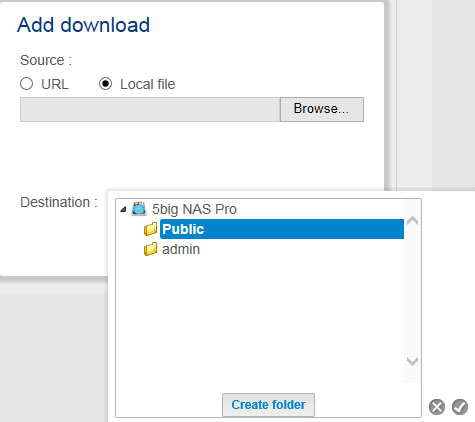
- Local File: Select Browse to search for the file.

Download: Local File radio button
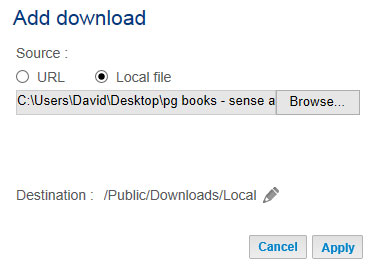
- Select the Destination share by clicking on the configuration icon (pencil).
- To better organize your downloads, you can choose Create folder at the prompt to add a folder to the share.
Create a folder to organize your downloads
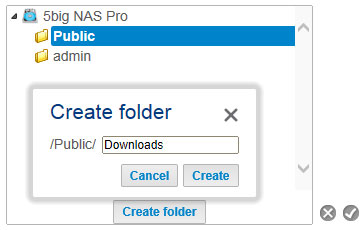
Name the folder for your downloads
- Choose Apply to begin the download.


Download Page Settings

Below the list of downloads are several settings.
- TCP Listening port: Choose the configuration icon (pencil) to enter a router port number through which the download service will operate.
- Download rate limit (down arrow): Choose the configuration icon (pencil) to type a maximum download speed.
- Upload limit rate (up arrow): Choose the configuration icon (pencil) to type a maximum upload speed.
- Max. active downloads (two down arrows): Choose the configuration icon (pencil) to limit the number of downloads that can download/upload simultaneously. Type zero for no limit.
Technical note: Multiple simultaneous downloads can impact your LaCie NAS's performance. In some instances, even after a download has completed, the download service may continue to use system resources if it is uploading.
Storage

The information below identifies and explains the functions on the Storage page. For directions on how to configure RAID for your LaCie NAS, select product below:
Manual note: Certain features and functions listed below apply only to the LaCie 5big NAS Pro, such as LaCie SimplyRAID, RAID 5, RAID 6, spare disks, and double-disk security.
LaCie NAS Volume and RAID Management
Your LaCie NAS can have up to five volumes, each with its own level of RAID.
Enhanced data protection: LaCie SimplyRAID
No matter the capacity of your disks, LaCie SimplyRAID will prepare the storage for immediate use as well as future expansion. LaCie SimplyRAID allows you to:
- Install disks of varying capacities (1TB, 2TB, and 3TB)
- Replace smaller capacity disks with larger capacity disks
- Upgrade storage capacity without deleting or moving data
- Protect data without compromising performance
When using disks of varying capacities, LaCie SimplyRAID will attempt to optimize available storage for your data.
Standard disk configuration: Manual RAID
While the benefits of LaCie SimplyRAID are highly recommended, the Storage page also gives you the option to manually configure your hard disks as:
- JBOD
- RAID 0 (minimum two disks)
- RAID 1 (minimum two disks for data protection)
- RAID 5 (minimum three disks)
- RAID 5 plus spare (minimum four disks)
- RAID 6 (minimum four disks)
- RAID 6 plus spare (minimum five disks)
Review and revise the storage settings

The initial view for the Storage page displays the volume(s) and current RAID scheme(s) for your LaCie NAS. Use this page to add, manage, and configure the NAS storage.
Select a volume

Choose a volume within the left-hand column. The selected volume will appear in white while the other volumes are grey.
Volume tools

Tools to manage the selected volume are available in the center of the Storage page.


Drive
The dynamic photo of the LaCie NAS backplate highlights:
- The disks associated with the volume selected on the left-hand column.
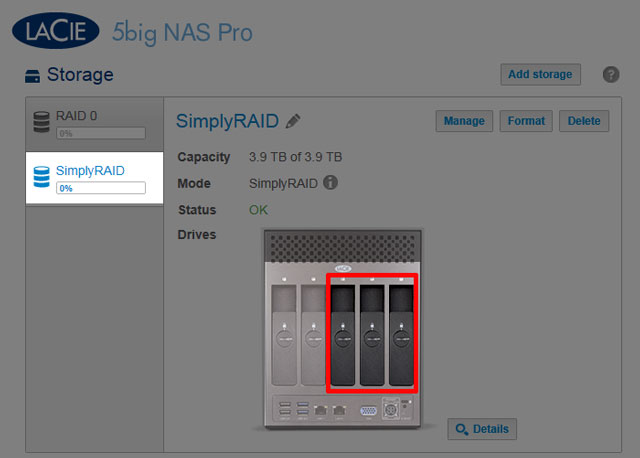
Disks in the volume
- New disks available for a new or existing volume.
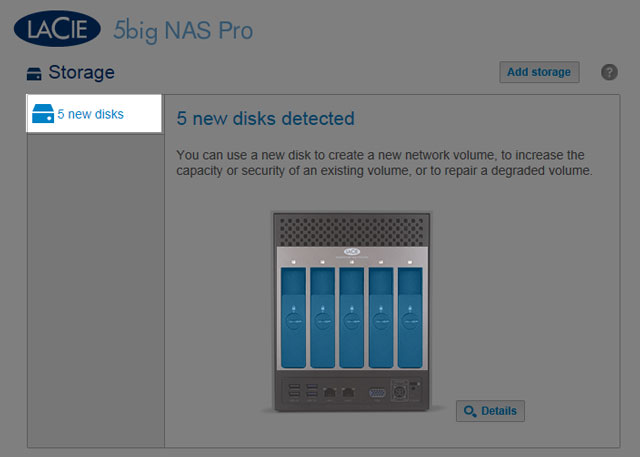
New disks
- Empty slots available for expansion.
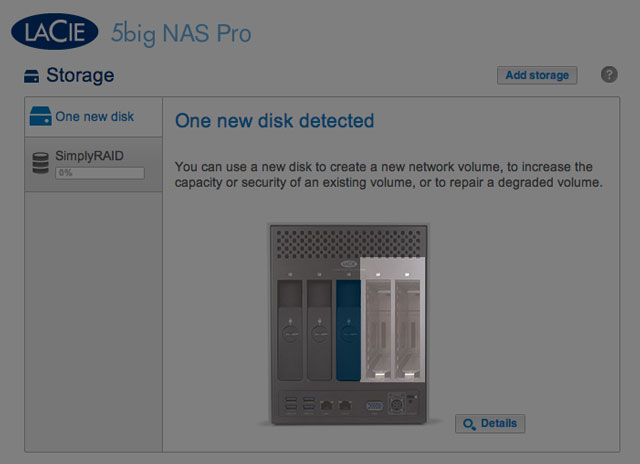
Empty slots
- Failed or missing disks.
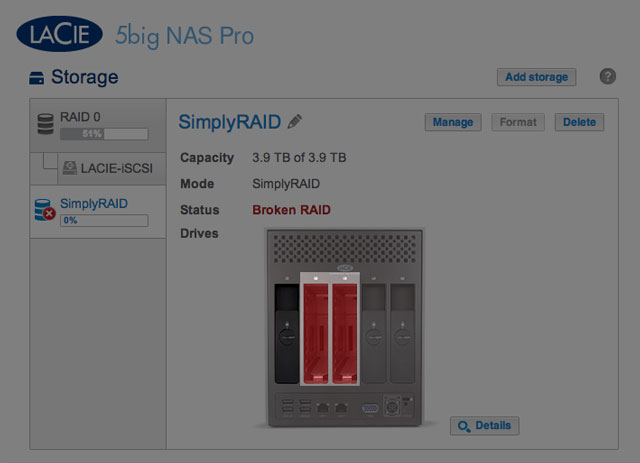
Missing disks


Storage capacity and distribution
Factors that determine the storage capacities for data, protection, and expansion:
- The amount of disks in the enclosure
- The storage capacity of each disk (see note below on mixed capacities)
- RAID mode
- Single-disk or double-disk security
Examples:
- RAID 0 configuration with five disks. The only color is dark blue for data capacity since RAID 0 has no protection.
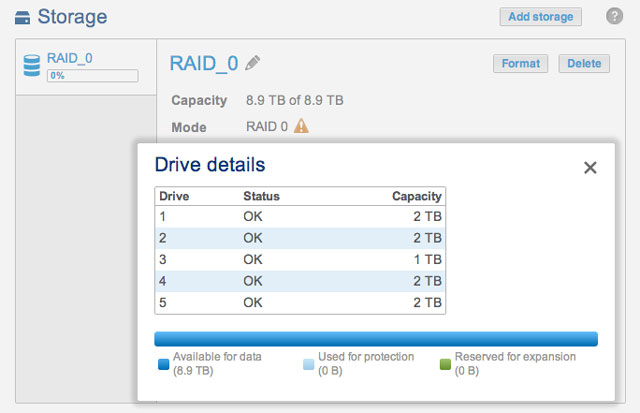
RAID 0: Five disks
- LaCie SimplyRAID configuration with two disks.. Dark and light blue for data and protection, respectively. Both disks are the same capacity.
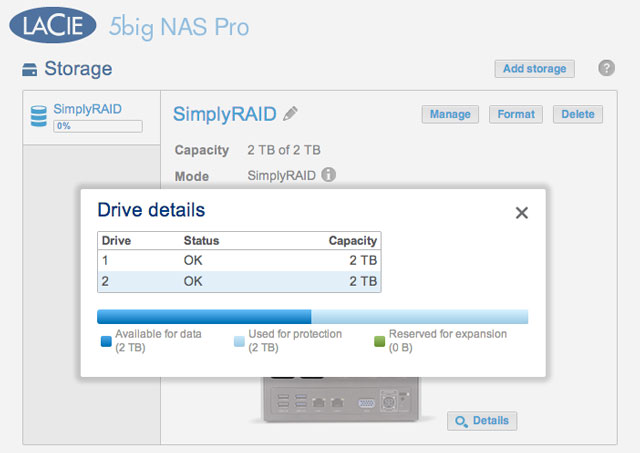
SimplyRAID: Five disks
- RAID 6 configuration with five disks. All colors are represented since the RAID 6 uses double-disk security and the disks are of mixed capacities.
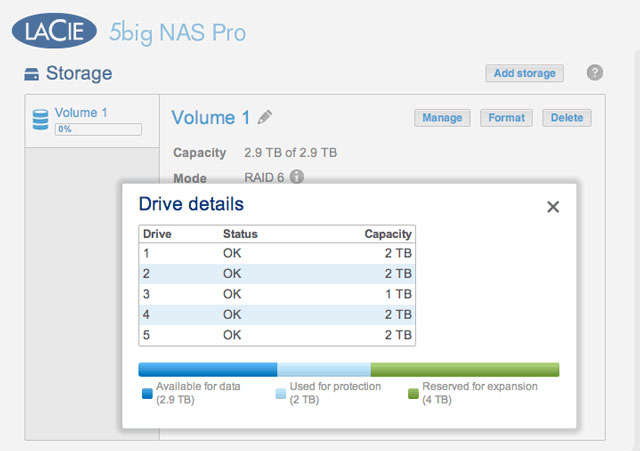
RAID 6: Five disks


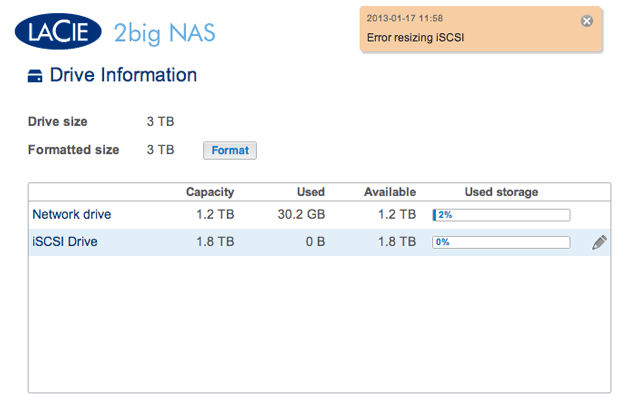
Drive Information & iSCSI Setup

This page shows you information about disk usage and will allow you to reformat your disk(s).
When you click the top Format button, ALL data on the disk(s) (including an iSCSIShare) will be erased and the disk(s) will be formatted for LaCie NAS OS. Data on any hard drive connected to the expansion ports will not be affected.
To reformat:
- Click the Format button.
- In the window that opens, confirm by clicking the Format button.
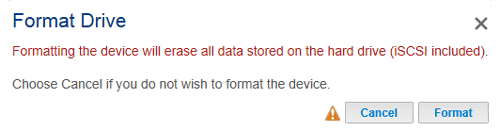

Caution: Formatting will erase all the data on your drive (but will not remove users or settings). Make sure to back up all your data onto another volume before proceeding. LaCie cannot be held responsible for the loss of data.
Configure iSCSI
You can configure your LaCie NAS share as an iSCSI target client, which allows you to mount a network share as a local volume. You can then format this volume in a non-network file system such as NTFS, HFS+, or FAT32.
Please note that the maximum capacity for an iSCSI volume is 8TB.
Follow the directions below to allocate a portion of the LaCie NAS's storage to iSCSIShare:
- Click the configuration icon (pencil) in the iSCSIShare row and then select Resize iSCSI.

- Drag the slider to change the amount of space allocated to the iSCSI Drive. After you click the slider, press the right and left arrow keys on your keyboard to fine tune.
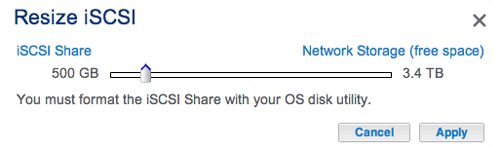
- Click the Apply button, then confirm in the popup window.
- You will need to format the share using your operating system's disk management utility (Disk Utility for Mac and Disk Management for Windows).
- Install and configure an iSCSI client initiator from Microsoft (Windows users) or a third party vendor. Refer to the vendor's documentation for details.


Important info on resizing error: At times, Dashboard > Drive may display a resizing error with iSCSI volumes equal to or greater than 1.5TB. The error can appear when the administrator creates/expands an iSCSI volume or reduces an existing iSCSI volume to 0TB. Please note that, in almost all instances, the error is not correct and that the changes to the iSCSI volume have been applied.

Advanced Parameters: iSCSI and CHAP
Click the configuration icon (pencil) and select Advanced Settings to modify parameters related to the iSCSI Drive. You can also configure CHAP (Challenge-Handshake Authentication Protocol) to limit access to the iSCSI volume.
Important Info: If you are using a Microsoft initiator, the CHAP password should be greater than or equal to 12 bytes and less than or equal to 16 bytes.

After modifying the above values, click Apply.
Eco Management

- Status light: Uncheck this box to turn off the front blue light. Note that this will not disable warning indicators or rear disk LEDs (see LED Behavior and Button Functions for details on LED status).
- Turn off the hard drives (Eco mode): Set the duration of inactivity after which the disks will revert to Eco mode. In Eco mode, the disks will spin down to reduce power consumption. The LaCie NAS will leave Eco mode automatically when a request is sent to the device.
- Deep sleep enabled: Check this box to allow your LaCie NAS to enter deep sleep mode. Deep sleep means that the drive will enter a very low energy consumption mode.
- Manual: Once enabled, you will have the option to choose deep sleep mode in the Shutdown Options button on the Dashboard (upper right power icon). You can also apply a short press to the front blue LED button. The front LED will begin to blink, indicating that the device is preparing to enter deep sleep mode. To wake the drive from deep sleep mode, apply a short press to the front blue LED button or use the Wake on LAN function in LaCie Network Assistant (see Wake on LAN (WOL)).
- Automatic: Set a schedule for the device to enter and exit deep sleep mode using Power on/off schedule.
- Power on/off schedule: Set the drive to activate/deactivate deep sleep mode to save energy. Deep sleep mode should be used when no one is accessing the NAS's data. For example, between 12:00 AM and 5:00 AM. Choose the configuration icon (pencil) under the Power on (wake from deep sleep) and Power off (enter deep sleep) columns to choose the times of day.
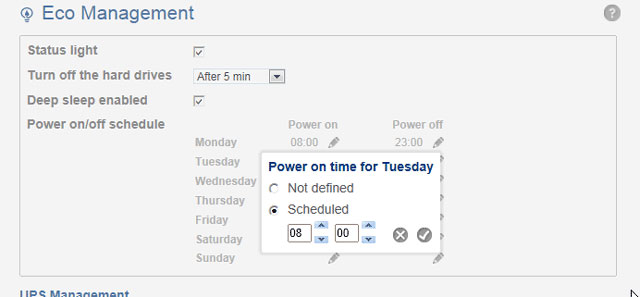

Important info: When deep sleep mode is activated, all processes, including downloads and backups, will be terminated. The shares are not accessible and the device cannot be managed via the Dashboard during deep sleep mode.
- UPS Management: Your LaCie NAS supports UPS (uninterrupted power supply) management. Connect a supported UPS device to a USB port on your LaCie NAS, then choose Advanced to set the battery threshold level (%). Upon reaching the threshold level, the LaCie NAS will automatically enter stand-by mode.
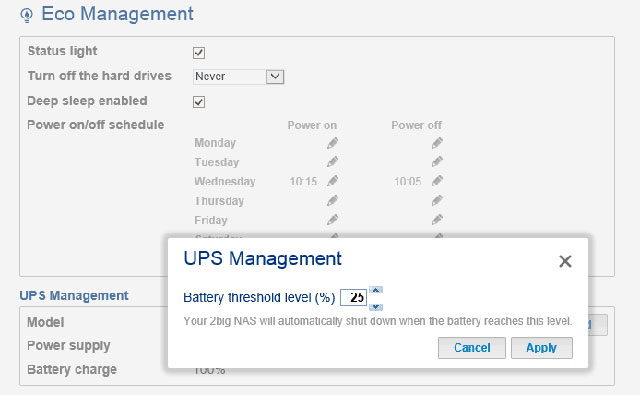 .
.
- UPS Management LED indications:
- Green - power is being supplied through the power cable.
- Gray - power is not being supplied through the power cable.
- For a list of supported UPS devices, choose this link.

Manage RAID - LaCie 2big NAS

Your LaCie 2big NAS features a robust RAID management system that will allow you to choose and manage the RAID mode most optimized for your data.
Modify RAID Mode
- RAID mode: This box shows you the current RAID scheme for your LaCie NAS, as well as the number of disks involved in the scheme.
- RAID status: This box lets you know whether the array is healthy, degraded, or synchronizing. A yellow warning icon will inform you if your array is unprotected in the case of a single disk failure. This may be due to a degraded protected RAID array or if you have chosen RAID 0.
- Hard Drive map: Click the illustration of the disk to see which slot in the LaCie NAS the disk occupies.
RAID Setup Wizard
- Click the Manage button to launch the RAID Setup Wizard. Choose which of the disks to include in the array. Click Next.
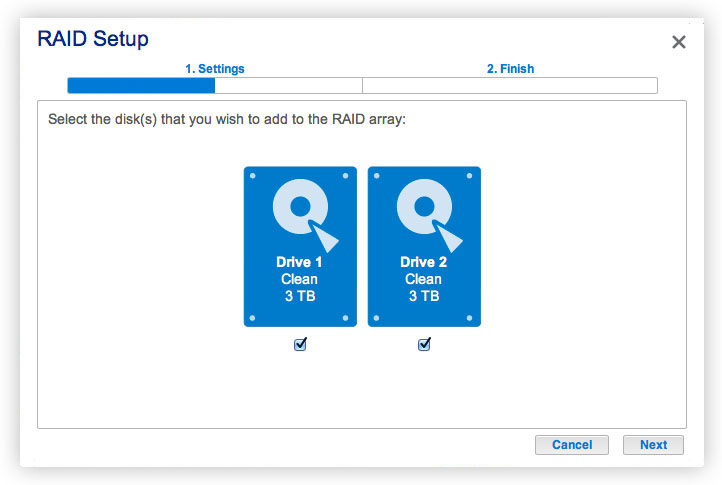
- In the next screen, choose a RAID level. Clicking the RAID mode's button will give you an explanation of its strengths and weaknesses.
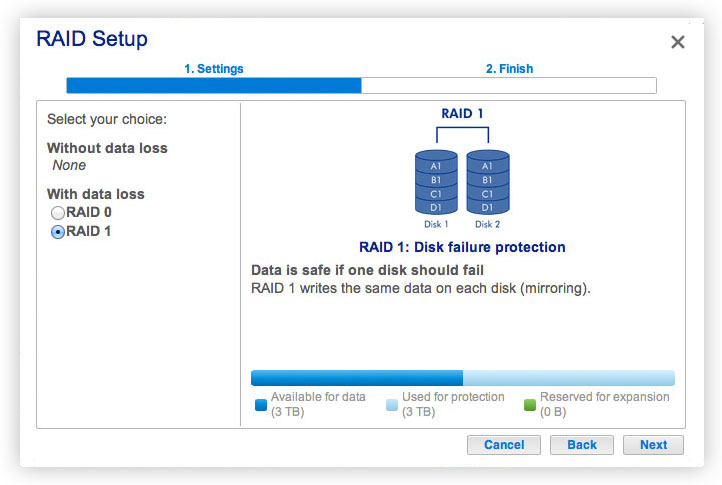
Note that converting to a new level of RAID (e.g. from RAID 1 to RAID 0 or RAID 0 to RAID 1) will erase files on the shares (but the Dashboard configuration will not be affected). - Click Next.
- Review the information then click Finish. Confirm the RAID in the popup window.
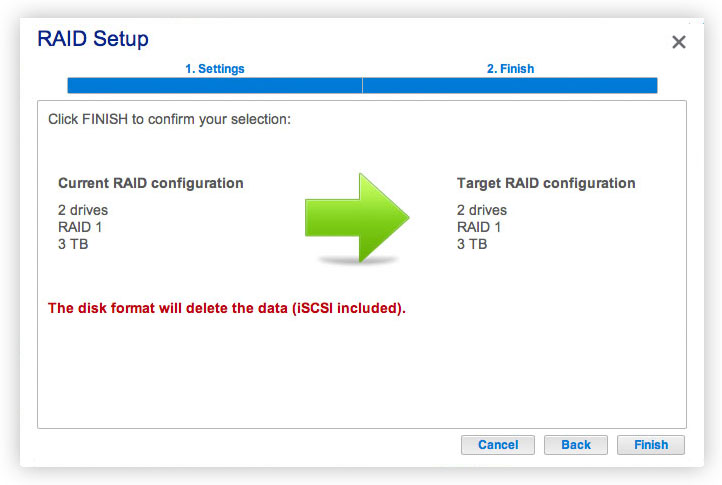
The Dashboard will become unavailable as the system configures the RAID.


Rebuilding Times
Rebuilding a protected RAID array takes many hours, depending on the capacity of the disks and your LaCie NAS's available resources (concurrent tasks such as backups or torrent downloads will slow rebuilding). Changing to an unprotected RAID mode (ie RAID 0) takes less than five minutes. Note that data is accessible during rebuilding.
About RAID Modes
Refer to the table below for an overview of the different RAID modes, and see the descriptions for details. Note that this information is also explained in the RAID Setup Wizard on the Dashboard (see above for details).
| RAID Mode | Capacity | Protection | Factory Default |
|---|---|---|---|
| RAID 0 | 100% |  | – |
| RAID 1 | 50% |  | YES |
RAID 0: RAID 0 gives users the total capacity of both hard disks as well as excellent performance. However, RAID 0 offers no protection if a hard disk fails.

Caution: If one physical hard disk in a RAID 0 array fails, the data of all hard disks becomes inaccessible because parts of the data have been written to all hard disks.
RAID 1: RAID 1 provides data safety since all data is written to each hard disk at the same time. In the event of a single hard disk failure, data remains available on the other hard disk. Due to the time it takes to write the data twice, performance is slightly reduced. RAID 1 is a good choice when safety is more important than speed. However, RAID 1 also reduces the available hard disk space by 50% due to the need to write each bit of data on each hard drive.

Replacing a Hard Disk
Disk Removal
Unprotected RAID Arrays and Swapping/Expanding Hard Disks:
- Removing a hard disk from a RAID 0 array while the device is powered on may cause you to lose data. To avoid problems, shut down the LaCie NAS before removing healthy disks. Return the hard drive to its proper bay before powering on the LaCie NAS.
- In cases where a hard drive has failed or you wish to expand storage capacity, data will be lost when replacing/swapping hard disks.
Protected RAID Arrays and Swapping/Expanding Hard Disks: If your array is protected (e.g. RAID 1), you can remove a hard disk while the product is turned on without damaging the array and losing data, a process also referred to as “hot-swapping”. In most instances, LaCie recommends hot-swapping when replacing or expanding hard disks in the LaCie NAS. For example, if you swap or insert unclean hard drives (with data) from another LaCie NAS (e.g. a LaCie 2big NAS to a LaCie 5big NAS Pro), you may experience problems when first booting your current LaCie NAS.
When replacing or expanding hard drives in a protected RAID array:
- Perform the operation while the LaCie NAS is powered on (hot-swapping).
- Use clean hard drives (without data).
Caution: After continuous use of the LaCie NAS, the hard drives may be hot. Use caution when removing.
- The hard drive tray may be locked. To unlock it, use the included hard disk drawer key to turn the lock until the slot is vertical.
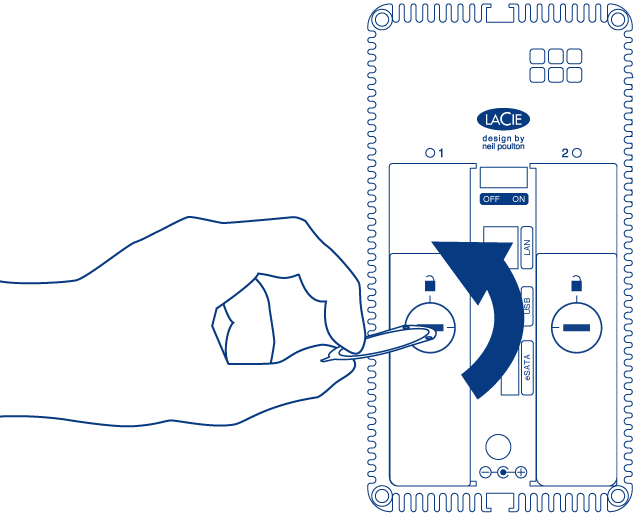
- Draw out the hard drive tray by inserting your finger into the space behind the hard drive tray handle and pulling to disengage the hard drive.
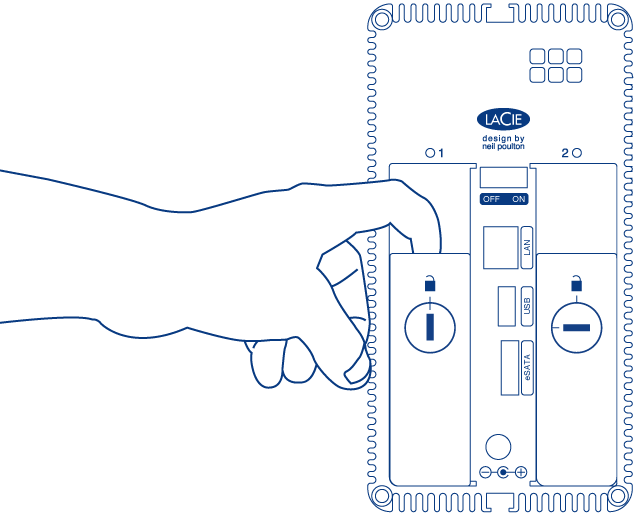
- Grasp the hard drive tray handle and carefully extract the hard drive.
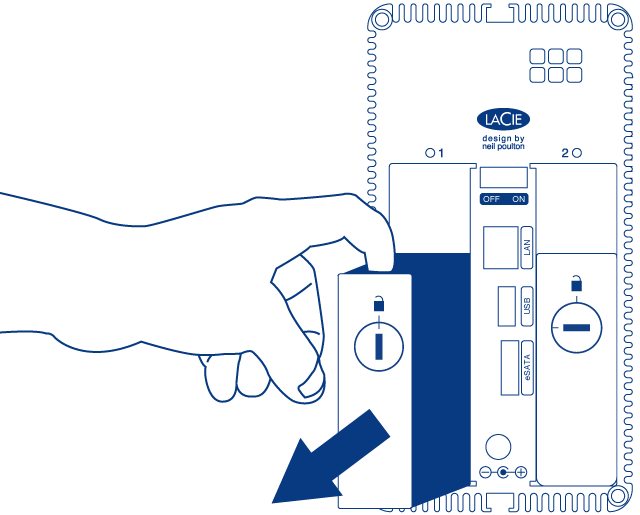


Disk Insertion
Important info: If a hard disk that you have purchased from LaCie fails, please contact your LaCie reseller or LaCie Customer Support.
Replacing a hard drive involves two main steps, installing the new hard drive and claiming the new hard disk at Dashboard > RAID (see below). Note that the new hard disk must have equal or greater capacity than the hard disk it is replacing.
- Carefully insert the tray into an empty hard drive bay. When the tray is most of the way in and you feel resistance, press the handle firmly until you feel the it snap into place and the handle is flush with the back of the LaCie NAS.
- Use the disk drawer key to lock the hard drive.
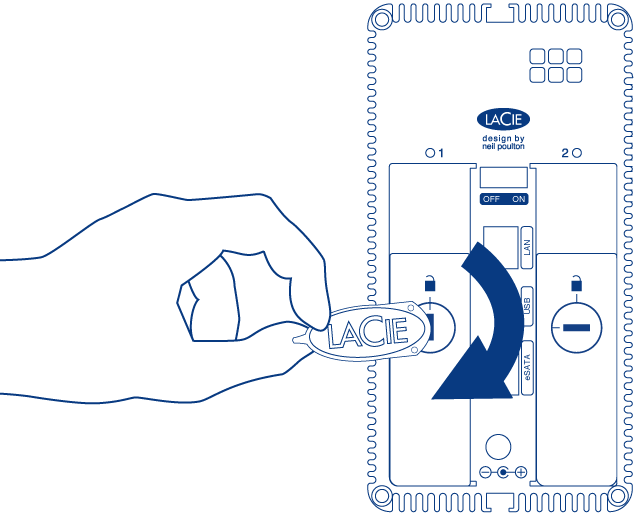
- Navigate in the Dashboard to the RAID Management page. In the hard drive map, the new hard disk will be represented by a lighter grey color than the already-claimed disk and will be labelled New (see screenshot below, which shows a RAID 1 array).
- If the LaCie 2big NAS is in RAID 1:
- Click the Replace button under the disk marked New.
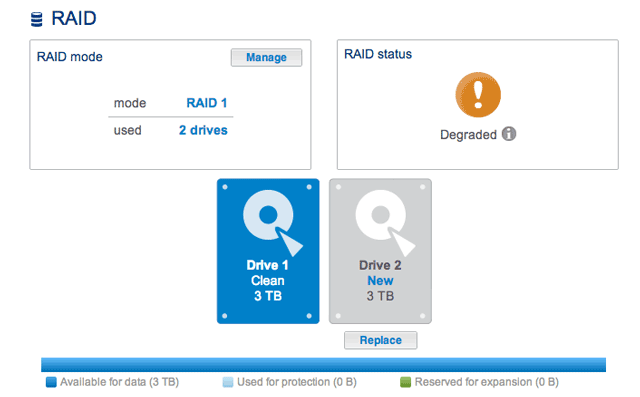
- In the next screen, confirm the addition and complete the RAID Setup wizard.
- You may use your LaCie 2big NAS as it rebuilds the data across both hard drives. Please note that performance may be affected during a rebuild.
- If the LaCie 2big NAS is in RAID 0:
- Click the Manage button and complete the RAID Setup wizard.


The Dashboard will become unavailable while the RAID mode is changed.
Expand Disk Capacity
RAID 1 configurations allow you to expand the capacity of your LaCie 2big NAS without losing data. Please note that RAID 1 configurations optimize storage with two hard drives of the same capactiy.
Example: A RAID 1 array with data is comprised of two 1TB hard drives. The administrator wants to upgrade both hard drives to 3TB. To begin, the adminstrator removes the 1TB hard drive from Drive Tray 2. There is no need to power off the 2big NAS since RAID 1 supports hot-swapping. Per the instructions in Disk Removal, the administrator removes the 1TB hard drive from the disk tray and screws in the new 3TB hard drive. Once the the disk tray with the new 3TB hard drive is reinserted into the 2big NAS chassis, the administrator synchroonizes the RAID 1 array. The process is repeated for the second hard disk.
Note on RAID 0 arrays: If you are updating a RAID 0 array, please follow the steps in Disk Removal and Disk Insertion.
- LaCie recommends backing up all data before continuing with the next steps.
- Go to Dashboard > RAID. Per the example above, the screenshot shows a RAID 1 array with two 1TB hard drives.
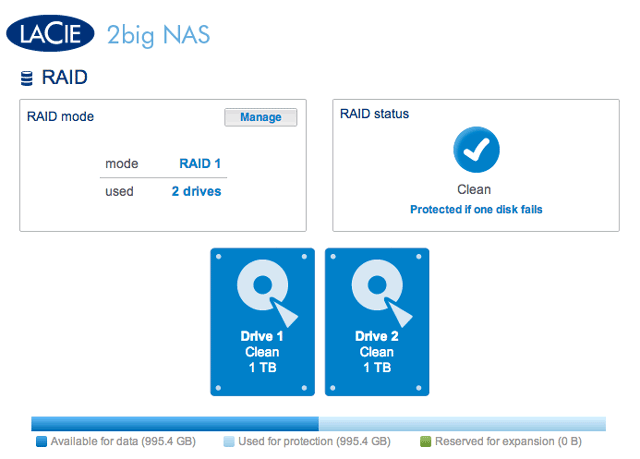
- Remove Disk Tray 2 (the hard drive on the right when facing the rear of the LaCie 2big NAS). See Disk Removal for more information, if necessary. The Dashboard will show that the disk is missing.
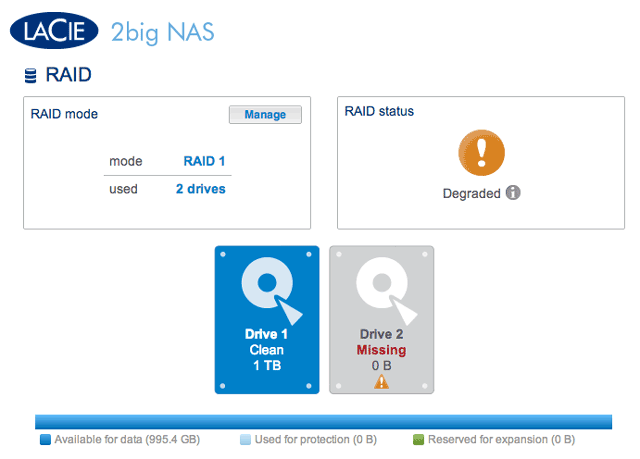
- Remove the drive currently screwed into the Disk Tray and screw in the new hard drive. For instructions on how to fix a hard disk into the drive tray, please see Connect to the Network: Diskless LaCie 2big NAS.
- Carefully insert the tray with the new hard disk into the empty bay. When the tray is most of the way in and you feel resistance, press the handle firmly until you feel the it snap into place and the handle is flush with the back of the LaCie NAS. Use the disk drawer key to lock the hard drive.
- The Dashboard will show the New disk. Click on Replace below the New disk. DO NOT click Manage. Following the instructions in Manage will create a new RAID array and delete all media.
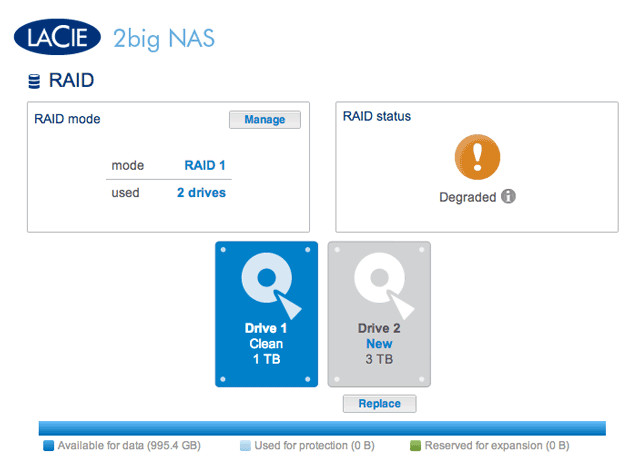
- At the prompt, confirm the synchronization. While the Dashboard is not available during the initial phase of the synchronization, you may access data stored on your LaCie 2big NAS throughout the process.
- Depending upon the capacity of your hard drives and the amount of data, the synchronization may take several hours.
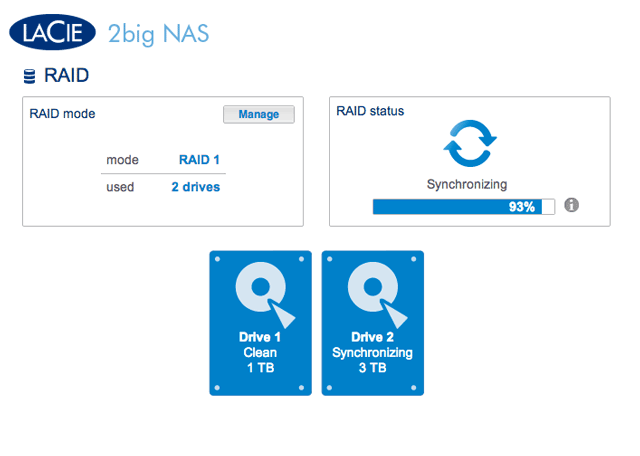
Synchronizing the RAID
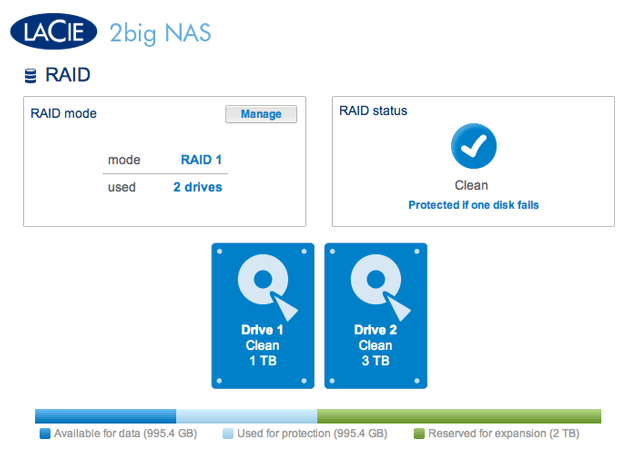 Synchronization complete
 - Once the synchronization is complete, remove the hard drive in Drive Tray 1 and replace it with the second hard drive using the same steps as Disk Tray 2.
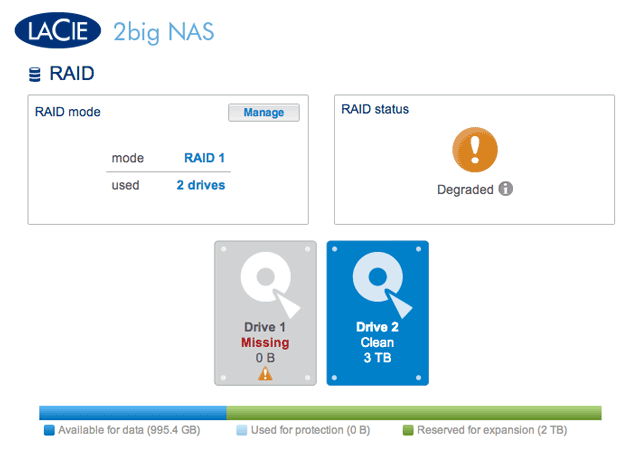
- Click Replace under the New disk to begin the synchronization. DO NOT click Manage. Following the instructions in Manage will create a new RAID array and delete all media.
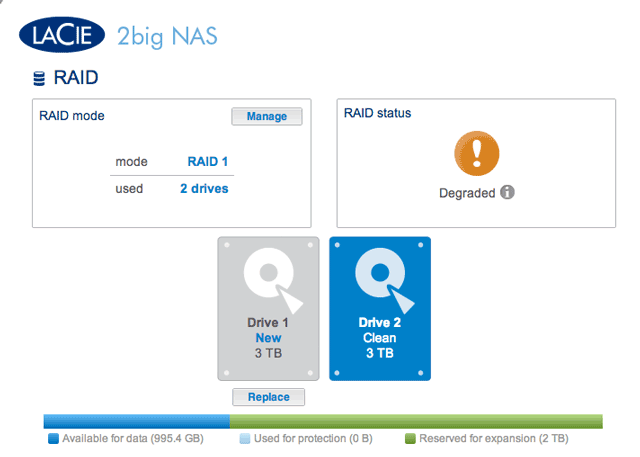
- At the prompt, confirm the synchronization. While the Dashboard is not available during the initial phase of the synchronization, you may access data stored on your LaCie 2big NAS throughout the process. Please note that the RAID 1 array is stll configured for the capacity of the original hard disks. It is not possible to surpass the previous capacity at this time.
- Once the synchronization is complete, click Expand in the RAID status section. DO NOT click Manage. Following the instructions in Manage will create a new RAID array and delete all media. The RAID 1 array will synchronize once more to extend the storage capacity to that of the new hard disks. In this example, from 1TB to 3TB. Data is available to users during the synchronization.
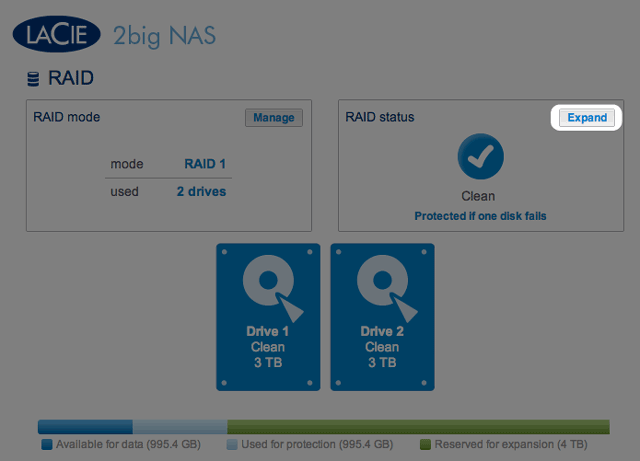
- You have successfully expanded the RAID 1 array once synchronizing and resizing are complete.


Support
Configuration

- Firmware: The LaCie NAS's operating system version will be listed here. This information is important when updating the NAS operating system or if you need to speak with LaCie technical support.
- Email notifications:
- Choose the Edit button to configure email notifications. Important: Make certain to enter the SMTP address for your email server. The LaCie NAS cannot send notifications without an email server. You may use an in-house SMTP server or third-party providers such as gmail, hotmail, etc.
- If verification is necessary, check the box next to Authentication required to enter the valid email address and password. (See Email Notifications Triggers below for events that will generate emails.)
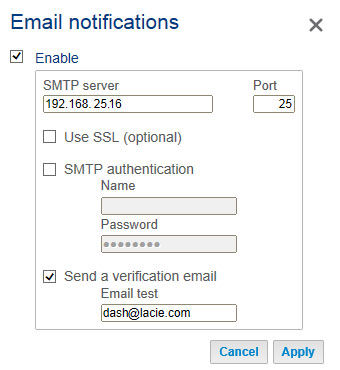
Email server prompt
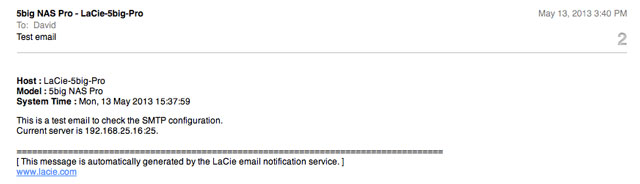
Test email from the NAS
- System log: Choose the Download button to save the system log to your computer.


Email notification triggers
The following events will trigger an email notification if an email address has been provided on the User page:
| Event identifier | Description | Recipient |
|---|---|---|
| Capacity | The total available capacity is less than 10% | Administrator |
| Download | A download job has completed or a download job error has occurred | Administrator |
| Backup | A backup job has: started, ended, been cancelled, or failed | Administrator |
| Test email | Email sent as a test on the Support page | Administrator |
| RAID | Creation of a RAID volume; unprotected volume or broken RAID | Administrator |
| Fan | The fan has stopped (5big NAS Pro only) | Administrator |
| Temperature | The product has remained at maximum temperature for at least one minute | Administrator |
| Password recovery | A user has recovered his/her password | Administrator or user, depending on who made the request |
Automatic update
LaCie may improve your LaCie NAS's software or add new features over time. Your LaCie NAS automatically checks for new firmware and, if an update is found, prompts you to install it at login.

Review the additional options below:


Update Using LaCie Network Assistant (LaCie 2big NAS only)


Important info: During the update process, the front LED will blink red and blue.
Logs
The Logs section will list important events, such as RAID changes, downloads, warnings, and much more.
To purge the listings from this list, choose the trash icon.
Manage RAID - LaCie 5big NAS Pro

Your LaCie 5big NAS Pro optimizes disk performance and capacity using LaCie SimplyRAID. No matter the capacity of your disk(s), LaCie SimplyRAID will prepare the LaCie 5big NAS Pro storage for immediate use as well as future expansion. LaCie SimplyRAID accommodates your storage needs, allowing you to:
- Install disks of varying capacities (1TB, 2TB, and 3TB)
- Replace smaller capacity disks with larger capacity disks
- Upgrade storage capacity without deleting or moving data
- Protect data without compromising performance
While LaCie recommends the benefits of LaCie SimplyRAID, the Dashboard RAID page also gives you the option to manually configure RAID.
Review your RAID settings
RAID mode

This box shows you the current RAID scheme for your LaCie NAS, as well as the number of disks involved in the scheme.
RAID Status

This box lets you know whether the array is healthy, degraded, or synchronizing.
- RAID 0 (no data protection).
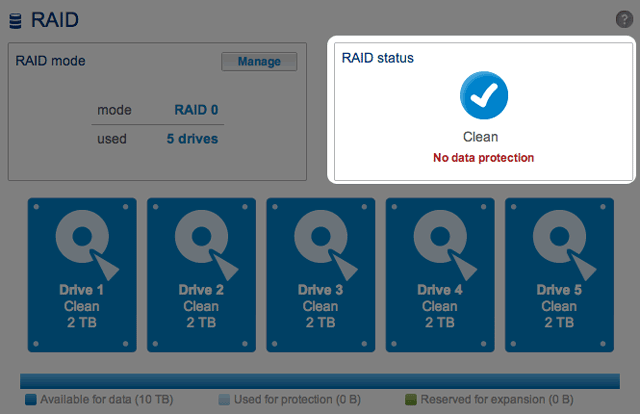
- RAID degraded due to a missing disk.
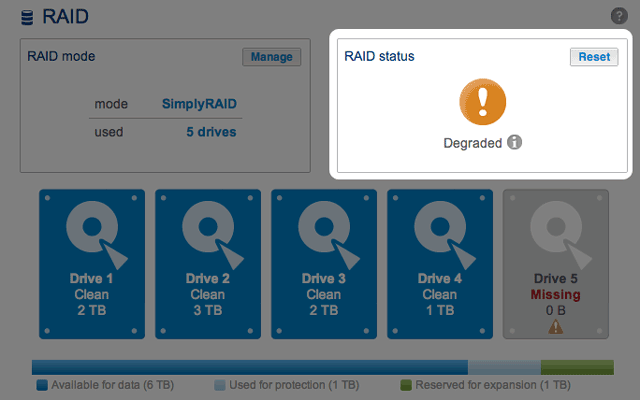
- RAID failure due to missing or bad disks.
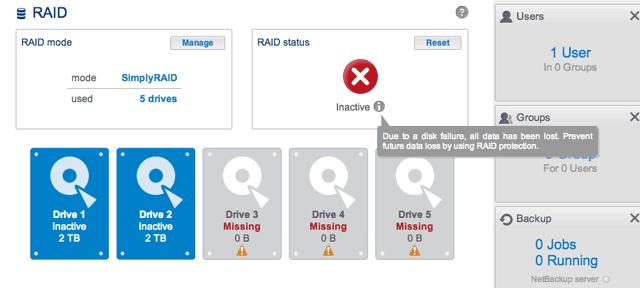
- RAID synchronizing following a disk replacement.
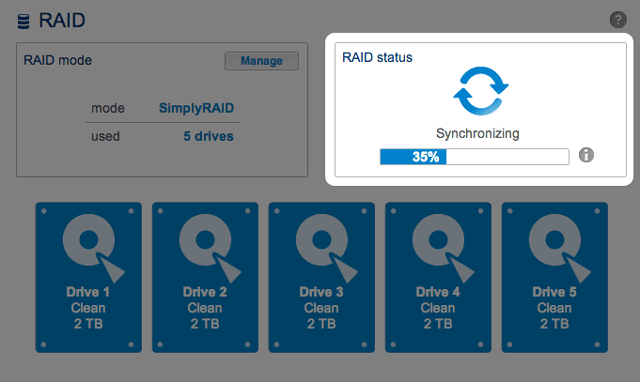


See RAID Status: Expand, Replace, and Reset for instructions on expanding your array and replacing disks.
Hard Drive Map

Click the illustration of the disk to see which slot in the LaCie NAS the disk occupies.

Click on the Hard Drive to see its physical location
Storage Distribution

The multicolor bar below the disks provides a fast reference on how LaCie SimplyRAID distributes the LaCie 5big NAS Pro storage.
- Dark blue: Storage capacity for your data.
- Light blue: Protection in case one or two disks fail. The light blue indicator will vary in size depending upon single or double disk protection.
- Green: Disk capacity that spans beyond the level of RAID assigned by LaCie SimplyRAID. This space is reserved for expansion should you add new or larger capacity disks.
Storage capacity and distribution
Factors that determine available data capacity include:
- The amount of disks in the enclosure
- The storage capacity of each disk (see note below on mixed capacities)
- RAID Mode
- Single disk or double disk security
Examples:
- Manual RAID 0 configuration with five disks. The only color is dark blue since RAID 0 has no protection and all the disks are of equal capacity (2TB).
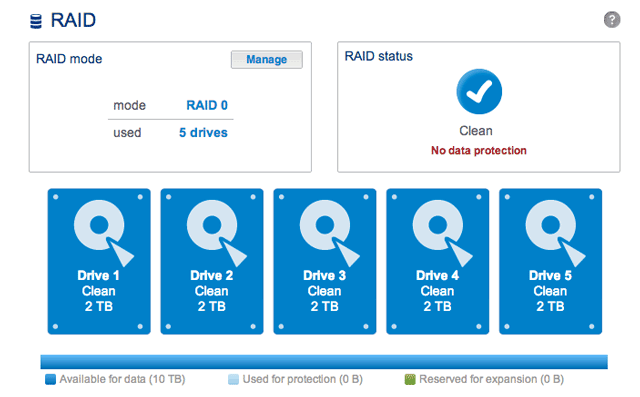
- LaCie SimplyRAID configuration with five disks. All colors are represented since the RAID array uses single disk security and the disks are of mixed capacities.
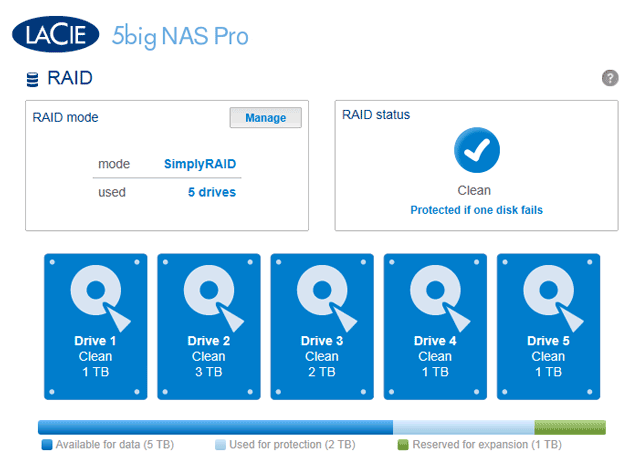
- LaCie SimplyRAID configuration with three disks. All colors are represented since the RAID array uses single disk security and the disks are of mixed capacities.
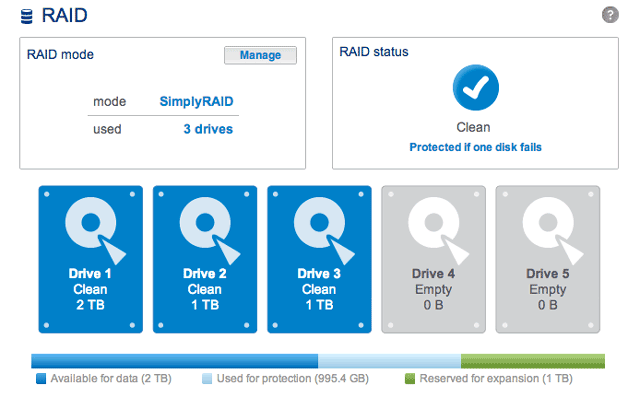


About RAID Modes
Refer to the table below for an overview of the different RAID modes, and see the descriptions for details. Note that this information is summarized in the RAID Setup Wizard on the Dashboard.
| RAID Mode | Minimum Hard Drives | Data Capacity | Protection | Performance | Factory Default |
|---|---|---|---|---|---|
| SimplyRAID | 2 | Optimized | |  | Yes |
| RAID 0 | 2 | 100% | | | – |
| RAID 1 | 2 | 50% | |  | – |
| RAID 5 | 3 | 60% - 75% (estimate varies by disk configuration) | |  | – |
| RAID 6 | 4 | 60% (estimate varies by disk configuration) | | | – |
Note on RAID 0 and 4TB hard drives: RAID 0 configurations with five hard drives cannot surpass 16TB. LaCie recommends against using five 4TB hard drives in a RAID 0 configuration.
Note on RAID 1: RAID 1 will not be available in four- and five-disk configurations.


RAID Setup Wizard
Follow the directions to run the RAID Setup Wizard. You may select:
- LaCie SimplyRAID: LaCie's smart RAID configuration agent.
- Manual RAID: Configure your array using standard RAID models based upon the amount of disks in your enclosure.


Rebuilding Times
Rebuilding a protected RAID array can take many hours, depending on the capacity of the hard disks and your LaCie NAS's available resources (concurrent tasks such as backups or torrent downloads will slow rebuilding). Changing to an unprotected RAID mode (e.g. RAID 0) takes less than five minutes. Note that data is accessible during rebuilding.
RAID Status: Expand, Replace, and Reset
The RAID Status box will inform you of changes to your array that may require action on your part. Follow the instructions below to:
- Remove and/or insert a disk
- Perform one of the following:
- Expand your RAID with a new disk
- Replace a missing or failed disk
- Reset the RAID configuration with the available disks
Important info: If a hard disk that you have purchased from LaCie fails, please contact your LaCie reseller or LaCie Customer Support.
Hard Disk Replacement/Expansion with Unprotected and Protected Arrays
Unprotected RAID Arrays and Swapping/Expanding Hard Disks:
- Removing a hard disk from a RAID 0 array while the device is powered on may cause you to lose data. To avoid problems, shut down the LaCie NAS before removing healthy disks. Return the hard drives to their proper bays before powering on the LaCie NAS.
- In cases where a hard drive has failed or you wish to expand storage capacity, data will be lost when replacing/swapping hard disks.
Protected RAID Arrays and Swapping/Expanding Hard Disks: If your array is protected (e.g. RAID 1), you can remove a hard disk while the product is turned on without damaging the array and losing data, a process also referred to as “hot-swapping”. In most instances, LaCie recommends hot-swapping when replacing or expanding hard disks in the LaCie NAS. For example, if you swap or insert unclean hard drives (with data) from another LaCie NAS (e.g. a LaCie 2big NAS to a LaCie 5big NAS Pro), you may experience problems when first booting your current LaCie NAS.
When replacing or expanding hard drives in a protected RAID array:
- Perform the operation while the LaCie NAS is powered on (hot-swapping).
- Use clean hard drives (without data).
Remove/Insert a Hard Disk


Expand your RAID array Hard Disk Capacity


Replace a failed or missing disk
If you have configured your RAID as Standard (Manual as opposed to SimplyRAID), the new disk must have equal or greater capacity than the disk it is replacing.
- Remove the failed disk and insert a new hard drive per the instructions above.
- Go to Dashboard > RAID. The recently inserted hard disk will be labelled New.
- If the LaCie 5big NAS Pro RAID configuration is SimplyRAID, RAID 1, RAID 5, or RAID 6:
- Click the Replace button below the New Disk. DO NOT click on Reset.
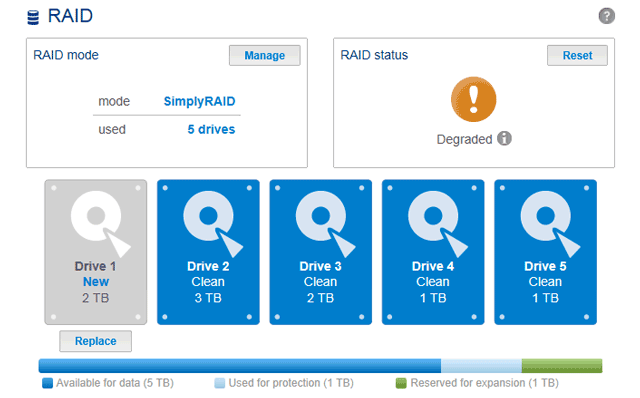
- Confirm the addition and complete the RAID Setup Wizard.
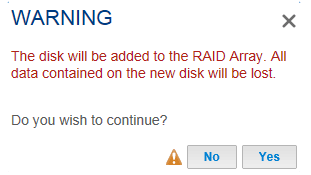
- You may continue to use the LaCie NAS during the RAID synchronization.
- If the LaCie 5big NAS Pro RAID configuration is RAID 0:
- Click the Manage button and complete the RAID Setup wizard.


The Dashboard will become unavailable for a brief period of time as the system configures the RAID. On protected RAID arrays, you may continue to access files stored on your LaCie NAS during the RAID synchronization.
Reset the RAID array (SimplyRAID only)

If a hard drive in the array fails and you do not have a replacement disk, you can use the Reset button to reconfigure the RAID. The Reset button will optimize the RAID configuration using the remaining disks. LaCie recommends that you back up your files since all data will be deleted while creating the new RAID array.
2big NAS: About RAID Modes
Refer to the table below for an overview of RAID modes available to the LaCie 2big NAS. Note that the levels of performance and protection will differ based upon the number of drives in the volume. The New storage volume wizard includes a helpful tooltip with star ratings for performance and protection.
| RAID Mode | Minimum Hard Drives | Factory Default (full disk version only) |
|---|---|---|
| JBOD | 1 | – |
| RAID 0 | 2 | – |
| RAID 1 | 1 (no data protection) | – |
| RAID 1 | 2 (data protection) | Yes |
Note on enclosures with one hard drive: You can create a JBOD or RAID 1 volume with a single drive in the enclosure. However, there is NO DATA PROTECTION with RAID 1 since a second drive is not available. A JBOD volume with one or more hard drives does not offer data protection.
Important info on NAS backup: It is recommended that all users back up data to DAS or another NAS as further protection against disk failure or secondary points of failure (e.g. hardware, network, etc.) See Backup Jobs for details.

New Storage Volume Wizard
Build one or two volumes using the New storage volume wizard. You can select:
- JBOD
- RAID 0 (two disks minimum)
- RAID 1 (two disks minimum for data protection)
Important note on creating a single-disk volume: Single-disk volumes can be created with expansion in mind. For example, you can use the New storage volume wizard to create a single-disk volume using JBOD or RAID 1. Though the volume will not provide data protection in a single-disk RAID 1 configuration, it is prepared for expansion when you add a second disk to the enclosure.
Important info: It is recommended that all users back up data to DAS or another NAS as further protection against disk failure or secondary points of failure (e.g. hardware, network, etc.) See Backup Jobs for details.
.


Hard Disk Expansion
Removing Healthy Disks from a RAID Volume
Unprotected volumes (Single-disk volume, RAID 0, or JBOD):
- Removing the sole disk in a single-disk volume will break the RAID and all data will be lost. Since NAS OS is installed on the hard drive, you will lose connection to the device if the only disk in the enclosure is removed while the device is powered on. Try to shut the NAS off then reinsert the disk. Power on the device and wait approximately five minutes before logging on to the Dashboard.
- Removing a healthy hard disk from an unprotected volume while the LaCie 2big NAS is powered on will break the RAID and all data will be lost. To avoid problems, shut down the LaCie NAS before removing healthy disks. Return the hard drives to their proper bays before powering on the LaCie NAS.
- Powering on the LaCie 2big NAS with a missing disk in an unprotected volume will break its RAID and all data will be lost.
Protected volumes:
- Removing a healthy hard disk from a protected volume while the LaCie 2big NAS Pro is powered on will render the volume unprotected. You can remove a disk from a protected volume to expand capacity or replace a failed disk (see Hard Disk Expansion and Replacement for details). Otherwise, shut down the LaCie NAS before removing healthy disks. Return the hard drives to their proper bays before powering on the LaCie NAS.
- If a healthy disk has been removed while the LaCie 2big NAS is powered on and you do not want to replace it, you can reinsert it into the enclosure slot. Data remains intact as the volume's hard disks synchronize.
Important info: If a hard disk that you have purchased from LaCie fails, please contact your LaCie reseller or LaCie Customer Support.
Important info on NAS backup: It is recommended that all users back up data to DAS or another NAS as further protection against disk failure or secondary points of failure (e.g. hardware, network, etc.) See Backup Jobs for details.
Expand the RAID by adding a second disk to the enclosure


Hard Disk Expansion and Replacement
Use the directions below to replace a hard disk that is:
- Healthy. Exchange a disk in the volume with a larger capacity hard drive.
- Failed or missing. Replace a hard drive that has failed or is missing.
Hot-swapping hard drives
You can remove one hard disk from a protected volume while the product is turned on without losing data. This process is referred to as “hot-swapping”. It is highly recommended that hot-swapping be performed when replacing or expanding a hard disk that is part of a protected volume. You can experience problems if you shut down the LaCie 2big NAS to replace a hard drive with an “unclean” hard drive (with data) from another LaCie NAS or a third-party NAS. In such a case, the NAS OS may become confused and remain frozen as it boots.
When replacing or expanding hard drives in a protected RAID volume:
- Perform the operation while the LaCie NAS is powered on (hot-swapping).
- Use clean hard drives (without data).


Remove/Insert a Hard Disk
Important info: If a hard disk that you have purchased from LaCie fails, please contact your LaCie reseller or LaCie Customer Support.


5big NAS Pro: About RAID Modes
Refer to the table below for an overview of the RAID modes available to the LaCie 5big NAS Pro. Note that the levels of performance and protection will differ based upon the number of drives in the volume. The New storage volume wizard includes a helpful tooltip with star ratings for performance and protection based upon the amount of disks in the volume.
| RAID Mode | Minimum Hard Drives |
|---|---|
| SimplyRAID | 1 (no data protection) or 2 (with data protection) |
| JBOD | 1 |
| RAID 0 | 2 |
| RAID 1 | 1 (no data protection) or 2 (with data protection) |
| RAID 5 | 3 |
| RAID 6 | 4 |
The factory default RAID for an enclosure purchased with five hard drives is SimplyRAID with single-disk protection.
Note on enclosures with one hard drive: You can create a SimplyRAID or a RAID 1 volume with a single drive in the enclosure. Single-disk volumes can be expanded by adding new disks to the enclosure and following the instructions at Hard Disk Expansion: Single-Disk and Unprotected Volumes. Data will remain intact on the volume during expansion. Additionally, expanding RAID 1 and SimplyRAID will provide protection against the loss of a single hard drive. However, there is NO DATA PROTECTION when the volume has only one hard drive.
Important info on NAS backup: It is recommended that all users back up data to DAS or another NAS as further protection against disk failure or secondary points of failure (e.g. hardware, network, etc.). See Backup Jobs for details.
Get help choosing your RAID
Understanding RAID and its many levels is critical when deciding how best to apportion the disks in your NAS. To help administrators configure their RAID volumes, LaCie NAS OS provides a handy star rating system with an intuitive storage capacity bar.
The last step of the New storage volume wizard provides:
- A list of available RAID configurations that are compatible with the amount of disks in the volume
- A tooltip that rates each level of RAID for the volume
Note: Step-by-step instructions on how to use the New storage volume wizard are available in New Storage Volume Wizard.
Available RAID configurations

The screenshots in this section represent levels of RAID available to an enclosure with:
- Three 2TB disks
- Two 1TB disks
All levels of RAID can be selected except for RAID 1, which is not compatible with volumes greater than three disks. Choose a RAID's radio button next to review its strengths and weaknesses in the center of the window. See the three examples below:
- RAID 0

- RAID 6
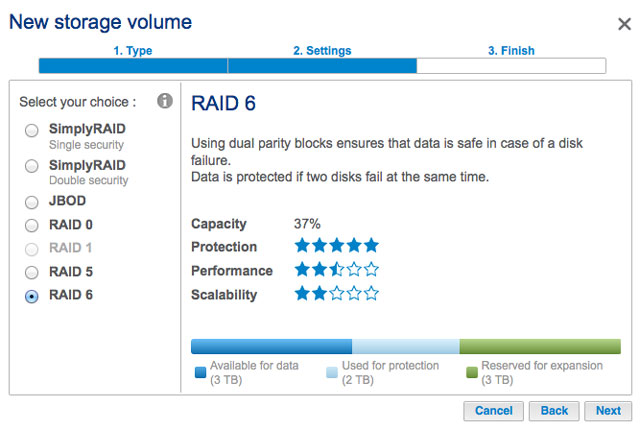
- SimplyRAID Double security
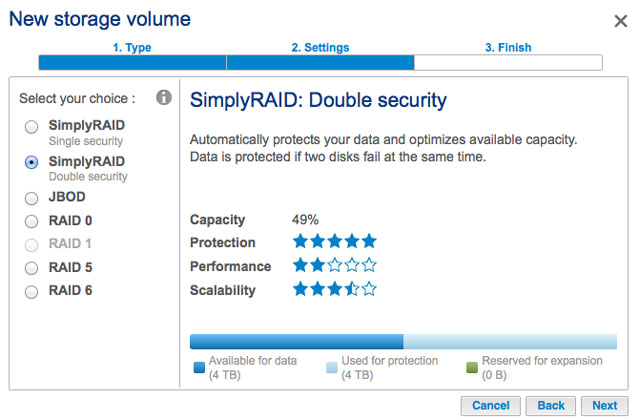


As the screenshots above show, RAID 0 is the best choice for storage capacity but it has a major weakness, no data protection. Both RAID 6 and SimplyRAID Double security offer data protection even if two disks fail. However, SimplyRAID optimizes storage capacity far better than RAID 6, giving users more space to store files.
Tooltip comparison
There is an easy way to compare all levels of RAID in one table, the tooltip. Click on the i next to Select your choice.

A table will appear comparing all levels of rate via star ratings and the storage capacity bar.

5big NAS Pro: RAID options
Choose the level of RAID to learn how it works with your NAS.

New Storage Volume Wizard
Build one or more volumes using the New storage volume wizard. You can select:
- Quick setup: Skip multiple configuration steps with LaCie SimplyRAID, LaCie's smart RAID configuration agent. SimplyRAID will review the amount of disks in the enclosure and the total storage to optimize data capacity and protect your data. To provide the most disk space for your data, Quick setup configures a SimplyRAID volume with single-disk security. Use Custom for SimplyRAID with double-disk security.
- Custom: Configure a volume using LaCie SimplyRAID or standard RAID models. Custom offers a wide range of RAID configurations:
- SimplyRAID with double-disk security (minimum of four disks)
- JBOD
- RAID 0 (two disks minimum)
- RAID 1 (two disks minimum for data protection)
- RAID 1+Spare (three disks minimum). Additional steps required to add the spare.
- RAID 5 (three disks minimum)
- RAID 5+Spare (four disks minimum) Additional steps required to add the spare.
- RAID 6 (four disks minimum)
- RAID 6+Spare (five disks minimum). Additional steps required to add the spare.
SimplyRAID and spare disks: Since LaCie SimplyRAID optimizes storage capacity using all disks in a volume, it is not possible to add a spare disk to a SimplyRAID volume.
Important note on SimplyRAID with double-disk security:
- You must use Custom to configure five disks as SimplyRAID with double-disk security.
- The New storage volume wizard does not offer a migration path from SimplyRAID single-disk security to SimplyRAID double-disk security.
Important info on creating a single-disk volume: Single-disk volumes can be created with expansion in mind. For example, you can launch the New storage volume wizard to create a single-disk volume using SimplyRAID, JBOD, or RAID 1. Though the volume will not provide data protection in a single-disk configuration, it is prepared for expansion when you add one or more disks to the enclosure. If you intend to expand the volume to four or more disks, it is recommended that you create the volume using SimplyRAID since RAID 1 cannot reach beyond three disks.
Important info: Backing up data stored on your LaCie NAS to desktop storage and/or another NAS will help keep critical files safe from hard drive or hardware failure. This is especially true for volumes that are not configured for RAID protection. Therefore, it is highly recommended that you perform frequent backups. See Backup Jobs for detailed instructions on how to back up your LaCie NAS.
New storage volume wizard steps
The default names for newly created volumes are Volume 1, Volume 2, etc. For instructions on how to change the name of the volume, see Volume Tools.


Synchronizing Times
Synchronizing a volume can take five minutes to many hours, depending on the level of RAID, the capacity of the hard disks in the volume, and your LaCie NAS's available resources (concurrent tasks such as backups or torrent downloads will slow synchronizing). For example, creating an unprotected RAID volume takes less than five minutes while RAID 6 with large capacity disks can run for one or more days. Note that you can access the volume while it is synchronizing.
Hard Disk Expansion: Single-Disk and Unprotected Volumes
Review the information below before attempting to add hard disks to a single-disk or unprotected volume.
Important info on NAS Backup: It is recommended that all users back up data to DAS or another NAS as further protection against disk failure or secondary points of failure (e.g. hardware, network, etc.). See Backup Jobs for details.
Removing Healthy Disks from an Unprotected Volume
An unprotected volume can be:
- SimplyRAID single-disk
- RAID 1 single-disk
- JBOD
- RAID 0
Removing a healthy hard disk from an unprotected volume while the LaCie 5big NAS Pro is powered on will delete all of the volume's data. While removing healthy disks is not recommended, you can avoid losing data by shutting down the LaCie NAS first. Return the hard drives to their proper bays before powering on the LaCie NAS.
Additionally, powering on the LaCie 5big NAS Pro with a missing disk in an unprotected volume will break its RAID and all data will be lost.
Hard Disk Expansion


Hard Disk Expansion and Replacement: Protected volumes
Review the instructions below before adding or replacing hard drives.
Removing healthy disks from a protected volume
A protected volume can be:
- SimplyRAID (single or double security)
- RAID 1/RAID 1+Spare (two disks minimum)
- RAID 5/RAID 5+Spare
- RAID 6/RAID 6+Spare
Removing a healthy hard disk from a protected volume while the LaCie 5big NAS Pro is powered on will render the volume unprotected. If the volume has double-disk security, removing two healthy hard disks while the LaCie 5big NAS Pro is powered on will render the volume unprotected. While removing healthy disks is not recommended, you can avoid breaking the RAID by shutting down the LaCie NAS first. Return the hard drives to their proper bays before powering on the LaCie NAS.
If a healthy disk has been removed while the LaCie 5big NAS Pro is powered on, you can reinsert it into the enclosure slot and NAS OS will synchronize the RAID. It is important to note that during synchronization:
- NAS performance is reduced due to a heavier demand upon the CPU
- RAID protection is not available until the synchronization is complete
- Older hard drives can fail, especially models that are not constructed for NAS
Important info on NAS backup: It is recommended that all users back up data to DAS or another NAS as further protection against disk failure or secondary points of failure (e.g. hardware, network, etc.). See Backup Jobs for details.
Hard Disk Expansion and Replacement with Protected RAID Configurations
Important info: If a hard disk that you have purchased from LaCie fails, please contact your LaCie reseller or LaCie Customer Support.
Expand a volume's storage capacity: Add disks to the enclosure
The instructions below pertain to storage expansion in a LaCie 5big NAS Pro with available or empty drive slots. If you are exchanging an existing hard disk in your enclosure for a hard disk of greater capacity, please follow the instructions in Repair a failed disk or expand storage capacity.
LaCie NAS OS gives you the freedom to configure volumes and RAID for your network. While it is not possible to list every option for expansion, review the examples below and apply them to your situation.
Adding hard disks: Make certain to add a new hard drive without data. While data on the volume is safe, performing the steps below will delete files stored on the new hard drive you are adding to the volume..


Repair a failed disk or expand storage capacity
Follow the instructions below to:
- Replace a failed hard disk.
- Expand a volume's total storage capacity by removing a hard disk and replacing it with a larger capacity hard disk.
Important info: It is not possible to replace existing hard disks with lower capacity hard disks.
Important info: All data stored on the replacement disk will be deleted.
Hot-swapping
If your volume is protected, you can remove one hard disk from the volume while the product is turned on without losing data. This process is referred to as “hot-swapping”. It is highly recommended that hot-swapping be performed when replacing or expanding a hard disk that is part of a protected volume.
When replacing or expanding hard drives in a protected RAID volume:
- Perform the operation while the LaCie NAS is powered on (hot-swapping).
- Use clean hard drives (without data).


No Replacement Disk - Reset the Volume's RAID
If a hard drive in a protected volume fails and you do not have a replacement disk, you can reset the RAID using the New storage volume wizard. Before you reset the RAID, LaCie recommends that you back up your files since all data will be deleted. See Backup Jobs for instructions on backing up your NAS.
To reset the RAID:
- Go to Dashboard > Storage.
- Select the volume and choose Delete.
- Confirm in the pop-up window.
- Go to New Storage Volume Wizard for instructions on how to create a new RAID volume.
Remove/Insert a Hard Disk
Important info: If a hard disk that you have purchased from LaCie fails, please contact your LaCie reseller or LaCie Customer Support.


Advanced Storage: Direct-Attached Storage and iSCSI
You can use your LaCie NAS to share direct-attached storage (DAS) on the network and to create iSCSI volumes. For details and instructions, see:
LaCie NAS Ports and Direct-Attached Storage
Review the table below for the USB and eSATA expansion ports on your LaCie NAS:
| Port | LaCie 2big NAS | LaCie 5big NAS Pro |
|---|---|---|
| eSATA | 1 | – |
| USB 2.0 | 1 | 2 |
| USB 3.0 | – | 2 |
Direct-Attached Storage (DAS)
Connect

Connect a DAS to the LaCie NAS via USB or eSATA, and it will be listed on the Dashboard > Storage page. If you do not see your hard drive listed, confirm that it has been formatted using one of the following file systems:
- FAT32
- NTFS
- HFS+
- EXT2, EXT3, EXT4
- XFS
The name of the DAS cannot be changed on the Storage page.
DAS share
By default, a DAS becomes a Public share when it is connected to the LaCie NAS.
You can change the DAS from a Public share to a Private share:
- Go to Dashboard > Shares and select the configuration icon (pencil).
- Choose Change to private share.
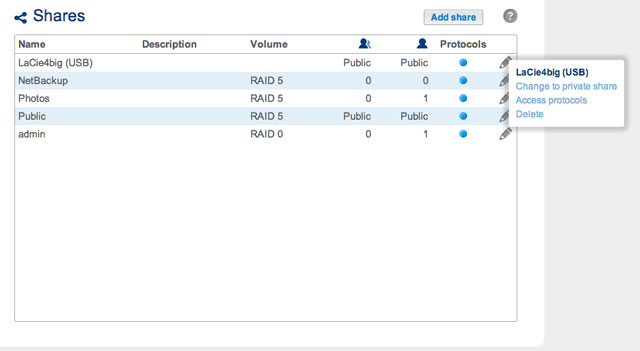
- Configure access to the share by following the instructions in Shares.

Disconnect
To avoid damaging your DAS's file system, choose Eject before disconnecting it from your LaCie NAS. A prompt will ask you to confirm.
Multimedia Indexing
You can take an inventory of available multimedia files on your LaCie NAS and all connected external hard drives. See Reindex the Media Server for details.
USB Printer
Your LaCie NAS features a printer server. See General Settings for further information.
iSCSI Target
A network share accesses data at the file level (SMB, NFS, or AFP), which is ideal for sharing data among multiple workstations. However, certain working environments require faster transfer rates than file level access can provide. To meet these demands, your LaCie NAS supports the creation of iSCSI targets (Internet Small Computer System Interface). As opposed to network shares, iSCSI targets offer enhanced performance by accessing data at the block level. The NAS can also experience lower demand on its CPU when iSCSI is employed since the data is written directly to the volume. Shares that read and write data at the file level require more processing due to IP and networking protocols.
In addition to requiring faster transfer rates, many professional applications are optimized for use with local storage. Potential compatibility issues with standard network volumes include sharing data and network file formats. Therefore, LaCie NAS iSCSI targets mount on a workstation as local volumes. A workstation that connects to an iSCSI target is called an iSCSI initiator.
The iSCSI initiator must format the LaCie NAS's iSCSI target in a non-network file system, such as NTFS, HFS+, or FAT32. For example, an administrator allocates all or a portion of a RAID volume (RAID 1, RAID 5, SimplyRAID, etc.) to an iSCSI target. A workstation on the same network as the LaCie NAS becomes an iSCSI initiator. Therefore, upon first mounting the iSCSI target, the iSCSI initiator is prompted to format the disk, as would happen with standard local storage (direct-attached storage, or DAS).
An administrator can allocate up to 8TB to an iSCSI target.
iSCSI and Bonding: Enhanced Performance (5big NAS Pro only)
The performance offered by an iSCSI target is ideal for applications that use larger files, such as graphics, photos, and video or, multiple small files in quick succession, as found with professional audio programs. It is possible to boost performance even higher by:
- creating the iSCSI target on a RAID 5 volume.
- configuring the LaCie 5big NAS Pro's dual LAN ports for bonding.
For further information on RAID configurations, go to 5big NAS Pro: About RAID Modes. See Network for details on bonding.
Sharing an iSCSI target
In general, an iSCSI target is meant to be used by a single iSCSI initiator. Once the iSCSI initiator disconnects from the iSCSI target, another initiator on the network can connect to it.
Advanced SAN clusters can be configured to manage multiple iSCSI targets and share them among workstations on the network. When adding a LaCie NAS iSCSI target to a SAN cluster, the administrator should choose Multiple sessions in the iSCSI target's advanced parameters.
Unless it is properly administered by a SAN cluster, sharing iSCSI targets can lead to high levels of corrupted data.
Create an iSCSI target
Follow the directions below to create an iSCSI target:
- Go to Dashboard > Storage and choose Add storage.

- Select iSCSI and choose Next.
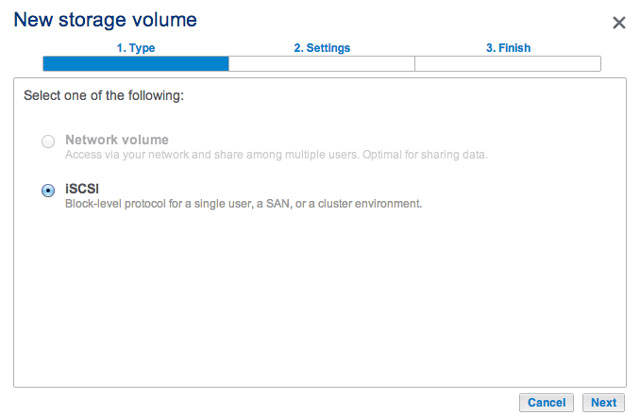
- Select the volume that will host the iSCSI target and choose Next.
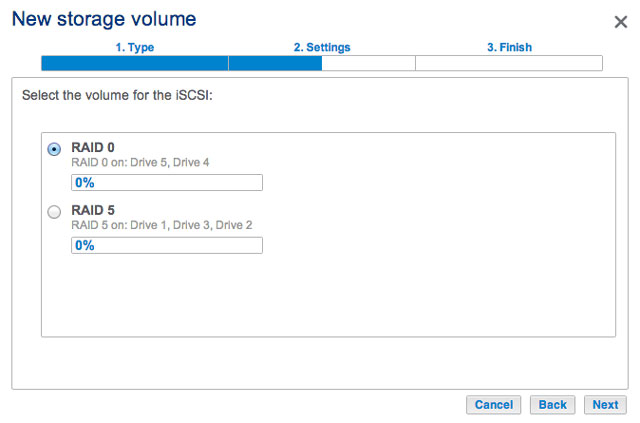
- Drag the slider or enter a number to change the storage space allocated to the iSCSI target. After clicking on the slider, you have the option to press the right and left arrow keys on your keyboard to adjust the capacity. Important: Capacity allotted to an iSCSI target cannot be reallocated to the volume. The iSCSI target and its data must be deleted to recover the capacity.
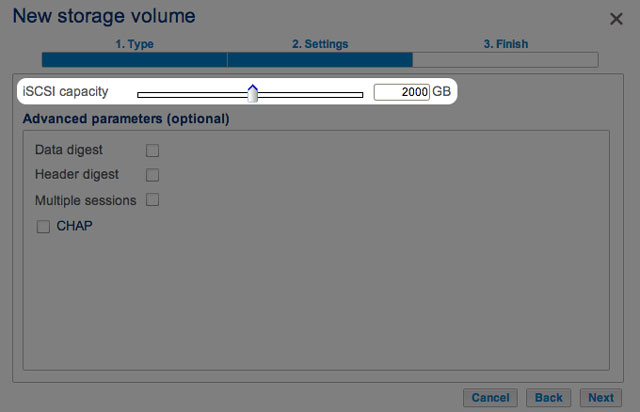
- Advanced parameters offers the following options:
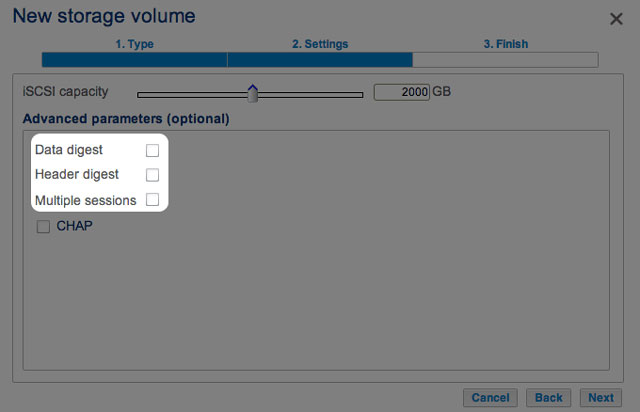
- Data digest: Enable checksum to verify the integrity of the SCSI Protocol Data Unit (PDU). Since it adds a step to the reading and writing of data, performance will be affected.
- Header digest: Enable checksum to verify the integrity of the header portion of the SCSI PDU. Similar to Data digest, performance will be affected.
- Multiple sessions: Select this option only if your iSCSI target will be managed within a SAN cluster environment. The SAN cluster allows multiple iSCSI initiators to access the iSCSI target at once.
- Check the box next to CHAP within Advanced parameters to configure a password for the iSCSI target. CHAP (Challenge Handshake Authentication Protocol) will secure access to the iSCSI target via a password that is 12 to 16 characters. There are two levels of CHAP:
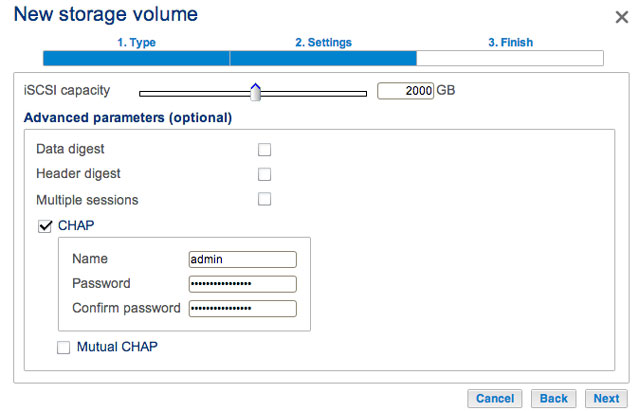
- CHAP: The iSCSI initiator must enter a name and a password to connect to the iSCSI target. This is also referred to as a Secret or Target secret.
- Mutual CHAP: Both the iSCSI target and the iSCSI initiator authenticate each other. Select this box to enter the name and password configured on the iSCSI initiator that will access the LaCie NAS's iSCSI target.
- Choose Next.
- Review the summary for the iSCSI target and choose Finish.
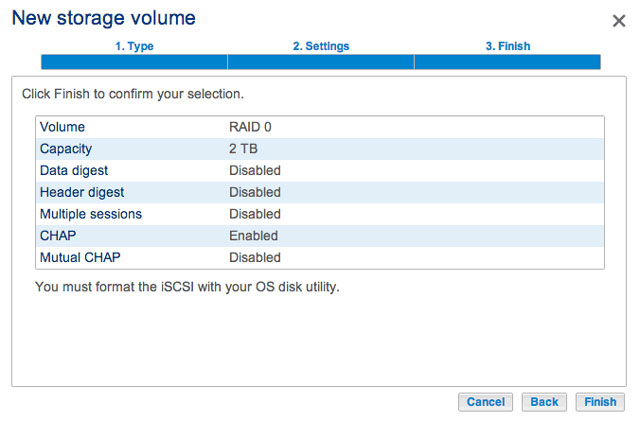


Dashboard: iSCSI target connection indicator
The Storage page provides the iSCSI target status:
- Not connected: The circle next to Connected is white.
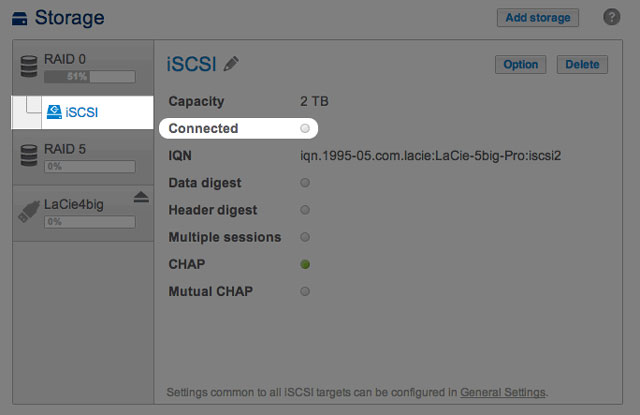
- Connected: The circle next to Connected is green.
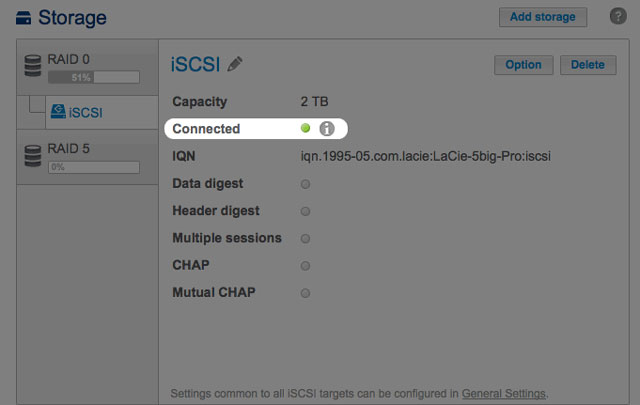


Choose the i tooltip next to the green circle to view the IP address of the workstation that has connected to the iSCSI target.

Dashboard: Revise iSCSI Advanced parameters
Advanced parameters for an iSCSI target may be changed following its creation.
- Go to Dashboard > Storage and choose the iSCSI target on the left.
- Choose Option.
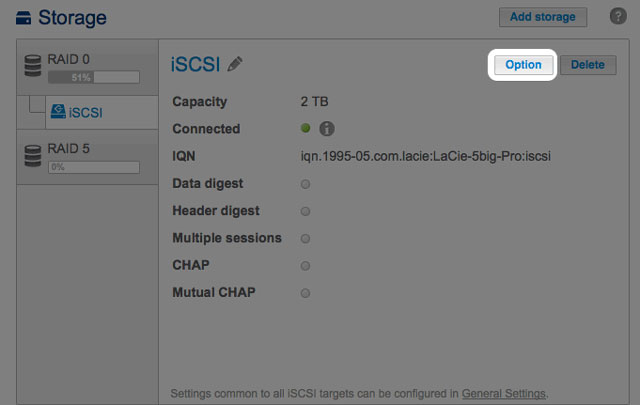
- Adjust the parameters for the iSCSI target.
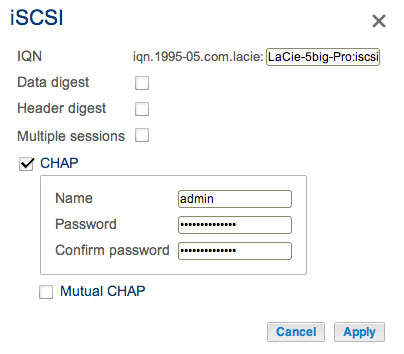


To review the definitions of the parameters, see Create an iSCSI target.
IQN stands for iSCSI Qualified Name. The IQN field represents the:
- Type
- Date that the network naming authority took ownership of the iSCSI target and the network naming authority
- Prefix for the naming authority
The Option window allows you to revise the prefix for the naming authority.
Technical note on changing parameters: It is recommended that the iSCSI initiator disconnects from the iSCSI target before selecting Option to revise advanced parameters. Certain changes may not take effect until the iSCSI target reconnects to the initiator.
iSCSI initiator
A workstation on the network can connect to the LaCie NAS's iSCSI target by acting as an iSCSI initiator. While it is not possible to list the directions on how to become an iSCSI initiator for every operating system or third-party application, you should note the following:
- Windows: Professional and enterprise versions of Windows Vista, Windows 7, and Windows 8 feature an iSCSI Initiator application. Windows XP users can download the iSCSI Initiator here. See the configuration example below.
- Mac: Third-party applications are available to connect to an iSCSI target.
iSCSI initiator: Example
The steps below demonstrate a single connection to an iSCSI target using a Windows 7 workstation as the initiator. For the example, a CHAP has been configured on the iSCSI target only. Configurations will vary but you can review the instructions below and make adjustments for your operating system and network.
- Search for and launch iSCSI Initiator or equivalent.
- Enter the network name or IP address of the server that hosts the iSCSI target. In this example, the LaCie NAS.

- Choose Quick connect or equivalent.
- Without and with CHAP:
- If the iSCSI target does not include a CHAP, you will connect immediately. If it is the first time that the iSCSI target has connected to an initiator, you will be prompted to format the disk.
- If the iSCSI target includes a CHAP, a prompt alerts you that a connection is not possible. Close the prompt.
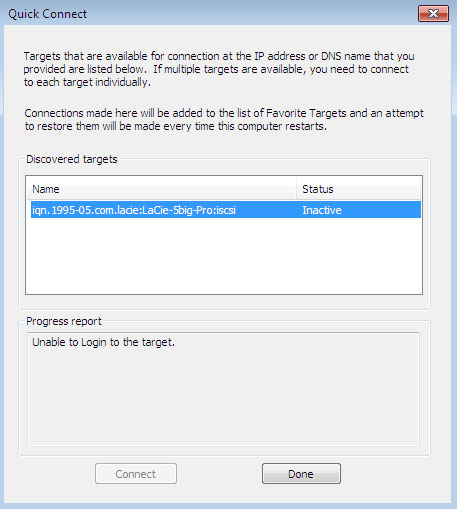
- Select the LaCie NAS's iSCSI target in the list of discovered agents and choose Connect.
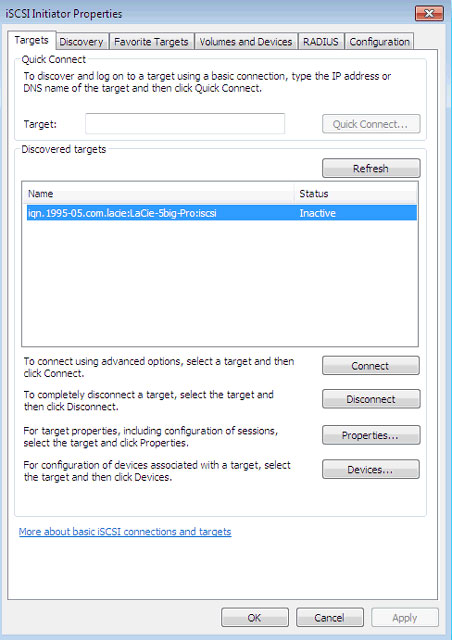
- Choose Advanced.
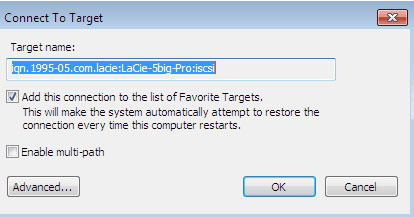
- Select Enable CHAP log on and enter the Name and Target secret (password) for the iSCSI target.
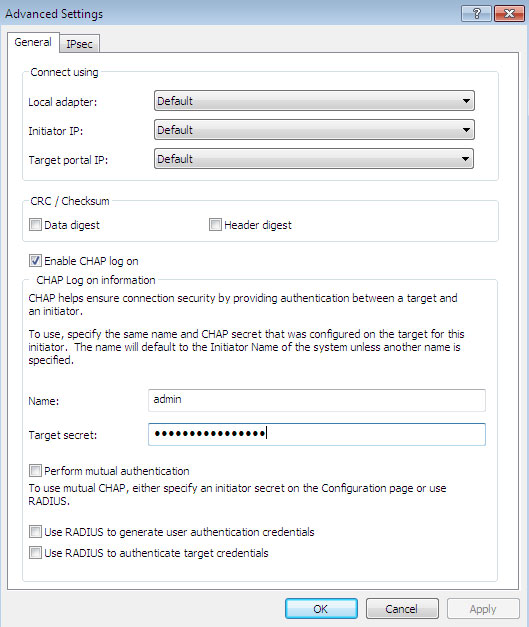
- A window may appear prompting you to add the target to your favorites. Make your selection and exit.
- If it is the first time that the iSCSI target has connected to an initiator, you will be prompted to format the disk.


The iSCSI target will appear in Computer/My Computer as a local disk.

iSNS: Internet Storage Name Service
A LaCie NAS iSCSI target can be managed by a server that supports the Internet Storage Name Service (iSNS). Certain iterations of Windows Server include the iSNS feature. A server that supports iSNS can manage multiple iSCSI targets on the network, thus saving time for each iSCSI initiator. For example, rather than searching the network for an iSCSI target, the initiator can look for a connection in a single location, the iSNS server. The iSNS server keeps tabs on all the iSCSI targets on the network, thus allowing the initiator to connect to one that is available.
Configure iSNS on your network server then review the instructions below to add your LaCie NAS iSCSI target.
iSNS: LaCie NAS Dashboard (iSCSI target)
Enable iSNS server and enter its IP address:
- Go to Dashboard > General Settings > File sharing.
- Select the configuration icon (pencil) for iSCSI and then Advanced parameters.
- Choose the checkbox and enter the iSNS server's IP address.
Important info regarding iSCSI volume sharing: Mounting an iSCSI volume on multiple workstations at the same time will lead to serious file corruption. An exception can be found with SAN cluster environments that include servers and software dedicated to managing iSCSI volume sharing. An iSNS server is not considered to be a SAN cluster environment.
iSNS: Workstation (iSCSI initiator)
The steps below demonstrate a single connection to an iSNS server using a Windows 7 workstation as the initiator. Configurations will vary but you can review the instructions below and make adjustments for your operating system and network.
- Search for and launch iSCSI Initiator or equivalent.
- Choose Discovery and Add server.
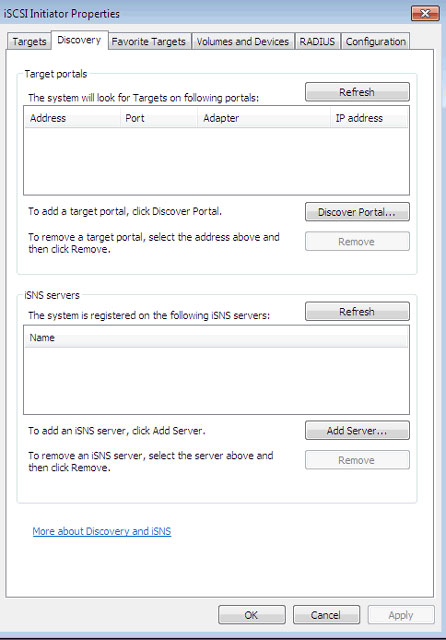
- Enter the IP address of the iSNS server.
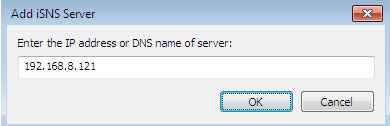
- The list of discovered targets should show all iSCSI targets that are connected to the iSNS server. In this example, only the LaCie NAS is connected.
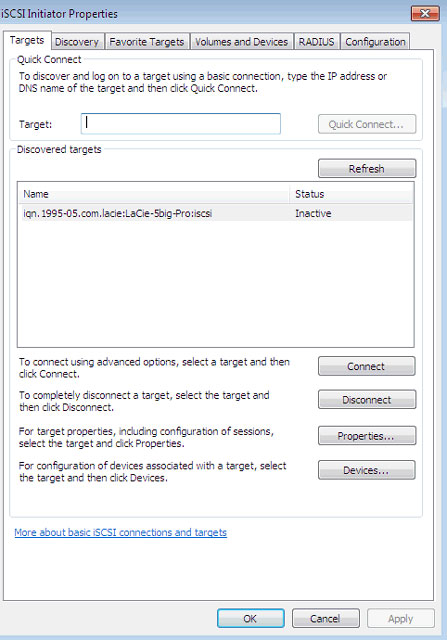
- To connect to the iSCSI target, follow the instructions in iSCSI initiator: Example.


Backup Jobs
The Backup page features a Backup & Restore Wizard to help you create a backup job. Types of backup jobs include:
- Local (Direct-attached storage (DAS)):
- Option 1: Share A on a LaCie NAS to an external hard drive (DAS) connected to one of the LaCie NAS's external ports. Each iteration of a backup job has a specific date and time giving you the flexibility to restore earlier versions of files. This can be helpful if someone has mistakenly deleted or made revisions to a document and you want to recover an earlier version.
- Option 2: Connect a DAS to one of your LaCie NAS's ports to back up the DAS's files to a share.
- Remote network (local network): A share on the LaCie NAS to a share on a second LaCie NAS or rsync-compatible NAS on your local network. For example, Share A on the LaCie 5big NAS Pro in your office to a LaCie 2big NAS in your colleague's office.
- Remote network (offsite): A share on the LaCie NAS to a share on a second LaCie NAS or rsync-compatible NAS outside of your local network. For example, Share A on your LaCie 2big NAS in your home office to a LaCie 5big NAS Pro at a colleague's home office.
- Restore: Restore a backup job from your DAS to the LaCie NAS or, the LaCie NAS to the DAS.
Note on backup jobs: To conserve processing resources, NAS OS runs one backup job at at time. If more than one job is scheduled for the same time or started manually, the backup page will place them in a queue.
Backup examples
Remote (local network): To prevent data loss due to hardware failure, you schedule regular backups of a LaCie 2big NAS to a LaCie 5big NAS Pro. They are both on the same local network. See Remote Backup: Rsync for details on how to back up data to non-LaCie servers that are rsync-compatible.
Remote (offsite): To prevent data loss due to onsite fire, flood, or theft, you back up folders on a LaCie 5big NAS Pro in your company's headquarters to a LaCie 5big NAS Pro at a branch office. You can use the Backup page to set up a remote backup to a LaCie NAS at another location (offsite). See Remote Backup: Offsite for details on how to back up to an offsite NAS.
Restore: Someone in the office accidentally deleted an important spreadsheet from his personal share. Fortunately, the administrator backed up the user's share every night onto the DAS connected to the 2big NAS. The administrator can:
- Create a Restore job to revert the share to an earlier state (see Restore a Local Backup for details on how to restore data to or from a DAS).
- Connect the DAS to a computer and browse for the missing file.
Important info: The time to complete the first backup job will vary based upon the amount of data and the speed of your network. It can take several hours or, if it is an offsite backups, several days.
Create a Local Backup (DAS)
Connect an external hard drive (direct-attached storage or, DAS) to one of the NAS's USB or eSATA ports before following the steps below (see Views of the Product for port locations). The DAS should appear as a volume on the Storage page LaCie NAS Ports and Direct-Attached Storage
- Go to Dashboard > Backup.
- Choose Add backup.
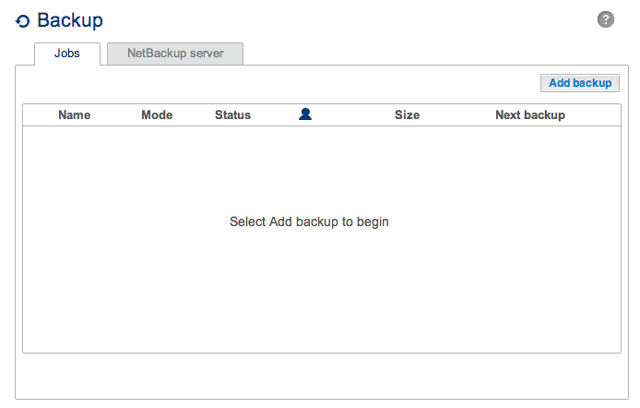
- Select Local backup then choose Next.

- Under Source on the left, select the NAS shares or DAS partitions to back up. Under Destination on the right, select the External ports or NAS share to store the backup job.
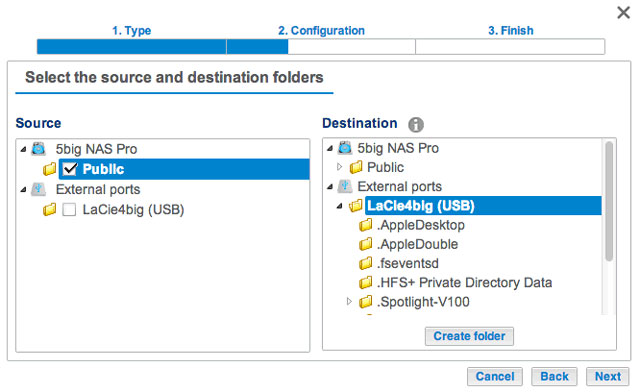
- To better organize backup jobs, you can create a folder inside the destination. Choose Create folder then enter its name. Choose Create then Next.
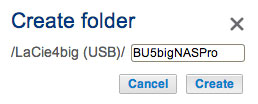
- Select a backup type, then choose Next.
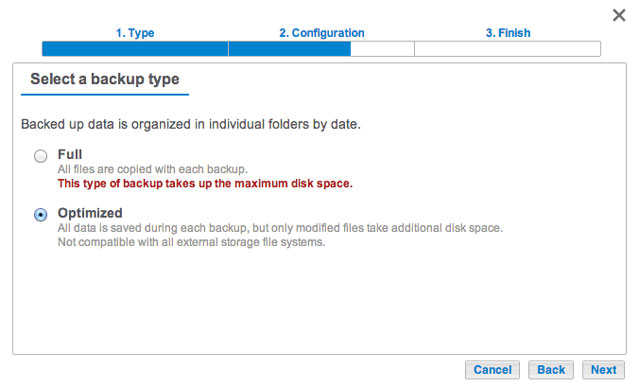
- Full: The entire contents of the source folder will be saved each time the backup job runs. This method offers high security but it requires a good amount of storage capacity on the destination.
- Optimized After the initial full backup, only modified files are added in subsequent backups. This is an efficient use of storage space on the destination. Important: Optimized backups are not available with certain DAS file systems. See Supported File Systems for Optimized Backups.
- Select Manual, Scheduled, or Custom then choose Next. See note regarding Manual backups.
- (Skip this step if you chose Manual.) Select the frequency for your backup job and the time of day. Choose Next.
- Enter a name for the backup job then choose Next.

- Confirm the backup settings on the Summary page. If you wish to begin the backup immediately, keep the box checked below the summary and choose Finish.
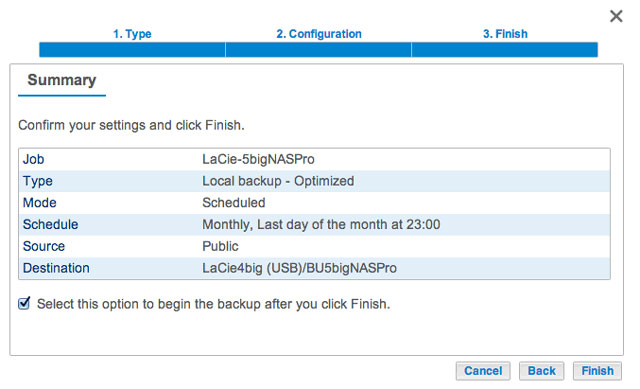


The backup job will appear on Dashboard > Backup.

Note on Manual Backups: A manual backup must be started by the administrator:
- Navigate to Dashboard > Backup.
- Locate the manual backup job you wish to start then click on its grey arrow icon on the far right.
Supported File Systems for Optimized Backups
| Operating Systems | Hard Disk File System | Optimized Backup (Incremental) |
|---|---|---|
| Linux | ext2, ext3, ext4, and XFS | Yes |
| Mac | HFS+ Non-Journaled | Yes |
| Mac | HFS+ Journaled | No |
| Windows/Mac | FAT32 | No |
| Windows | NTFS | No |
Remote Backups: Enable Network Backup Server
Remote backups copy data from a share on your LaCie NAS to a share on a second NAS. A second NAS can be another LaCie NAS running LaCie NAS OS (see LaCie Network Storage for details). It can also be a non-LaCie NAS compatible with rsync.
The share that you back up on your LaCie NAS is the Source. The second NAS is the Destination that stores the backup.
| Source NAS | Destination NAS | Destination NAS Location | Destination share | Type of Remote Backup |
|---|---|---|---|---|
| LaCie NAS A on the local network | LaCie NAS B or a third-party rsync-compatible NAS | Local network | Network Backup Share or rsync equivalent | Local NAS-to-NAS |
| LaCie NAS A on the local network | LaCie NAS B or a third-party rsync compatible NAS | Network outside of the local network (e.g. a colleague's home or a branch office) | Network Backup Share or rsync equivalent | Offsite NAS-to-NAS |
Note on rsync: See Remote Backup: Rsync for instructions on how to back up to to a non-LaCie NAS that is rsync compatible.
Enable Network Backup Share
All remote backups from a LaCie NAS to a second LaCie NAS are copied to a special share called Network Backup. The Network Backup share on the destination LaCie NAS must be enabled before creating a remote backup job.
Enable the Network Backup Share:
- Launch the Dashboard for the Destination LaCie NAS.
- Navigate to Dashboard > Backup and select the tab Network Backup server.
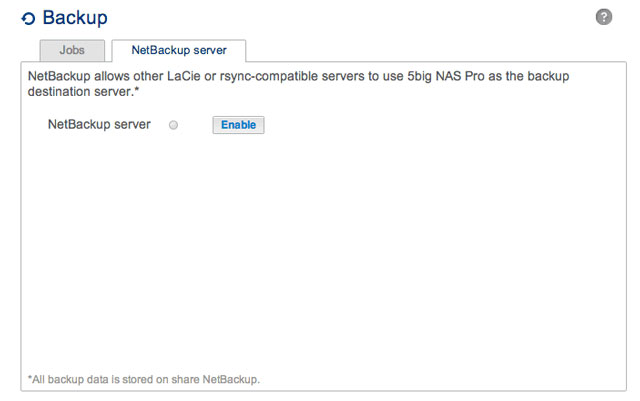
- Choose Enable.
- At the prompt, enter and confirm a password. The password can be different from the password you used for your Dashboard login. Your Network Backup password will be needed when you set up a Remote backup.
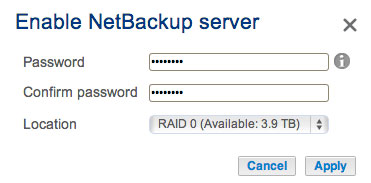
- If you have more than one volume, select the Location pull-down menu to choose a volume for the Network Backup share. It is highly recommended that you use a volume with RAID protection (RAID 1, RAID 5, or RAID 6).
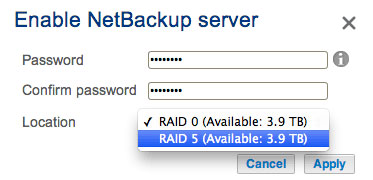
- Choose Apply.
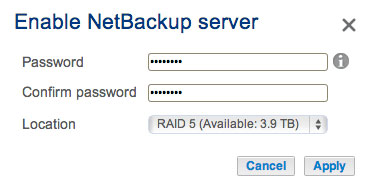
- With Network Backup enabled, the Dashboard provides a summary of the settings. You can return to this page if you forget the password or you want to disable the Network Backup share.
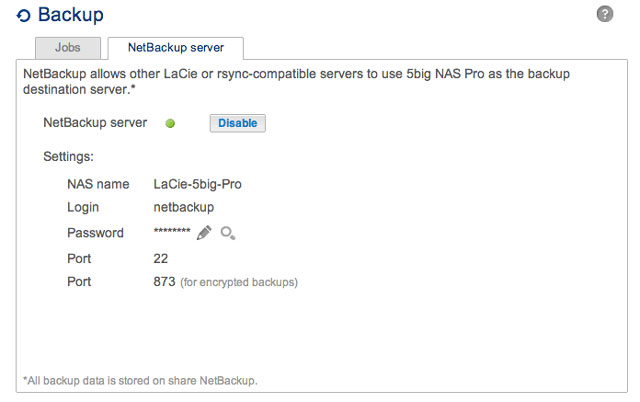


Network Backup tab
- The Network Backup Share can only be accessed by the administrator of the LaCie NAS.
- The administrator can find the Network Backup password if it is forgotten. Go to the Network Backup tab and click on the magnifying glass icon.
- To change the Network Backup password, choose the configuration icon (pencil).
Remote Backup: Local Network
Before following the instructions below, please make certain that:
- The Destination NAS is connected to the same network as your source LaCie NAS and that both devices are powered on.
- The Network Backup share has been enabled on the destination LaCie NAS.
- Go to Dashboard > Backup.
- Choose Add backup to launch the Backup & Restore Wizard.
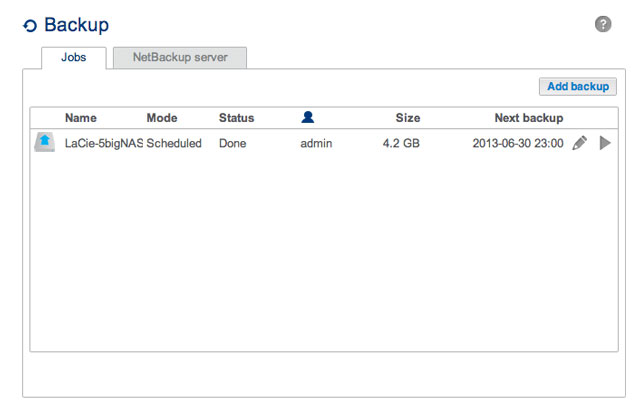
- Select Network backup and choose Next.
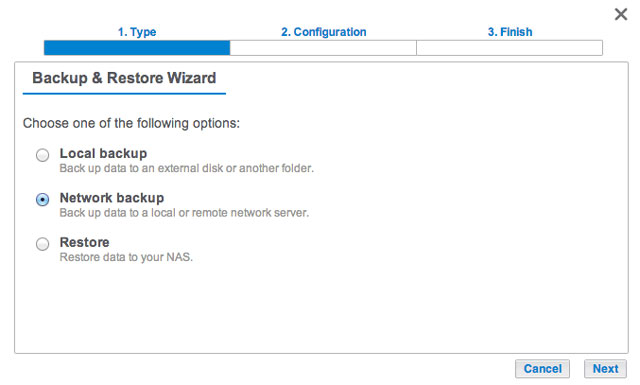
- Select the share(s) you want to back up then choose Next.
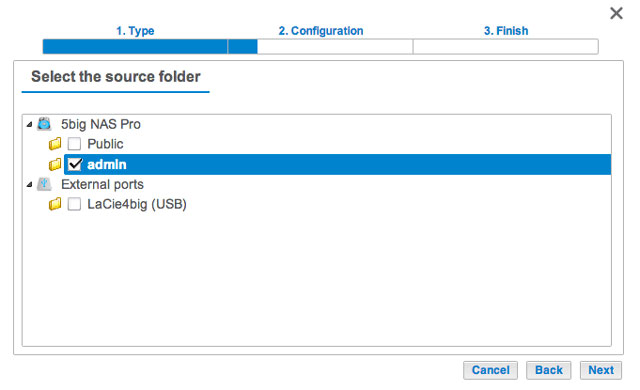
- Select LaCie NAS to back up to another LaCie NAS then choose Next (see Remote Backup: Rsync for non-LaCie NAS).
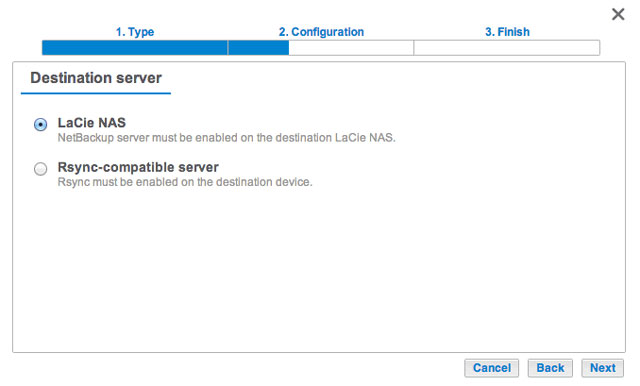
- The wizard will search for and list compatible LaCie NAS on the local network. Choose the radio button next to the destination LaCie NAS and enter its Network Backup server password on the bottom of the window (see Remote Backups: Enable Network Backup Server for further information on the Network Backup server password). Choose Next.
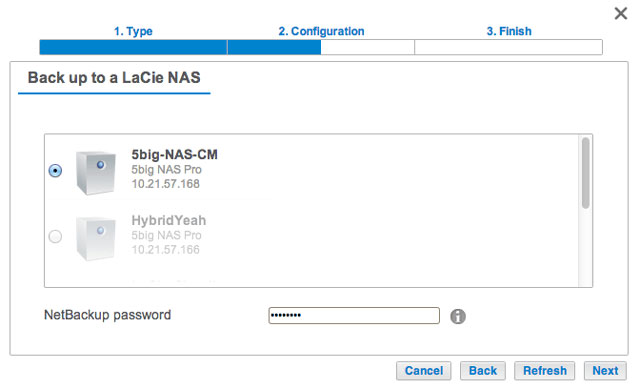
- If the LaCie NAS is listed but cannot be selected, you must enable Network Backup server. See Remote Backups: Enable Network Backup Server.
- If the LaCie NAS does not appear on the list, please make certain it is powered on and out of sleep mode (see Eco Management).
- The Advanced parameters window lists four options for your backup job. See the explanations below. It is not mandatory to select one or more of the parameters to continue with the backup:
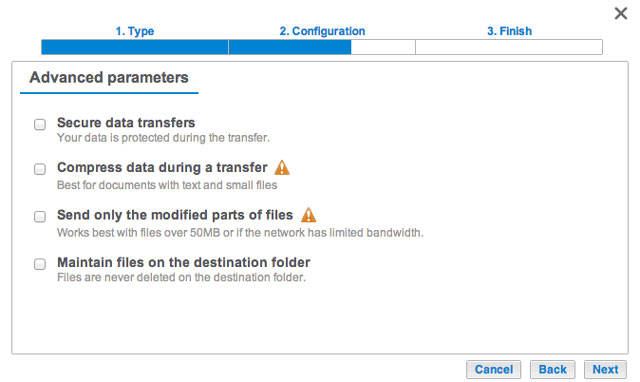
- Secure data transfers uses encryption during the data transfer. The data is not encrypted once it is stored on the destination NAS. This option is ideal for offsite backups.
- Compressing data optimizes data transmission rates. Data is compressed during the transfer only. While this option is good for low bandwidth networks, it can affect the NAS's performance.
- Sending modified parts of files is best used with backups that include files larger than 50MB. For example, if you edit a document that has already been backed up, only the edits will be copied during the next backup. This option can affect the NAS's performance.
- Maintain files on the destination folder keeps files on the destination NAS even if they are deleted from the original NAS's source folder.
- Choose Next.
- Set the frequency for the backup.

- Manual: You must initiate the backup.
- Scheduled: The backup will begin at the scheduled time.
- Enter a name for the backup job then choose Next. The name will be listed on the Backup page job table. It is also the reference name for the backup job's folder on the destination volume.

- Confirm the backup settings on the Summary page. If you wish to begin the backup immediately, keep the box checked below the summary and choose Finish.
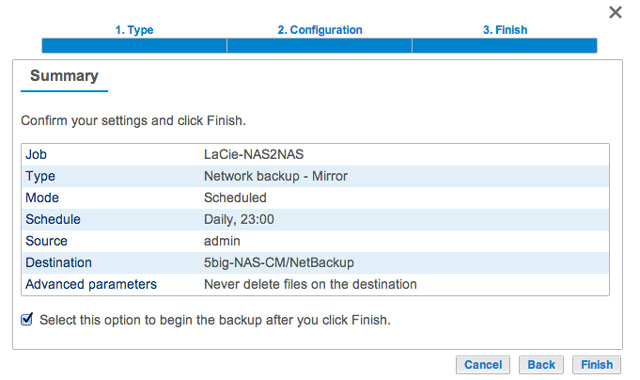


The backup job will be listed on the Backup page.

Note on Manual Backups: A manual backup must be started by the administrator:
- Go to Dashboard > Backup.
- Locate the manual backup job you wish to start then click on its grey arrow icon on the far right.
Remote Backup: Offsite
Review the list of prerequisites for an offsite backup before following the instructions:
- The destination NAS must be connected to an offsite network and powered on.
- You must have the public IP address for the Destination NAS. You can find the public IP address by visiting http://www.whatismyip.com/ or by accessing your router's management software. When searching for the public IP address, use a computer connected to the same router as the destination NAS. For further information, review the user manual for the offsite network router or contact your internet service provider. An explanation of IP addressing is available at http://en.wikipedia.org/wiki/IP_address.
- If you are using a LaCie NAS for the offsite backup, enable the Network Backup server (see Remote Backups: Enable Network Backup Server).
Note on offsite backups: If you have disabled port forwarding or you are experiencing difficulties connecting to the destination NAS, use the router's management software at the offsite location to open port numbers 22 and 873. Review the user manual for the offsite network router or contact your internet service provider.
Adding an offsite backup
- Go to Dashboard > Backup.
- Choose Add backup to launch the Backup & Restore Wizard.
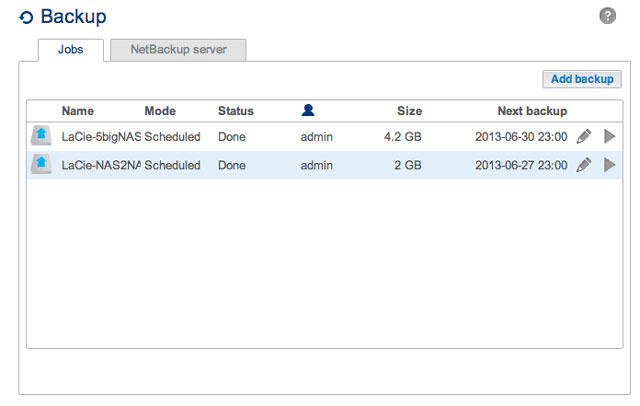
- Select Network backup and choose Next.

- Select the share(s) you want to back up.

- Select LaCie NAS to back up to another NAS OS device and choose Next.

- The wizard will search the local network for a LaCie NAS. You can select Skip to move to the next step.

- Choose NAS name or IP address then enter the destination NAS's public IP address. If you do not know the public address for the destination NAS, please refer to the offsite network router's documentation or contact the internet service provider. Select Next to continue.
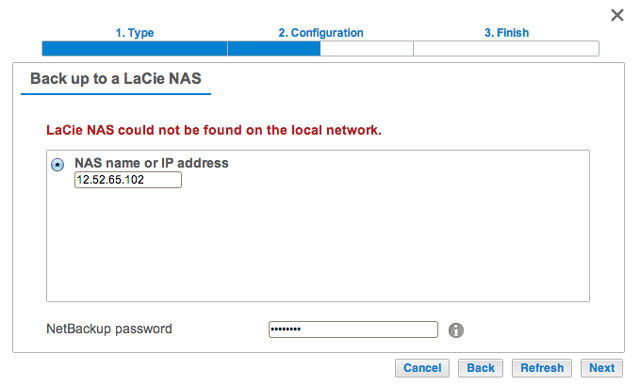
Enter the destination NAS's public IP address
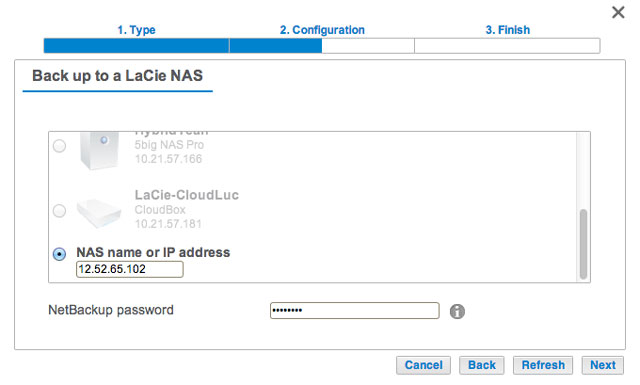
For multiple NAS listings, scroll down to enter the destination NAS's public IP address
- The Backup & Restore Wizard will search for the offsite destination NAS. If the destination NAS cannot be found, please make certain that:
- It is powered on and out of sleep mode (see Eco Management).
- Network Backup server has been enabled (see Remote Backups: Enable Network Backup Server).
- The proper IP address has been entered. You must use the public IP address rather than the IP address generated by the destination NAS's DHCP server.
- The Advanced parameters window lists four options for your backup job. See the explanations below. It is not mandatory to select one or more of the parameters to continue with the backup:

- Secure data transfers uses encryption during the data transfer. The data is not encrypted once it is stored on the destination NAS. This option is ideal for offsite backups.
- Compressing data optimizes data transmission rates. Data is compressed during the transfer only. While this option is good for low bandwidth networks, it can affect the NAS's performance.
- Sending modified parts of files is best used with backups that include files larger than 50MB. For example, if you edit a document that has already been backed up, only the edits will be copied during the next backup. This option can affect the NAS's performance.
- Maintain files on the destination folder keeps files on the destination NAS even if they are deleted from the original NAS's source folder.
- Choose Next.
- Set the frequency for the backup.
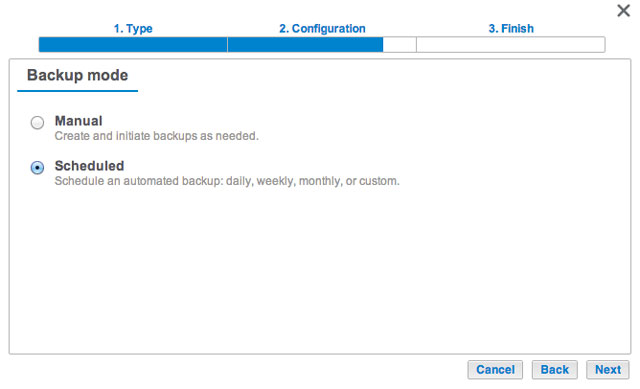
- Manual: You must initiate the backup job. See the note below.
- Scheduled: The backup job will begin at the scheduled time.
- Enter a name for the backup job then choose Next.
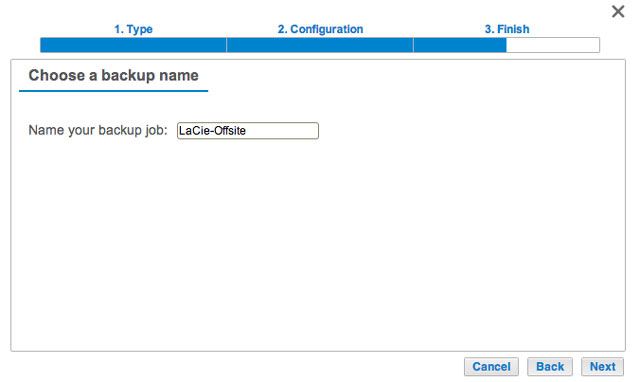
- Confirm the backup settings on the Summary page. If you wish to begin the backup immediately, keep the box checked below the summary and choose Finish.
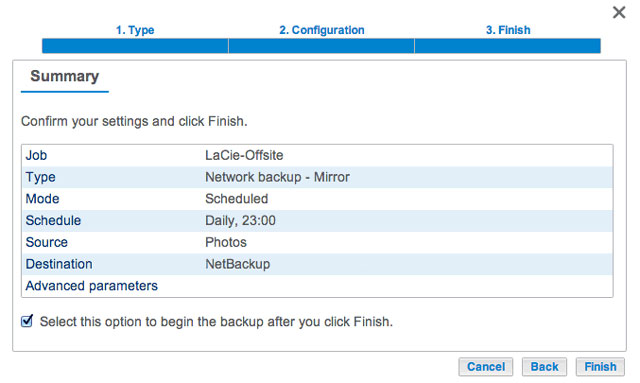


The Backup job will appear on the Backup page.
Note on Manual Backups: A manual backup must be started by the administrator:
- Go to Dashboard > Backup.
- Locate the manual backup job you wish to start then click on its grey arrow icon on the far right.
Remote Backup: Rsync
Please review the list of prerequisites for a backup to an rsync-compatible server before following the instructions:
- The rsync-compatible NAS must be connected to a network, local or offsite.
- Your rsync-compatible NAS may require a unique username and password to act as a backup destination. Review the user manuals for your rsync-compatible NAS and router.
- Local network: you must have the name or IP address of the rsync-compatible NAS.
- Offsite: you must have its public IP address. You can find the public IP address by visiting http://www.whatismyip.com/ or by accessing your router's management software. When searching for the public IP address, use a computer connected to the same router as the destination NAS. For further information, review the user manual for the offsite network router or contact your internet service provider. An explanation of IP addressing is available at http://en.wikipedia.org/wiki/IP_address.
- Offsite: you may need to open ports using your router's management software. Review the user manuals for your rsync-compatible NAS and router.
Adding an rsync backup
- Go to Dashboard > Backup.
- Choose Add backup to launch the Backup & Restore Wizard.
- Select Network backup and choose Next.

- Select the share(s) you want to back up and choose Next.
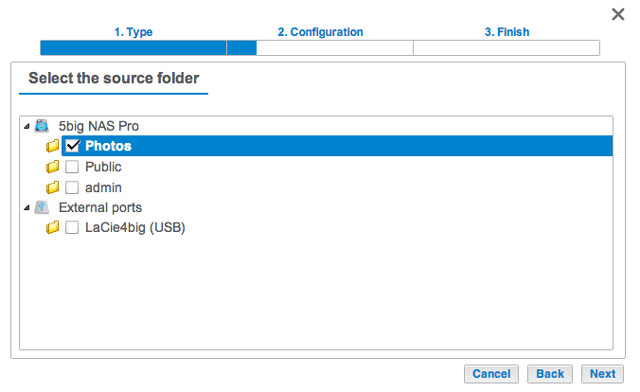
- Select Rsync-compatible server and choose Next.
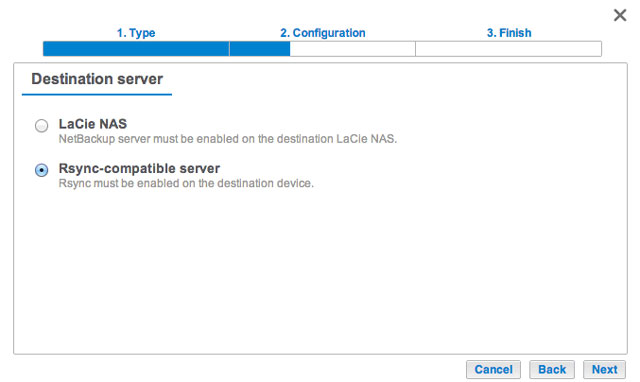
- Local network: enter the destination NAS's name or IP address. Offsite network: enter the destination NAS's public IP address. If you do not know the public address for the destination NAS, please refer to the offsite network router's documentation or contact the internet service provider. Choose Next to continue.
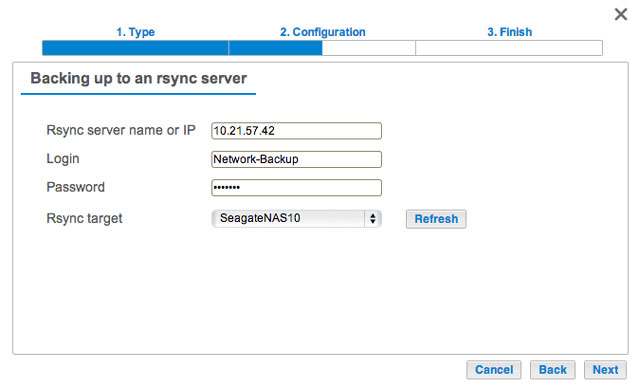
- Enter the login and password for the rsync-compatible NAS (see the rsync-compatible NAS's documentation for details on creating a login and password for network backups). If the destination NAS cannot be found, please make certain that:
- It is powered on and out of sleep mode.
- The proper IP address has been entered.
- The Advanced parameters window lists four options for your backup job. See the explanations below. It is not mandatory to select one or more of the parameters to continue with the backup:
- Secure data transfers uses encryption during the data transfer. The data is not encrypted once it is stored on the destination NAS. This option is ideal for offsite backups.
- Compressing data optimizes data transmission rates. Data is compressed during the transfer only. While this option is good for low bandwidth networks, it can affect the NAS's performance.
- Sending modified parts of files is best used with backups that include files larger than 50MB. For example, if you edit a document that has already been backed up, only the edits will be copied during the next backup. This option can affect the NAS's performance.
- Maintain files on the destination folder keeps files on the destination NAS even if they are deleted from the original NAS's source folder.
- Choose Next.
- Set the frequency for the backup.
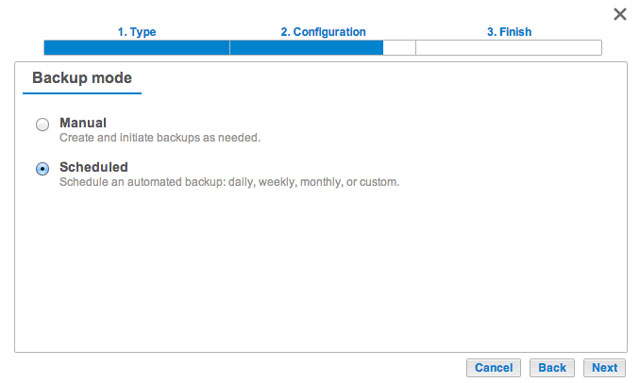
- Manual: You must initiate the backup. See the note below.
- Scheduled: The backup will begin at the scheduled time.
- Enter a name for the backup job then choose Next.
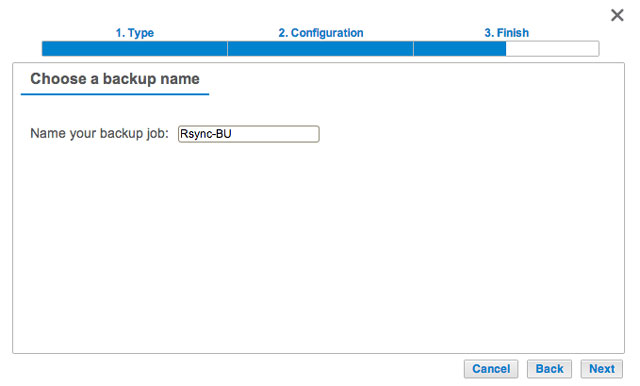
- Confirm the backup settings on the Summary page. If you wish to begin the backup immediately, keep the box checked below the summary and choose Finish.
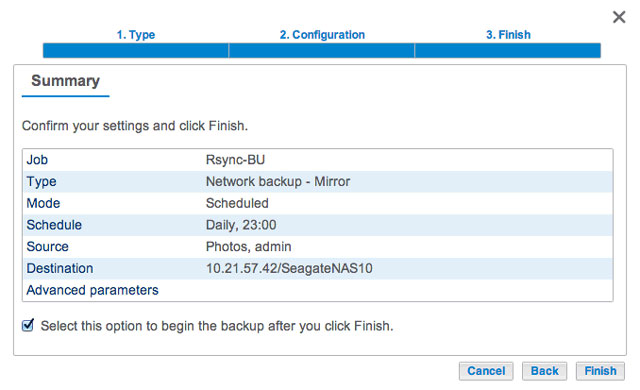


The Backup job will appear on the Backup page.

Note on Manual Backups: A manual backup must be started by the administrator:
- Go to Dashboard > Backup.
- Locate the manual backup job you wish to start then click on its grey arrow icon on the far right.
Restore a Local Backup
Restore and Remote Backups: Remote backups cannot be restored using the Backup & Restore Wizard. You can retrieve backup files directly from the backup storage.
- Go to Dashboard > Backup.
- Choose Add backup.
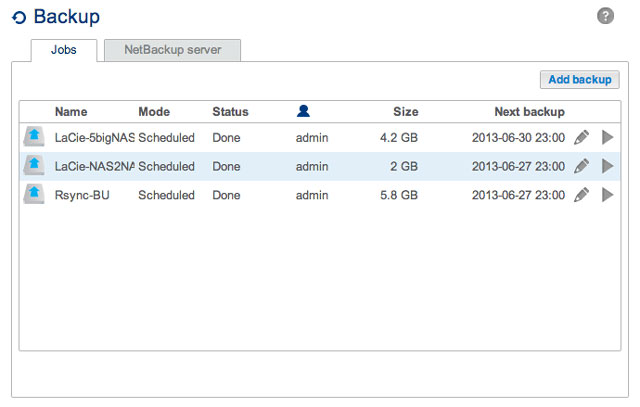
- Select Restore and choose Next.

- Select a restore type, either from an existing backup job, or from a backup folder. Choose Next.
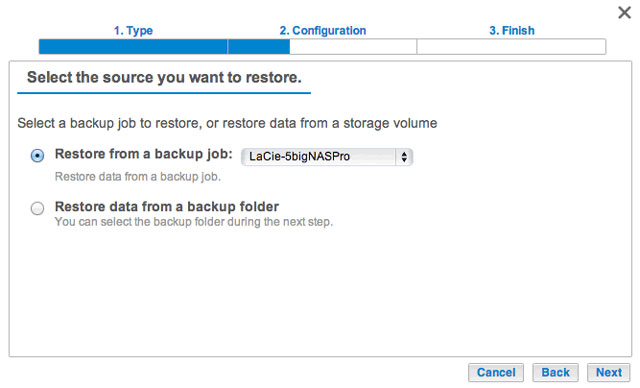
- Backup job: select the backup job from the pull-down menu, then choose Next.
- Backup folder: browse for the source folder that hosts your backup. Select the backup directory and choose Next.
- Review the summary of the restore then choose Next.
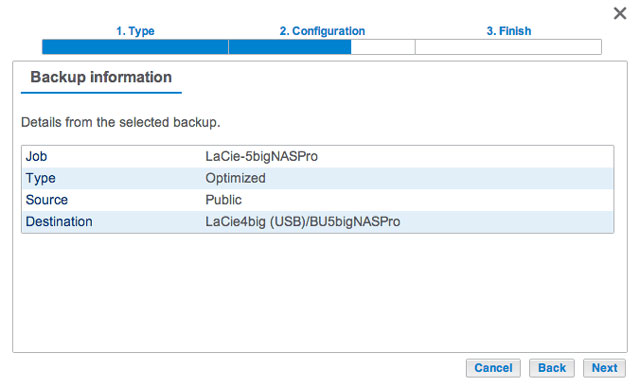
- Select the last backup or choose an earlier restore point. A restore point is the date for a backup. You can select an earlier restore point from the calendar and the time from the drop-down menu. Choose Next.

- Choose where to restore the backup.
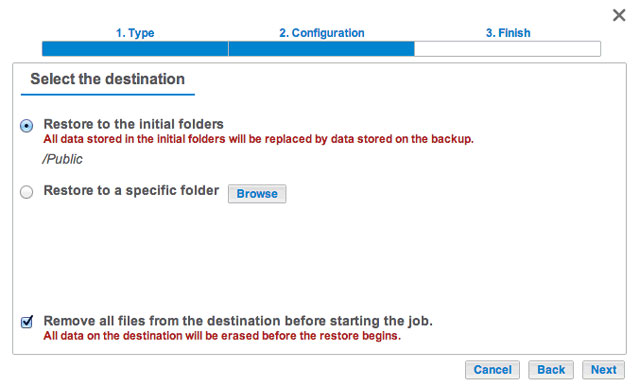
- Restore to the initial location of the data, which will save the data on the source folder. By default, the box Remove all files on the bottom of the window is checked. By keeping this box checked, all changes since the date of the backup will be lost. You can deselect the box to keep all data.
- If you want to restore the backup to a specific folder, select Browse to choose another destination. You can create a folder in the new location. Choose Apply.
- To free disk space, you can check the box to erase all data in the destination directory.
- Name the restore job, then choose Next.
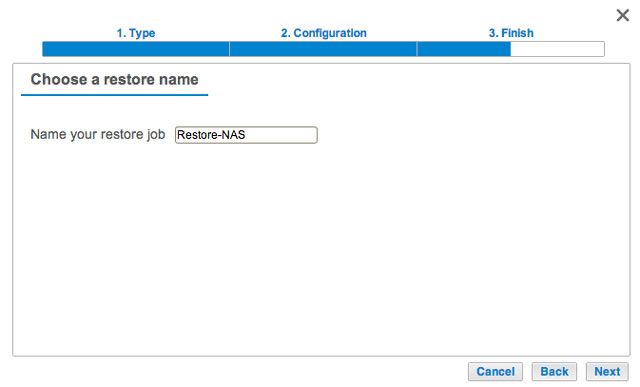
- Review the summary for the restore job then choose Finish to add the job.


The Restore job has been added to the list of backup jobs.

Start/Stop Existing Backup Jobs
Locate the job you wish to modify at Dashboard > Backup and choose its configuration icon (pencil). You can get detailed information on a job or choose delete/enable/disable.
If you disable a scheduled job, it will not run until it is enabled again.
Starting/Stopping Jobs
Start and stop icons appear on the far right of the backup jobs table:
- Start a job: Choose the triangular play icon.
- Stop a job that is in progress: Choose the square stop icon.
Remote Access: Sdrive and LaCie MyNAS
Remote access to your LaCie NAS is available using:
- Sdrive
- LaCie MyNAS
- FTP (see Accessing Shares via FTP)
While Sdrive and MyNAS are easy to configure, they differ in accessing data and managing the NAS from remote locations:
- Sdrive is an application with file system integration. Once Sdrive is launched, a separate volume becomes available on your computer similar to a standard DAS or NAS. Sdrive also gives you access to NAS OS.
- LaCie MyNAS provides direct access to the Dashboard using an internet browser and does not require additional software. However, file integration is not available with LaCie MyNAS so files must be uploaded and downloaded via the File Browser (see File Browser).
Sdrive
Sdrive is an application for:
- Windows
- Mac OS
- iOS
- Android
Download and install Sdrive
Go to the Sdrive download page to download and install the application for your operating system.
Create an Sdrive account
Sdrive requires a user account for local and remote access. Therefore, the first time a user launches Sdrive, he can create a free account and associate it with NAS OS devices on the local network.
- Following the installation, launch Sdrive.
- If you already have an account, enter your Sdrive Username and Password. If you do not have an account, choose Sign up.
- When signing up, fill in all the applicable fields. Check the box next to I have read and agree with the Terms of Service and choose Create a new account.
Your personal account has been created. An email is sent confirming your Sdrive account.
Accessing Sdrive
Once it is launched, Sdrive takes on two roles:
- An application to manage NAS OS devices.
- A volume to access content at the file level.
Sdrive application
Click on the Sdrive icon to access its features. The Sdrive icon location differs by operating system:
- Windows: System tray > Hidden icons (up arrow in the system tray). See below for instructions on how to add the Sdrive icon to the system tray for easy access.
- Mac: Menu bar.

Similar to most applications in the system tray or menu bar, actions depend upon the operating system. For example, Windows users must apply a right click on the Sdrive icon to access most of its features. A left click in Windows launches the Sdrive volume in an Explorer window. Mac users can use a standard left click.
Sdrive volume
The Sdrive volume gives users quick access to files on their NAS OS devices.
- Windows: Explorer window > Network
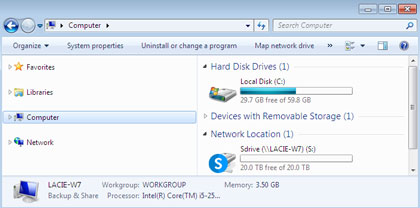
- Mac: Desktop

Windows: Move the Sdrive icon to the system tray
- In the system tray, click on Hidden icons (up arrow).
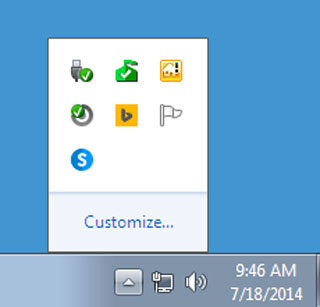
- Choose Customize.
- Click on the pull-down menu for Sdrive and choose Show icon and notifications.
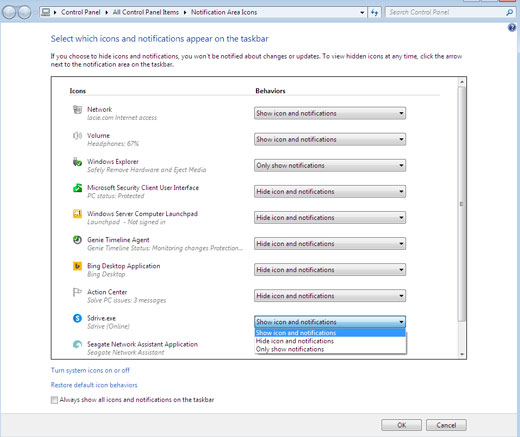
- Choose OK.


Link Sdrive to your NAS OS device
- Sdrive recognizes all compatible LaCie and Seagate NAS OS devices on your local network. All devices must run the latest version of NAS OS.
- Sdrive helps you navigate NAS OS shares on your local network, similar to traditional network volumes.
- Sdrive gives you and your colleagues access to your NAS OS shares anywhere with a connection to the internet.
Add your NAS OS device to Sdrive
Users and administrators must perform the steps below on a computer connected to the same network as the NAS OS device. Once the NAS OS device is added to an Sdrive account, access is available outside of the local network.
- Launch the Sdrive application and sign in using Sdrive credentials.
- Click on the Sdrive icon.
- Windows: Go to the system tray and right click on the Sdrive icon.
- Mac: Go to the menu bar and click on the icon.
- Select the NAS OS device and choose Add to Sdrive.
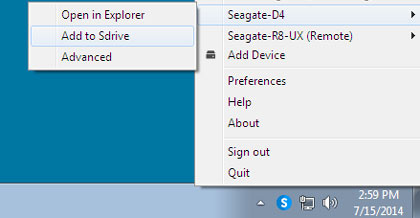
- Enter the username and password for the NAS OS device. Do not enter the credentials for Sdrive at this step.

The NAS OS device has been added to the Sdrive account. The administrator can confirm that users have linked the NAS OS device to their Sdrive accounts.
- Go to LaCie Dashboard > Users.
- In the Users table, review the Sdrive account column. It is filled in automatically once the NAS OS device is added to an existing user’s Sdrive account.
The administrator cannot edit the Sdrive account field in the Users table for NAS OS. However, the administrator can remove a user’s link to Sdrive using the Edit pull-down menu.
NAS OS discovery
If Sdrive cannot find your compatible NAS OS device, confirm that your company's firewall permits the following:
- Multicast UDP
- Group = 224.0.0.1
- Port = 4448 (in and out)
- TCP is enabled for port 18811 (out only)
- A proxy server for your NAS (if applicable)
Sdrive features
Sdrive has three primary functions:
- Local and remote access to NAS OS shares via the Sdrive volume.
- Remote NAS OS management for administrators and users.
- Share the NAS OS device by inviting colleagues and clients to join Sdrive.
Sdrive remote access
Users and administrators must follow the installation and setup steps to link compatible NAS OS devices to their Sdrive accounts. Once the link is established on the local network, the Sdrive application can be downloaded and installed on any computer with a connection to the internet.
For example, an employee wants to access her files from a home computer. After Sdrive is installed on the home computer, she signs in using the same Sdrive account created in the office. The Sdrive volume appears in an Explorer window (Windows) or the desktop (Mac).
The Sdrive installers are available at the LaCie download page.
Remote access requires that:
- The NAS OS device is turned on.
- One or more ports on the company's router have been opened to allow access from outside the network.
- The Sdrive service is enabled in NAS OS.
Sdrive remote management
Administrators and user can access NAS OS using Sdrive.
- Launch the Sdrive application and sign in using Sdrive credentials.
- Click on the Sdrive icon.
- Windows: Go to the system tray and right click on the Sdrive icon.
- Mac: Go to the menu bar and click on the icon.
- Select the NAS OS device and choose Advanced.
- The login page for the NAS OS device opens in the computer’s default web browser. Enter the login credentials for the NAS OS device.
Administrators can view all NAS OS functions while users have limited access to their account information.
Sdrive invitations to join the NAS OS device
An administrator can invite users to join the NAS OS device using Sdrive. Sdrive invitations perform two functions:
- Create a user account in NAS OS.
- Create a dedicated share with the user’s name.
This option is ideal for sharing a NAS OS device with colleagues and clients who do not work within the local network. Users created in NAS OS should follow the steps in Add your NAS OS device to Sdrive and Sdrive remote access.
Example 1: An employee in the office wants easy access to his files on the Seagate NAS OS device. Since he works within the local network, he follows the steps in Add your NAS OS device to Sdrive and Sdrive remote access.
Example 2: The administrator wants to give a colleague in a branch office access to the NAS OS device at the company’s headquarters. Once the invitation is accepted, the colleague has a user account and a dedicated share on the NAS OS device. The administrator can also give the colleague rights to access additional shares on the NAS OS device.
Example 3: The creative services team wants to share artwork with a client using secure remote access. The NAS OS administrator sends an Sdrive invitation to the client, automatically creating a user account and a dedicated share in the user’s name. The administrator also gives the group Creative Services read+write access to the client’s dedicated share (see Groups for instructions on how to manage multiple users in a single group). The creative services team can now collaborate with the client by sharing files on the dedicated share. Additionally, the administrator knows that the client only has access to the dedicated share. Sdrive provides ideal content sharing since it is secure and easy to manage.
Administrator: Invite a user
- Launch the Sdrive application and sign in using Sdrive credentials.
- Click on the Sdrive icon.
- Windows: Go to the system tray and right click on the Sdrive icon.
- Mac: Go to the menu bar and click on the icon.
- Select the NAS OS device and choose Users.
- Enter the email address in the applicable field and then choose Invite.
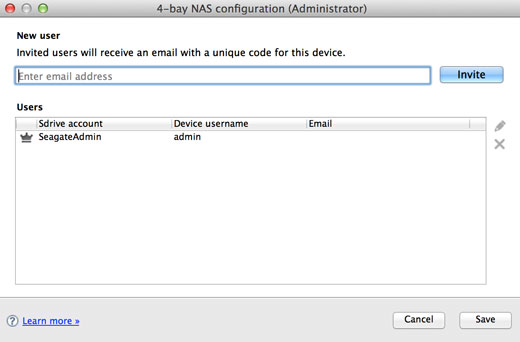
- The user appears in the table. Choose Save to send the invitation.

The user must accept the invitation for access to the NAS OS device.
User: Accept the invitation
Open the email from the administrator and follow the steps to download and install Sdrive. The invitation includes a unique code.
A new share is created on the NAS OS device with each Sdrive invitation. The name of the share is determined by the name of the user’s Sdrive account. For example, the name of the invitee.
By default, only the user has read+write access to the share that bears his name. However, the administrator can revise access rights to the share using the Dashboard > Shares page. See Shares for details.
Administrator: Remove a user
A user added in Sdrive can be removed in the Sdrive Users window or in Dashboard > Users (see Users for details). To remove a user in Sdrive:
- Launch the Sdrive application and sign in using Sdrive credentials.
- Click on the Sdrive icon.
- Windows: Go to the system tray and right click on the Sdrive icon.
- Mac: Go to the menu bar and click on the icon.
- Select the NAS OS device and choose Users.
- Select the user you want to remove and click on the X on the right.
- A popup window asks you to confirm.
If the user was created in Sdrive, he has an associated share on the NAS OS device with the same name. Deleting the user does not remove the associated share and its data. Additionally, a user cannot be recreated in Sdrive as long as the NAS OS device continues to have a share with the same name.
Instructions to remove a share are available at Shares. Removing the share also deletes its data.
Administrator: User accounts and preferences
The administrator can adjust usernames and passwords by choosing Sdrive > NAS OS device > Users. Select a user in the table and click on the pencil icon.
Sdrive options are also available at Sdrive > Preferences. Options include:
- Setting memory limits.
- Removing NAS OS devices from the account.
- Adjusting the account profile.
LaCie MyNAS

MyNAS provides direct access to NAS OS using an internet browser. However, MyNAS does not offer the type of file integration found with Sdrive. Therefore, files must be uploaded and downloaded via the File Browser (see File Browser.
Set up LaCie MyNAS remote access
Important info: In order to prevent unauthorized access, it is critical to protect user and administrator accounts registered to your NAS OS device with a strong password BEFORE setting up remote access. Since MyNAS lets you access your data with a simple URL, unwanted users could access the NAS's files unless each authorized user is protected by a strong password. For added protection, a user can select secure authentication by choosing Switch to HTTPS at the NAS OS login.
- Navigate to Dashboard > Network > Remote Connection.
- In the Remote Access drop-down menu, choose LaCie MyNAS.
- Type a name for your LaCie NAS in the Name field. The name should be different than the NAS OS device’s network name.
- Choose Apply. The Dashboard queries the MyNAS server to see if the name is available. If so, a message confirms the connection.
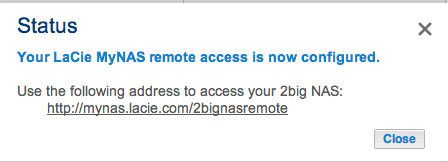

If your name is already chosen, type a new one and choose Apply until you find an available name.
Failed connection
If you receive an error that your LaCie NAS is unable to connect to the internet:
- You may require a proxy server to access the internet. Contact your network administrator or internet provider then review Network for further instructions on how to add your proxy server's address.
- You may need to configure port forwarding on your router. See the steps below.
Router
If the issue is related to your router, you must access its administration page in order to forward a port (by default, 8080), which creates a path from your LaCie NAS to the internet. From the router’s administration page, select its port forwarding tab to assign a port to the LaCie NAS. Refer to your router's documentation for details.
Once a port has been selected on your router, you must assign the port on the LaCie NAS:
- Go to Dashboard > Network > Remote Access.
- Next to the Name field, select the configuration icon (pencil) and choose Advanced settings. (If you do not see the configuration icon next to the Name field, first type a name and then choose Apply. The icon should appear.)
- In the dialogue window that appears, choose Manual.
- Type the port you forwarded in your router. In the screenshot below, port 54200 has been forwarded.
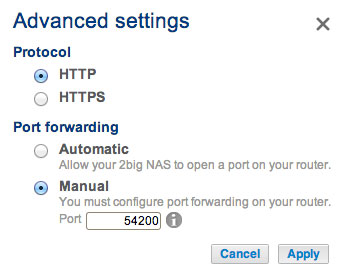
- Choose Apply.

Using LaCie MyNAS remote access
Once MyNAS is successfully configured, simply type your LaCie NAS's URL into any browser, anywhere.

Your URL is: mynas.lacie.com/mynas_name
The mynas_name is the name selected on the remote access page and not the NAS's network name.
After entering the URL, you are prompted to log in to the Dashboard. Enter the username and password created by the administrator. Once logged in, an administrator can administer the NAS. Users and administrators can use File Browser to upload and download files (seeFile Browser).
Mobile Apps
Sdrive and LaCie MyNAS are available as apps for your mobile devices. See the table below for compatibility:
| iOS | Android | |
|---|---|---|
| Sdrive | Yes | Yes |
| LaCie MyNAS | Yes | Connect via an internet browser |
Getting Help
If you are having problems with your LaCie product, consult the table below for a list of available resources.
| Order | Source | Description | Location |
|---|---|---|---|
| 1 | Quick Install Guide | Concise steps to follow for getting your product up and running | Either a printed leaflet or accessory box and included in the product box, or download PDF from the product page |
| 2 | Support Pages | Includes interactive troubleshooting topics for most common problems | www.lacie.com/support/, select your product, then click the “Troubleshooting” tab |
| 3 | User Manual | Includes common troubleshooting topics | See Troubleshooting Topics below |
| 4 | Customer Support | Create an account on lacie.com, register your product, and fill out a support ticket | Create an account here: www.lacie.com/us/mystuff/login.htm?logout&rtn=mystuff |
Note: LaCie is dedicated to providing high quality products that enrich the lives of our customers. To help LaCie offer the best customer support, we encourage you to create an account and register your product at www.lacie.com/us/mystuff/login.htm?
logout&rtn=mystuff. You can give us important feedback as well as receive updated information on your LaCie device.
Software Updates
LaCie frequently releases firmware updates to improve the functionality of products. Please check for recent updates to firmware and to LaCie Network Assistant to ensure optimum product performance. See Support for details.
Troubleshooting Topics
Note: Interactive troubleshooting, a highly effective way to resolve problems with your product, is available from www.lacie.com/support/. Select your product, then click the “Troubleshooting” tab.
Troubleshooting the Network Connection
No shares appear on the network.
Q: Is the NAS's power supply connected and is the front blue light on?
Q: Is the blue light on the front of the device flickering for an inordinate period of time?
Q: Did you follow the correct installation steps?
Q: Are both ends of the Ethernet cable firmly connected?
A user does not have access to the LaCie NAS Dashboard or shares.
Q: Has the administrator created an account for the user?
I cannot access my account. I enter my login and password and receive an error message.
I've noticed a delay in accessing the shares.
Troubleshooting the Multimedia Server
I cannot see the media files stored on the LaCie NAS.
Q: Are the media files stored on a public share? Is the multimedia service active?
Windows Media Player
Q: I can't configure Windows Media Player to find media files on the LaCie NAS.
Q: Certain files aren't recognized by Windows Media Player.
iTunes
Q: Some files appear in my iTunes™ shared playlist, but some do not.
Q: Why aren't files stored on the network storage appearing in iTunes?
UPnP/DLNA-Compatible Game Consoles and Set Top Boxes
Q: Some files stored on the LaCie NAS appear on my UPnP/DLNA compatible device, but others do not.
Troubleshooting Expansion Device Connection
I connected a USB drive to the enclosure, but the drive does not appear on the Storage page.
Q: Is the drive's file system supported by the LaCie product?
I can't copy a file from a share to the DAS connected to my LaCie NAS.
Q: Is the DAS formatted in FAT32 and is the file larger than 4GB?
I think that the hard disk is making unusual noises.
Q: Is the sound "soft clicking" or "hard clicking"?
The VGA monitor that I connected to the LaCie 5big NAS Pro appears to be receiving a signal but the screen is black.
Q: How long has the VGA monitor been connected to the NAS?
Troubleshooting the Active Directory (AD) Connection
The numbered list below provides general troubleshooting recommendations to resolve problems with AD.
LaCie NAS
- Confirm that your NAS is running the latest NAS OS firmware (see Support.
- Check the Hardware monitor page to review CPU usage (see Hardware Monitoring). You can experience AD connection problems if the CPU is running high. Actions or jobs that can burden the CPU include:
- RAID synchronization (in this case, wait until the RAID is built)
- Multiple download jobs are running (stop or wait until download is finished)
- Multimedia reindexing (disable UPnP)
- Backup jobs are running (stop or wait until backup jobs are finished)
- Multiple simultaneous data transfers to/from the NAS from computers on the network (wait until the transfers are complete)
- Make sure the product is assigned the correct date, time, and time zone (see General Settings). A time discrepancy of more than five minutes between the domain and the product may prevent or cause disruptions to the Active Directory (AD) connection. This tolerance is defined in Domain Controller Policy, and the default value is usually five minutes.
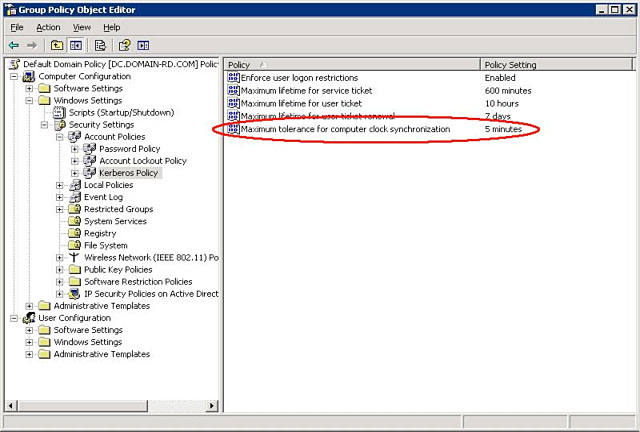
- Make sure that the DNS server address provided to the NAS is a domain DNS, not an internet DNS provided by an internet service provider (see Network). The NAS must connect to the local network domain, not to a server on the internet.
The NAS must be assigned a DNS server IP address on the local network configuration since joining a domain is based upon DNS resolution. To verify that the NAS is using a DNS IP address, try to ping the DNS server from a computer on the same network. - General Settings > Workgroup/Domain (see General Settings):
- Enter the domain's Full Qualified Domain Name (FQDN). For example:
directory-example.domain.com (Active Directory Users and Computers Tool on Primary Domain Controller)

- Administrator login: The AD's administrator username.
- Administrator password: The AD's administrator password.
- Advanced criteria (optional).
- Server Name is the Domain Controller Host Name
- Server IP is the Domain Controller IP

Active Directory
The AD administrator can check the following:
- Verify if Kerberos Server & Time Server are registered in the domain DNS, allowing the LaCie NAS to connect. Kerberos Server & Time Server need to be accessible to the NAS, as these servers are involved in the joining process.
- Confirm that the machine name object is placed in the right container (not the default “computer” container) and check access rights for the machine name (such as who can log on). If necessary, delete the machine name in order to reset the object in AD.
The domain administrator can create a computer account in AD and place it in the right container prior to joining the LaCie NAS to the domain (the computer account name is the NAS's name). - Sub-domains can create problems when joining a domain. Confirm that the proper domain is being used and review the machine name object location/rights. As well, see if the user belongs to a different sub-domain. If so, review the user's rights to determine if there is an authorization conflict that prevents access to the NAS.
Reset to Factory Conditions: 2big NAS
Reset the Dashboard Settings
Important info:
- Following these steps will erase all Dashboard data such as users, groups, shares, and settings. It will also reset the machine name to the default and reset the network settings to DHCP.
- Connected DAS will not be affected by the NAS reset.
- User data is moved to a folder named Recovery in a share named Share. Only the administrator can access Share.
- Power off the 2big NAS.
- Press and hold down the front LED button. Without releasing the front button, turn the product on using the power switch on the rear of the product.
- Keep the front button pressed until the front LED becomes solid red, then release it.
- The LED will blink red. Within five seconds, press the front button once to confirm the reset. The front LED will blink blue for several seconds.
The front LED will blink red/blue during a system reset. The LaCie 2big NAS is ready when it reboots and the front LED is static blue.
Format, delete, or recreate the volume
Once the NAS is reset, you can:
- Access your data on Share
- Format the existing volumes
- Delete the existing volumes
- Create new volumes
See Storage for instructions on formatting, deleting, and creating volumes.
Caution: Formatting, deleting, or recreating existing volumes will erase all the data on the NAS. Make sure to back up all your data onto another storage device before proceeding. LaCie cannot be held responsible for any loss of data.
LaCie NAS Rescue: 5big NAS Pro
The LaCie NAS Rescue can help you troubleshoot potential technical problems. The Rescue includes three recovery options:
- Data Recovery: Enable FTP Access to the data on your LaCie 5big NAS Pro. Once enabled, you can use FTP client software or a web browser to back up the data stored on your LaCie 5big NAS Pro.
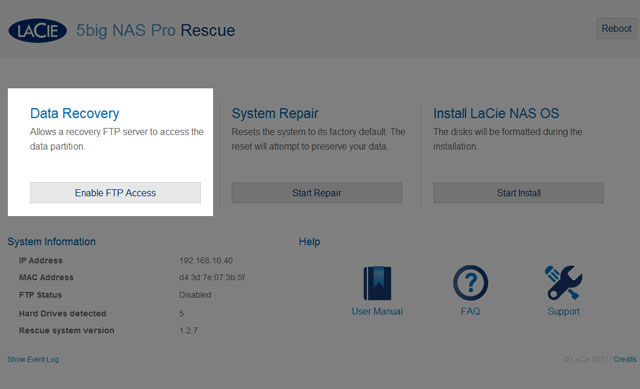
- System Repair: The Rescue will reset your LaCie 5big NAS Pro to its factory default while attempting to preserve the shares and data. LaCie cannot guarantee that all your data will be saved. Factory default includes the reversion of all Dashboard parameters (e.g. Users, General Settings, Network, etc.) to their original states.
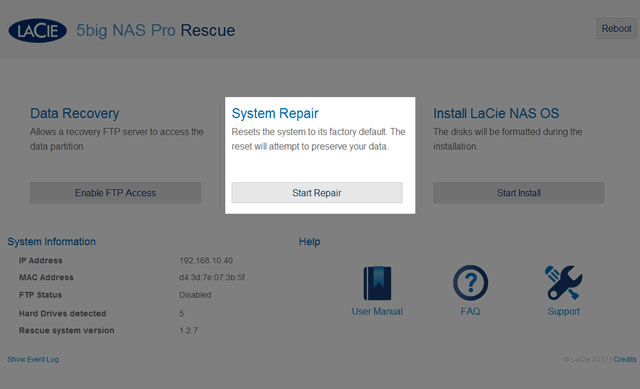
- Install LaCie NAS OS: The Rescue will format the LaCie 5big NAS Pro hard drives before reinstalling LaCie NAS OS. Since all data will be deleted during the format, LaCie highly recommends that you back up your files before selecting this option.
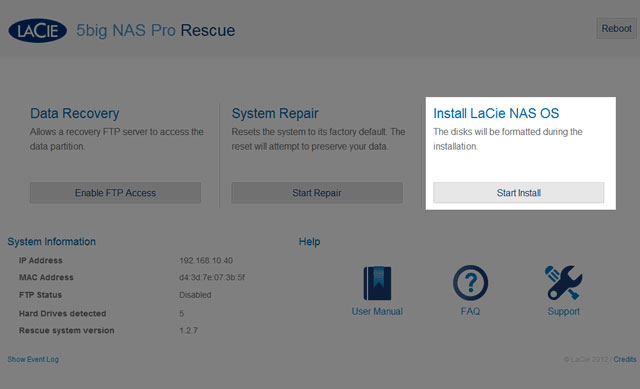


Prepare for the Rescue
The LaCie NAS Rescue will prompt you to enter:
- The LaCie 5big NAS Pro's IP address or network name
- The LaCie 5big NAS Pro's MAC address (Your LaCie 5big NAS Pro has two MAC addresses, one for each LAN port. You may use either MAC address for the Rescue.)
To find the addresses:
- Check the sticker located on the bottom of your LaCie 5big NAS Pro enclosure for the MAC address.
- Launching LaCie Network Assistant to review MAC and IP address information (see LaCie Network Assistant).
- Connect a VGA monitor to the NAS's VGA port.


Rescue Steps


Maximum Elements By Feature
The table below provides the maximum amount of elements allowed for specific features.
| Feature | 2big NAS | 5big NAS Pro |
|---|---|---|
| Users | 2048 | 2048 |
| Groups | 256 | 256 |
| Shares | 256 | 256 |
| iSCSI Targets | 10 | 32 |
| Volumes | 2 | 5 |
| Volume size | 108TB | 108TB |
Legal Info
Copyrights
Copyright © 2024 LaCie. All rights reserved. No part of this publication may be reproduced, stored in a retrieval system, or transmitted in any form or by any means, electronic, mechanical, photocopying, recording or otherwise, without the prior written consent of LaCie.
Changes
The material in this document is for information only and subject to change without notice. While reasonable efforts have been made in the preparation of this document to assure its accuracy, LaCie assumes no liability resulting from errors or omissions in this document, or from the use of the information contained herein. LaCie reserves the right to make changes or revisions in the product design or the product manual without reservation and without obligation to notify any person of such revisions and changes.
Federal Communication Commission Interference Statement
This equipment has been tested and found to comply with the limits for a Class B digital device, pursuant to Part 15 of the FCC Rules. These limits are designed to provide reasonable protection against harmful interference in a residential installation. This equipment generates, uses and can radiate radio frequency energy and, if not installed and used in accordance with the instructions, may cause harmful interference to radio communications. However, there is no guarantee that interference will not occur in a particular installation. If this equipment does cause harmful interference to radio or television reception, which can be determined by turning the equipment off and on, the user is encouraged to try to correct the interference by one of the following measures:
- Reorient or relocate the receiving antenna.
- Increase the separation between the equipment and receiver.
- Connect the equipment into an outlet on a circuit different from that to which the receiver is connected.
- Consult the dealer or an experienced radio/TV technician for help.
FCC Caution: Any changes or modifications not expressly approved by the party responsible for compliance could void the user's authority to operate this equipment.
This device complies with Part 15 of the FCC Rules. Operation is subject to the following two conditions: (1) This device may not cause harmful interference, and (2) this device must accept any interference received, including interference that may cause undesired operation.
Important info: FCC Radiation Exposure Statement: This equipment complies with FCC radiation exposure limits set forth for an uncontrolled environment. This equipment should be installed and operated with minimum distance 20 cm between the radiator & your body.
This transmitter must not be co-located or operating in conjunction with any other antenna or transmitter.
The availability of some specific channels and/or operational frequency bands are country dependent and are firmware programmed at the factory to match the intended destination. The firmware setting is not accessible by the end user.
WEEE
![]() This symbol on the product or on its packaging indicates that this product must not be disposed of with your other household waste. Instead, it is your responsibility to dispose of your waste equipment by handing it over to a designed collection point for the recycling of waste electrical and electronic equipment. The separate collection and recycling of your waste equipment at the time of disposal will help to conserve natural resources and ensure that it is recycled in a manner that protects human health and the environment. For more information about where you can drop off your waste equipment for recycling, please contact your local city office, your household waste disposal service, or the shop where you purchased the product.
This symbol on the product or on its packaging indicates that this product must not be disposed of with your other household waste. Instead, it is your responsibility to dispose of your waste equipment by handing it over to a designed collection point for the recycling of waste electrical and electronic equipment. The separate collection and recycling of your waste equipment at the time of disposal will help to conserve natural resources and ensure that it is recycled in a manner that protects human health and the environment. For more information about where you can drop off your waste equipment for recycling, please contact your local city office, your household waste disposal service, or the shop where you purchased the product.
Trademarks
Apple, Mac, Time Machine, and Macintosh are registered trademarks of Apple Computer, Inc. Microsoft, Windows XP, Windows Vista, and Windows 7 are registered trademarks of Microsoft Corporation. Other trademarks mentioned in this manual are the property of their respective owners.
Licences and Free Software
Your LaCie product ships with copyrighted software that are licensed under the GPL, AFL, Apache, Apple, BSD, GNU LGPL, MIT, OpenLDAP, OpenSSL, PHP, Python, and Creative Common. It also includes free software, the source code for which can be downloaded from the LaCie website: www.lacie.com/support/
© 2007-2008, Thomas BERNARD. © 2006 Allan Saddi allan@saddi.com © 2004, Jan Kneschke, incremental. © 2001-2006, Patrick K. O’Brien and Contributors. © 2003-2009 Stuart Bishop stuart@stuartbishop.net. © 2006 Kirill Simonov. © 1996-2006 Julian R Seward. © 2004, 2005 Darren Tucker. All rights reserved. © 1997-2008 University of Cambridge. All rights reserved. © 2007-2008, Google Inc. All rights reserved. © 1990-2003 Sleepycat Software. All rights reserved. © 1995-2004 Jean-loup Gailly and Mark Adler. © 2004 Micah Dowty. ® 1997-2006 by Secret Labs AB ® 1995-2006 by Fredrik Lundh. © 1988,1990,1993,1994 by Paul Vixie. © 2007-2009 Charles du Jeu.
This list of licenses can evolve over time and can be found on the user interface under the heading “Credits.”
Canada Compliance Statement
This Class B digital apparatus meets all requirements of the Canadian Interference-Causing Equipment Regulations.
CAN ICES-3 (B)/NMB-3(B)
Japan Compliance Statement
This is a Class B product based on the standard of the Voluntary Control Council for Interference from Information Technology Equipment (VCCI). If this is used near a radio/TV receiver, it may cause radio interference. Install the equipment according to the manual. This statement does not apply to the LaCie CloudBox.
Manufacturer's Declaration for CE Certification
![]() We, LaCie, solemnly declare that this product conforms to the following European standards: Electromagnetic Compatibility Directive (2004/108/EC); Low-Voltage Directive: 2006/95/EC
We, LaCie, solemnly declare that this product conforms to the following European standards: Electromagnetic Compatibility Directive (2004/108/EC); Low-Voltage Directive: 2006/95/EC
Precautions
Caution: It is essential that you use only the power supply that shipped with your product, since it is a shielded-type power cord that meets FCC emission limits as well as to prevent interference to the nearby radio and television reception.
Caution: Modifications not authorized by the manufacturer may void the user's authority to operate this device.
Important info: Any loss, corruption or destruction of data while using a LaCie drive is the sole responsibility of the user, and under no circumstances will LaCie be held liable for the recovery or restoration of this data. To help prevent the loss of your data, LaCie highly recommends that you keep TWO copies of your data; one copy on your external hard disk, for instance, and a second copy either on your internal hard disk, another external hard disk or some other form of removable storage media. If you would like more information on backup, please refer to our website.
Important info: 1TB (Terabyte) = 1,000GB. 1GB = 1000MB. 1MB = 1,000,000 Bytes. Total accessible capacity varies depending upon operating environment (typically up to 10% less per TB).
Health and Safety Precautions
- Only qualified persons are authorized to carry out maintenance on this device.
- Read this User Manual carefully and follow the correct procedure when setting up the device.
- Do not open a disk drive or attempt to disassemble or modify it. Never insert any metallic object into the drive to avoid any risk of electrical shock, fire, short-circuiting or dangerous emissions. The disk drives shipped with your LaCie device contain no user-serviceable parts. If it appears to be malfunctioning, have it inspected by a qualified LaCie Technical Support representative.
- Never expose your device to rain, or use it near water, or in damp or wet conditions. Never place objects containing liquids on the LaCie device, as they may spill into its openings. Doing so increases the risk of electrical shock, short-circuiting, fire or personal injury.
- Make sure that the computer and LaCie device are electrically grounded. If the devices are not grounded, there is an increased risk of electrical shock.
General Use Precautions
- Power requirements 100-240 V~, 50-60 Hz, (supply voltage fluctuations not exceeding ± 10% of the nominal and transient over-voltages according to over-voltage category II).
- Do not expose the LaCie device to temperatures outside the range of 5º C to 30º C (41º F to 86º F); or to operational humidity beyond 10-80%, non-condensing, or non-operating humidity beyond 10-90%, non-condensing. Doing so may damage the LaCie device or disfigure its casing. Avoid placing your LaCie device near a source of heat or exposing it to sunlight (even through a window). Inversely, placing your LaCie device in an environment that is too cold may damage the unit.
- Rated cooling for altitudes up to 2000 meters.
- If your drive features a power cable, always unplug it from the electrical outlet if there is a risk of lightning or if it will be unused for an extended period of time. Otherwise, there is an increased risk of electrical shock, short-circuiting or fire.
- Use only the power supply shipped with the device (if applicable).
- Do not use the LaCie device near other electrical appliances such as televisions, radios or speakers. Doing so may cause interference which will adversely affect the operation of the other products.
- Do not place the LaCie device near sources of magnetic interference, such as computer displays, televisions or speakers. Magnetic interference can affect the operation and stability of your LaCie device.
- Never use excessive force on your LaCie device. If you detect a problem, consult the troubleshooting section in this manual.
- Protect your LaCie device from excessive exposure to dust during use or storage. Dust can build up inside the device, increasing the risk of damage or malfunction.
- Never use benzene, paint thinners, detergent or other chemical products to clean the outside of the LaCie device. Such products will disfigure and discolor the casing. Instead, use a soft, dry cloth to wipe the device.
Warranty Information
LaCie offers first-rate service and support through our generous three-tiered warranty policy. Our 1-, 2-, 3-, and 5-year policies include comprehensive, complimentary web-based resources, expert in-house technical support, and worldwide repair and/or replacement coverage. To benefit from this warranty, please contact LaCie Support at www.lacie.com/us/support where you can find online support and contact information. You may also contact representatives at the original point of purchase who will be able to help guide you.
Standard warranties vary depending on the product. To verify your product’s warranty status and to see which standard warranty is included with your product, type in your product’s serial number at www.lacie.com/us/support. If no warranty is listed under your product’s name, this means that the warranty has expired.
Warranty Upgrades
If you wish to extend your warranty coverage, you can purchase Silver, Gold, or Platinum Care or Advanced Exchange. For details, see www.lacie.com/warranties.
Legal Information
A standard LaCie limited warranty is included with all products. Please read the terms and conditions below.
LaCie Limited Warranty Policy
LaCie (“LaCie”) warrants, to the original purchaser, that this equipment shall be free of defects in materials and workmanship for a period of one (1), two (2), three (3), or five (5) years, depending on the model, from LaCie's date of original shipment when the equipment is used normally and is properly serviced when needed. If you discover a defect covered by the warranty set forth above, your sole and exclusive remedy will be for LaCie, in its sole discretion to (i) repair or replace the product at no charge to you; or, if a repaired unit or replacement product is not available, (ii) to refund the current market value of your product. You acknowledge and agree that replacement product, at the sole option of LaCie, may be a new product or a remanufactured product. In order to receive the remedy set forth above, you must return the product during the warranty period and include with each returned product (i) a copy of your original purchase invoice to verify your warranty; (ii) a Return Material Authorization number; (iii) your name, address and telephone number; (iv) a copy of the bill of sale bearing the appropriate LaCie serial numbers as proof of date of original retail purchase; and (v) a description of the problem. The customer must pay all transportation costs for a returned product. The product will need to be returned to LaCie within the country of original retail purchase. This warranty applies only to hardware products; LaCie software, media, and manuals are licensed and warranted pursuant to separate written agreement. This warranty does not apply if the product has been misused or has been damaged by accident, abuse, misuse, or misapplication; if it has been modified without permission of LaCie; or if any LaCie serial number has been removed or defaced. If a customer has purchased a LaCie Advance Care Option (ACO) to go with this equipment, the ACO shall be valid for three (3) years from activation.
EXCEPT FOR THE LIMITED WARRANTY SET FORTH ABOVE, ALL PRODUCTS ARE SOLD “AS IS” AND LACIE EXPRESSLY DISCLAIMS ALL WARRANTIES OF ANY KIND, WHETHER EXPRESS, IMPLIED OR STATUTORY, INCLUDING THE IMPLIED WARRANTIES OF MERCHANTABILITY, NONINFRINGEMENT AND FITNESS FOR A PARTICULAR PURPOSE. WITHOUT FURTHER LIMITING THE GENERALITY OF THE FOREGOING, DOES NOT WARRANT (1) THE PERFORMANCE OR RESULTS OBTAINED FROM USING THIS PRODUCT, (2) THAT THE PRODUCT IS APPROPRIATE FOR THE CUSTOMER'S PURPOSES, (3) THE MANUAL IS ERROR FREE, OR (4) THAT NO DATA WILL BE LOST WHILE USING THE PRODUCT. THE ENTIRE RISK AS TO THE RESULTS AND PERFORMANCE IS ASSUMED BY THE CUSTOMER. THE WARRANTY AND REMEDIES SET FORTH ABOVE ARE EXCLUSIVE AND IN LIEU OF ALL OTHERS, ORAL OR WRITTEN, EXPRESS OR IMPLIED.
EXCLUSIONS AND LIMITATIONS
This Limited Warranty applies only to hardware products manufactured by or for LaCie that can be identified by the “LaCie” trademark, trade name, or logo affixed to them. The Limited Warranty does not apply to any non-LaCie hardware products or any software, even if packaged or sold with LaCie hardware. Manufacturers, suppliers, or publishers, other than LaCie, may provide their own warranties to the end user purchaser, but LaCie, in so far as permitted by law, provides their products “as is”. Software distributed by LaCie with or without the LaCie brand name (including, but not limited to system software) is not covered under this Limited Warranty. Refer to the licensing agreement accompanying the software for details of your rights with respect to its use.
LaCie does not warrant that the operation of the product will be uninterrupted or error-free. LaCie is not responsible for damage arising from failure to follow instructions relating to the product's use. This warranty does not apply: (a) to consumable parts, unless damage has occurred due to a defect in materials or workmanship; (b) to cosmetic damage, including but not limited to scratches, dents and broken plastic on ports; © to damage caused by use with non-LaCie products; (d) to damage caused by accident, abuse, misuse, flood, fire, earthquake or other external causes; (e) to damage caused by operating the product outside the permitted or intended uses described by LaCie; (f) to damage caused by service (including upgrades and expansions) performed by anyone who is not a representative of LaCie or a LaCie Authorized Service Provider; (g) to a product or part that has been modified to alter functionality or capability without the written permission of LaCie; or (h) if any LaCie serial number on the product has been removed or defaced.
No LaCie dealer, agent, or employee is authorized to make any modification, extension, or addition to this warranty.
Any loss, corruption or destruction of data while using a LaCie drive is the sole responsibility of the user, and under no circumstances will LaCie be held liable for the recovery or restoration of this data. To help prevent the loss of your data, LaCie highly recommends that you keep TWO copies of your data; one copy on your external hard disk, for instance, and a second copy either on your internal hard disk, another external hard disk or some other form of removable storage media. LaCie offers a complete line of CD and DVD drives. If you would like more information on backup, please refer to our website.
LACIE IS NOT RESPONSIBLE FOR SPECIAL, INCIDENTAL, OR CONSEQUENTIAL DAMAGES RESULTING FROM ANY BREACH OF WARRANTY, OR UNDER ANY LEGAL THEORY, INCLUDING LOST PROFITS, DOWNTIME, GOODWILL, DAMAGE TO OR REPLACEMENT OF EQUIPMENT AND PROPERTY, AND ANY COSTS OF RECOVERING, REPROGRAMMING, OR REPRODUCING ANY PROGRAM OR DATA STORED IN OR USED WITH LACIE PRODUCTS EVEN IF IT HAS BEEN ADVISED OF THE POSSIBILITY OF SUCH DAMAGES.
Some states do not allow the exclusion or limitation of implied warranties or liability for incidental or consequential damages, so the above limitation or exclusion may not apply to you. This warranty gives you specific legal rights, and you may have other rights, which vary from state to state.
Your opening of your package, your use of the product, or your return of the enclosed Registration Card acknowledges that you have read and agree to the terms of this Agreement. You further agree that it is the complete and exclusive state of the agreement between us and supersedes any proposal or prior agreement, oral or written, and any other communications between us relating to the subject matter of this Agreement.
Read carefully all information related to warranty and precautions of use of your new LaCie product in the user manual.
For products purchased in the United States, you may contact LaCie at 7555 Tech Center Drive, Tigard, Oregon 97223 USA. Email: sales@lacie.com. Website: www.lacie.com. Customer service: 503-844-4503.
Service DOA
On rare occasions, a newly purchased LaCie product may be delivered in non-working order. We are working to avoid these issues, but unfortunately, these situations may arise from time to time. Within the 15 calendar days of purchase, should you experience an issue with your new LaCie product, we ask you to return the product to the place where it was originally bought. You will be required to give a proof of purchase.
Customer Warning
Please be sure to back up your data before returning your drive to LaCie for repair. LaCie cannot under any circumstances guarantee the integrity of data remaining on a returned drive. We make no provisions for data recovery and cannot be held liable for any data loss on drives or media returned to LaCie.
All products returned to LaCie must be securely packaged in their original box and shipped with postage prepaid, except for Products registered under the Advance Care Option.
Note to Australian Customers
Our goods come with guarantees that cannot be excluded under the Australian Consumer Law. You are entitled to a replacement or refund for a major failure and for compensation for any other reasonably foreseeable loss or damage. You are also entitled to have the goods repaired or replaced if the goods fail to be of acceptable quality and the failure does not amount to a major failure.
Contact us:
LaCie Australia, 6/151 Beauchamp Rd, Matraville NSW 2036 AUSTRALIA
Phone: 02 8063 3711
Email: info.au@lacie.com
For fast technical support, create a support ticket after registering your product at www.lacie.com/au/register.
© LaCie 2024
Last modified : Apr 09, 2014